iOS SDK 集成指南
适用版本
v3.0.0 及以后版本。目前 SDK 只支持 iOS 10 以上版本的手机系统。
资源文件
包名为 engagelab-ios-{版本号}
注意从4.3.3版本开始,不再提供.a包。都将只提供.xcframework的包。
- lib 文件夹:包含 mtpush-ios-x.x.x.xcframework,mtpush-extension-ios-x.x.x.xcframework,(请注意:模拟器不支持 APNs)
- README 文件:SDK 相关说明
- demo 文件夹:示例
获取应用信息
在控制台上创建应用,创建成功后自动生成 AppKey 用以标识该应用,详情参考 应用设置文档。
配置工程
导入 SDK
Cocoapods 导入
                  pod 'MTPush'

    注:如果无法导入最新版本,请执行 pod repo update master 这个命令来升级本机的 pod 库,然后重新 pod 'MTPush'
- 如果需要安装指定版本则使用以下方式(以 MTPush 3.5.0 版本为例):
pod 'MTPush', '3.5.0'
手动导入
- 将 SDK 包解压,在 Xcode 中选择 “Add files to 'Your project name'...”,将 mtpush-ios-x.x.x.xcframework 添加到你的工程目录中。
- 添加 Framework
- CFNetwork.framework
- CoreFoundation.framework
- CoreTelephony.framework
- SystemConfiguration.framework
- CoreGraphics.framework
- Foundation.framework
- UIKit.framework
- Security.framework
- libz.tbd
- UserNotifications.framework
- libresolv.tbd
- libsqlite3.tbd
Swift Package Manager 导入
打开工程,选择菜单栏中的File > Add Packages...
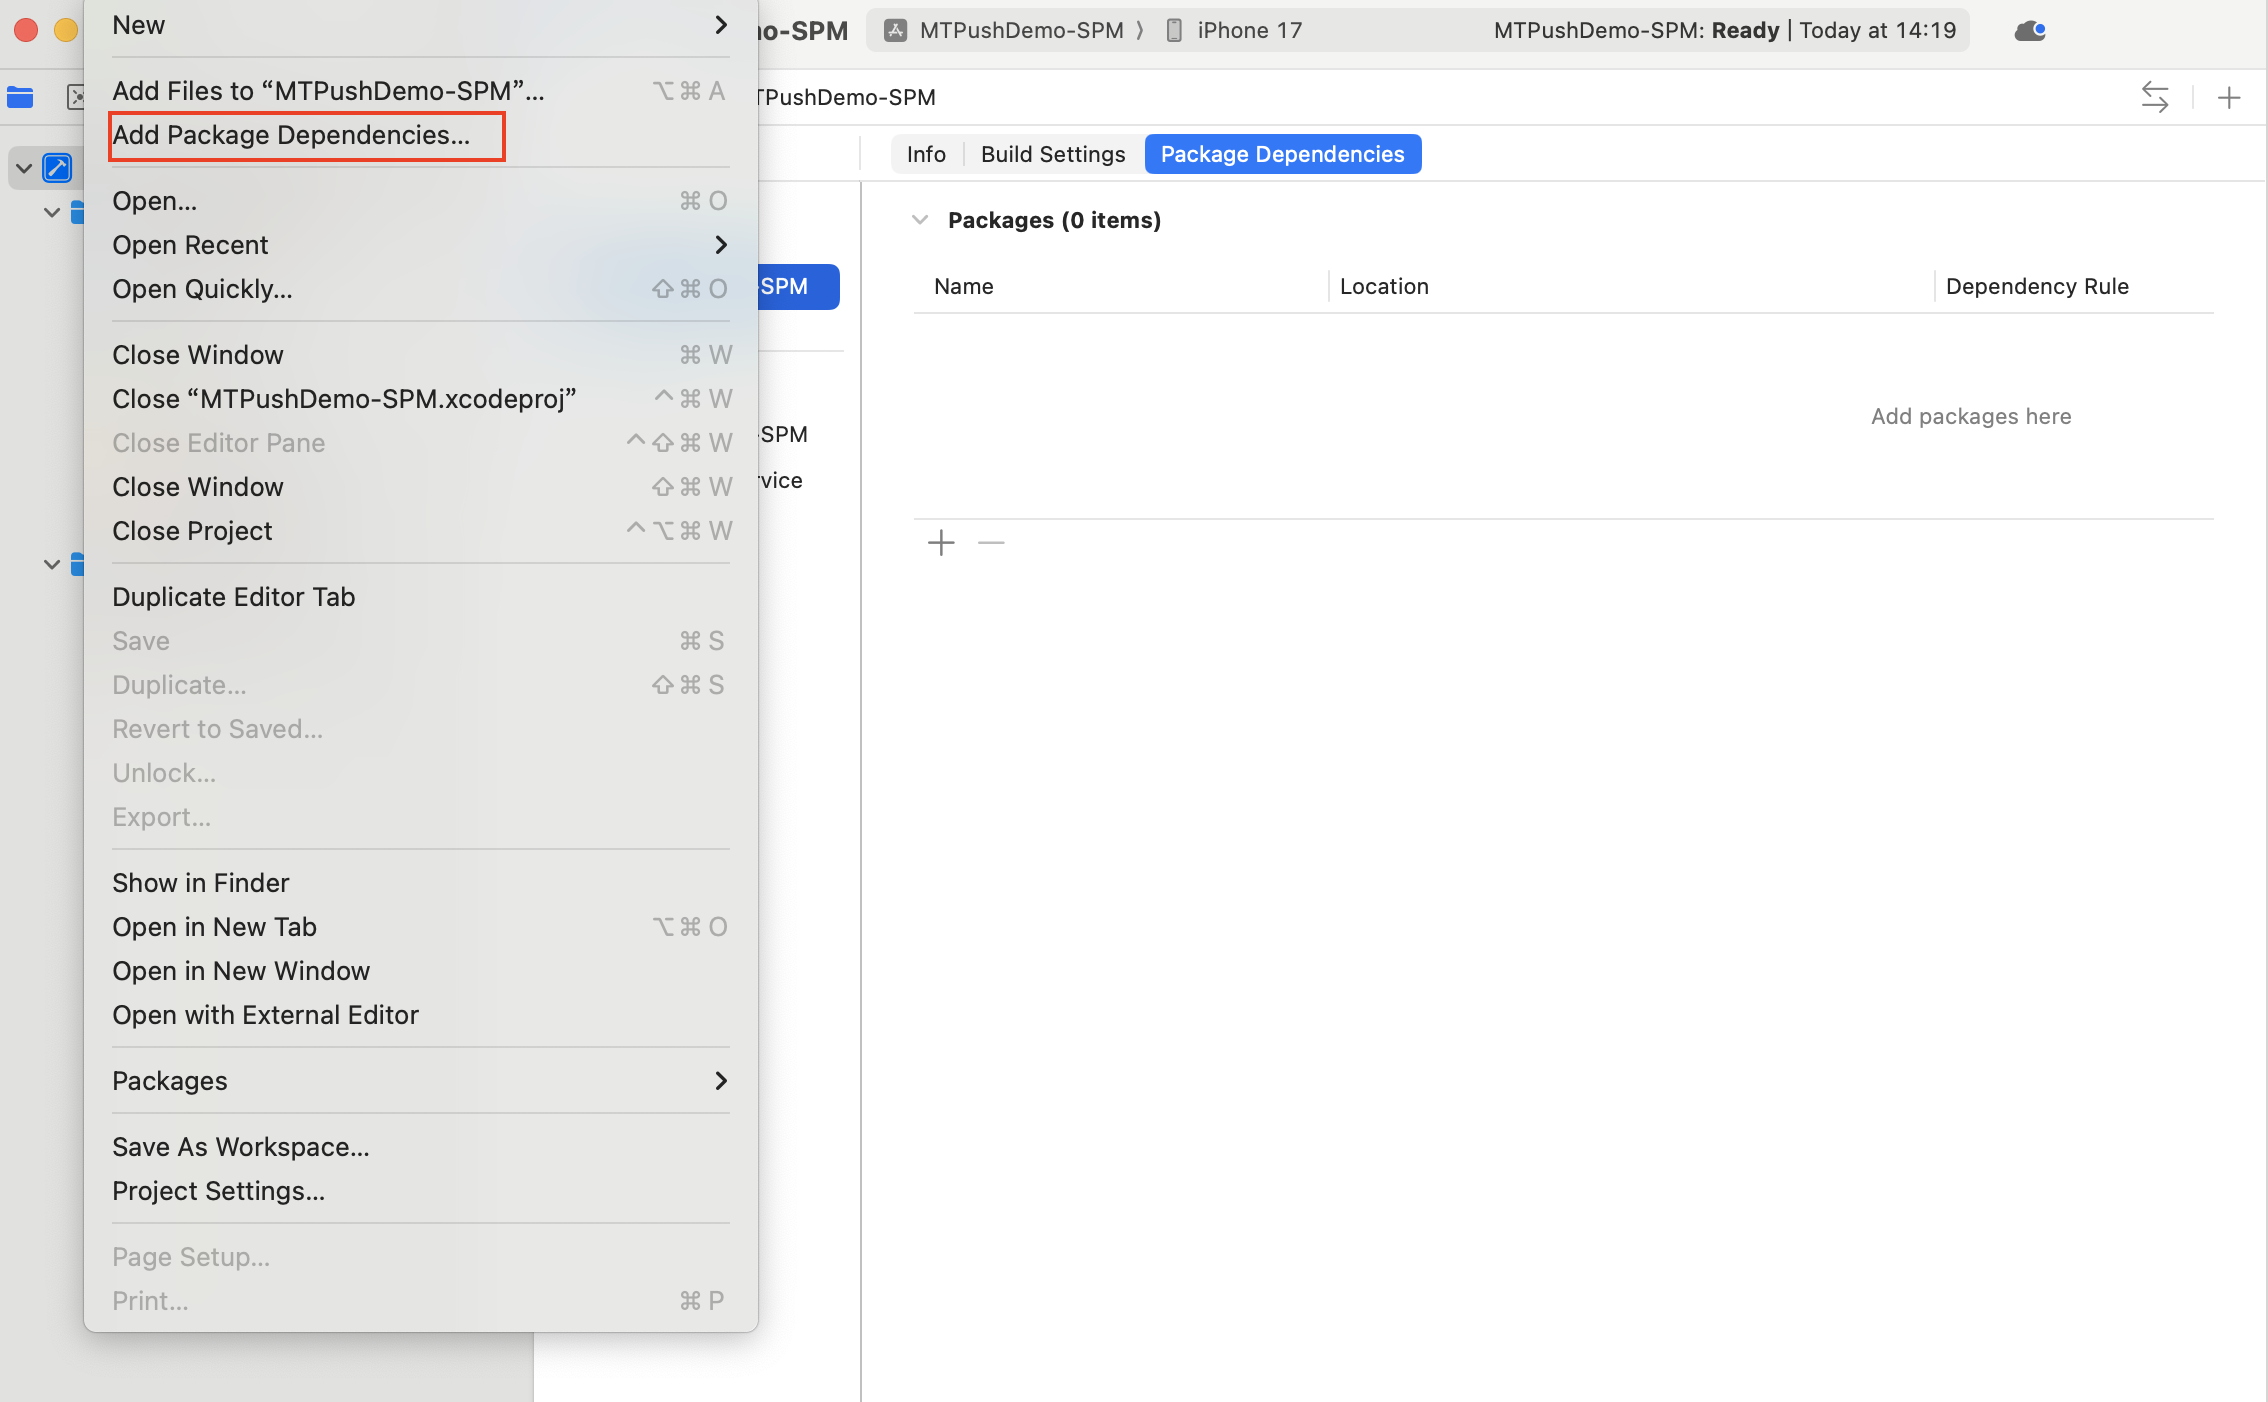
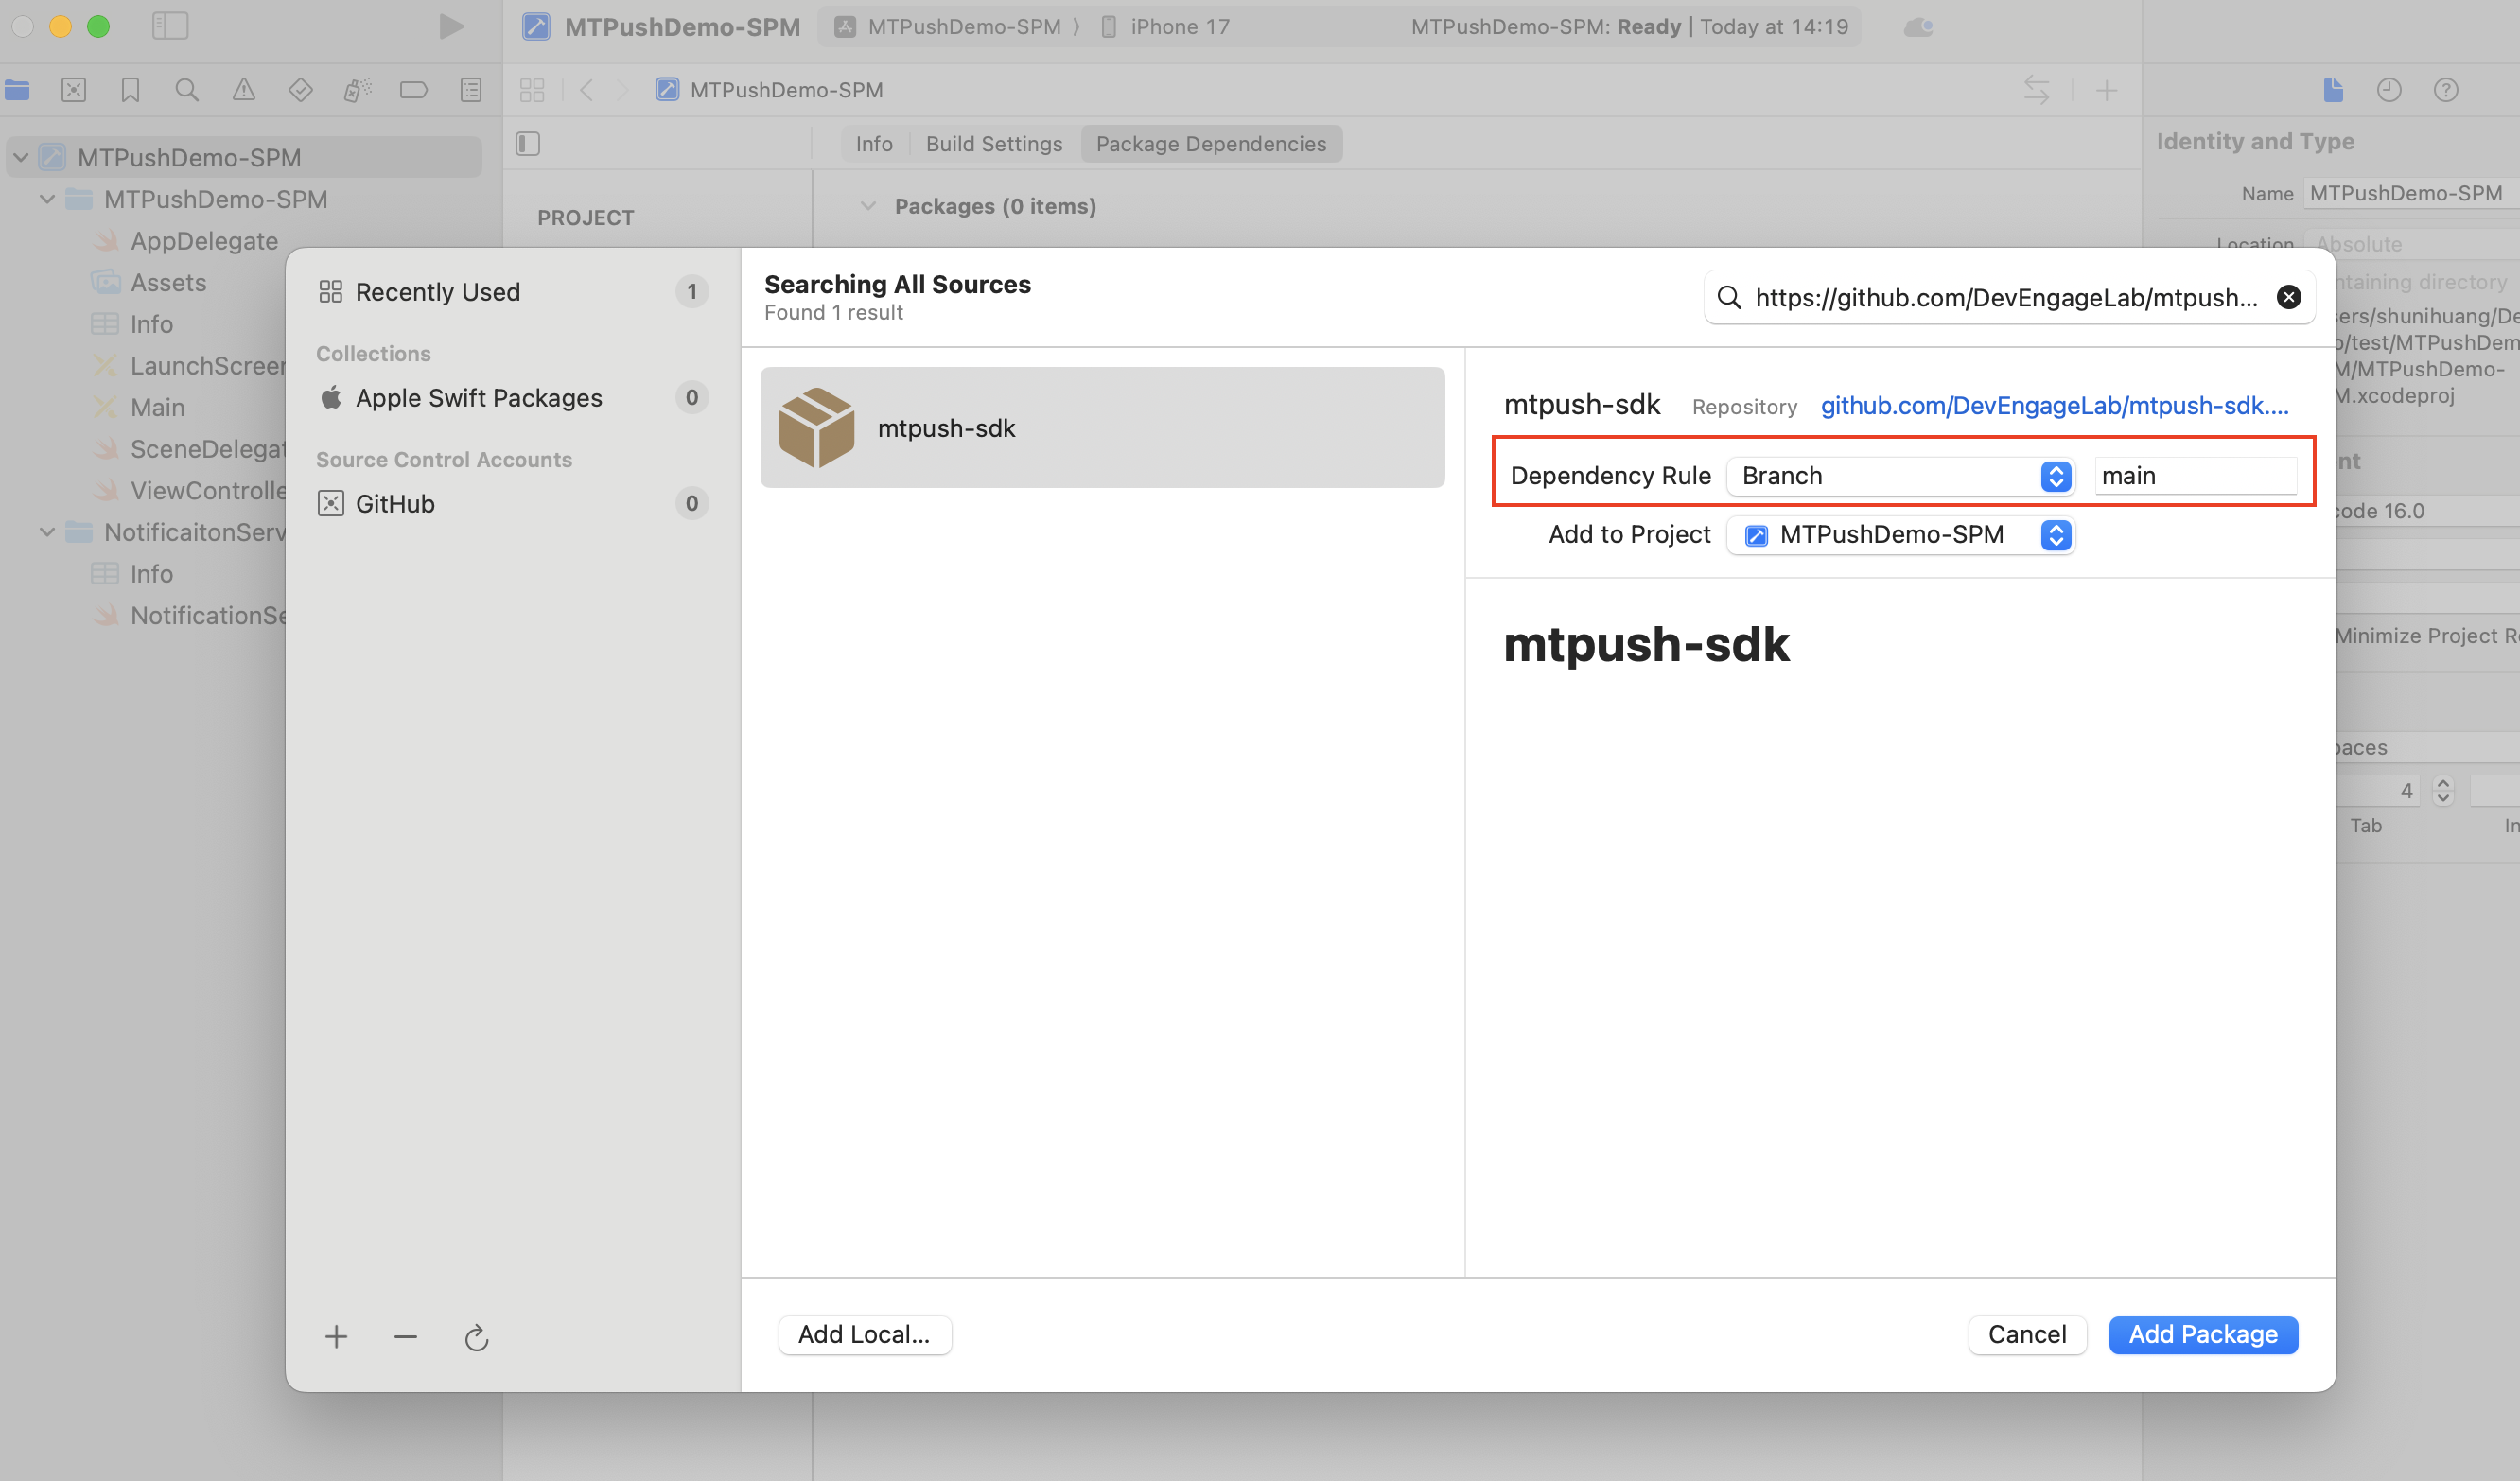
在搜索框中输入MTPush的Github仓库地址:https://github.com/DevEngageLab/mtpush-sdk.git , 进行查找。
找到仓库之后,修改Dependency Rule为Branch=main, 点击Add Package。
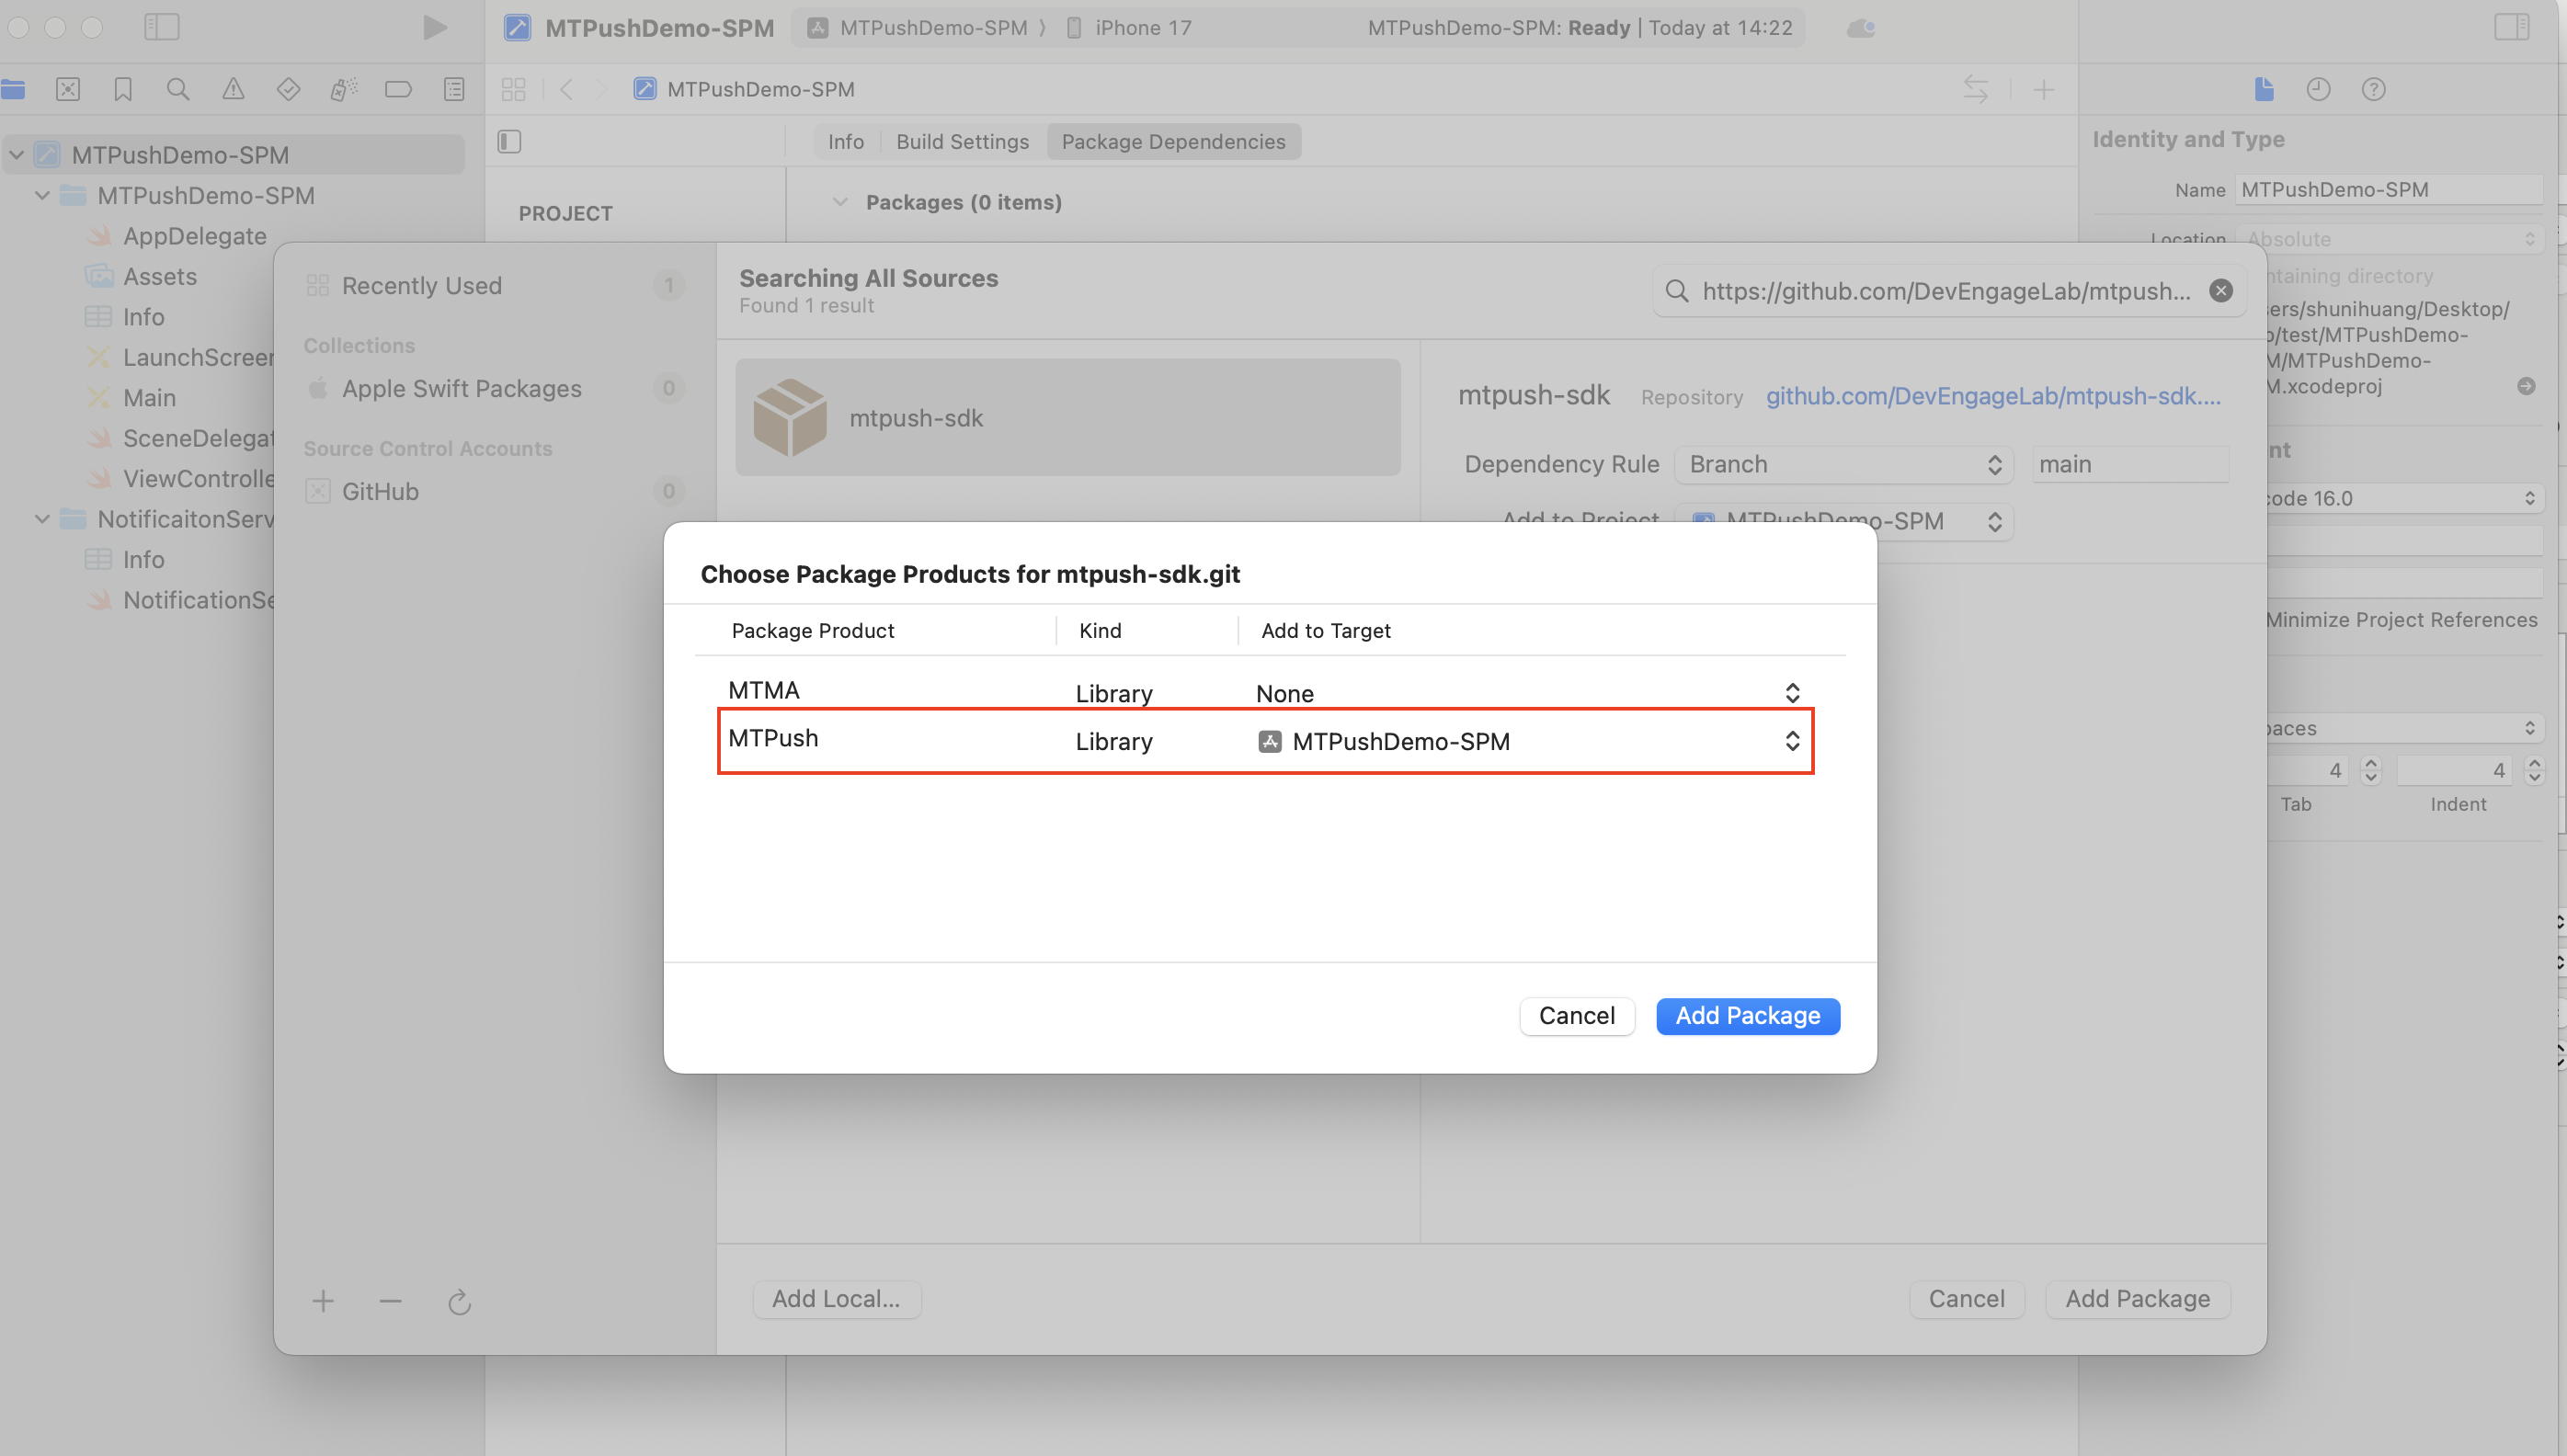
 将MTPush的 Target选择为对应的Target项目。(如果要使用MASDK,也需要给MTMA选择对应的Target,如果不集成MA SDK, Target保持为None)点击Add Package,集成完成。
Build Settings
- 设置 Search Paths 下的 User Header Search Paths 和 Library Search Paths,比如 SDK 文件夹(默认为 lib )与工程文件在同一级目录下,则都设置为 "$(SRCROOT)/{静态库所在文件夹名称}" 即可。
Capabilities
如使用 Xcode 8 及以上环境开发,请开启 Application Target 的 Capabilities->Push Notifications 选项,如图:

如使用 Xcode 10 及以上环境开发,请开启 Application Target 的 Capabilities-> Access WIFI Infomation 选项。 
添加头文件
请将以下代码添加到 AppDelegate.m 引用头文件的位置。
Objective-C
              // 引入 MTPush 功能所需头文件
#import "MTPushService.h"
// iOS10 注册 APNs 所需头文件
#ifdef NSFoundationVersionNumber_iOS_9_x_Max
#import <UserNotifications/UserNotifications.h>
#endif
// 如果需要使用 idfa 功能所需要引入的头文件(可选)
#import <AdSupport/AdSupport.h>
Swift
              // 引入 MTPush 功能所需头文件
import MTPush
// iOS10 注册 APNs 所需头文件
import UserNotifications
// 如果需要使用 idfa 功能所需要引入的头文件(可选)
import AdSupport
添加 Delegate
为 AppDelegate 添加 Delegate,参考代码如下:
Objective-C
              @interface AppDelegate ()<MTPushRegisterDelegate>

@end
Swift
              extension AppDelegate: MTPushRegisterDelegate {

}
添加初始化代码
添加初始化 APNs 代码
请将以下代码添加到
-(BOOL)application:(UIApplication *)application didFinishLaunchingWithOptions:(NSDictionary *)launchOptions
Objective-C
                //Required

  MTPushRegisterEntity * entity = [[MTPushRegisterEntity alloc] init];
  entity.types = MTPushAuthorizationOptionAlert|MTPushAuthorizationOptionSound|MTPushAuthorizationOptionProvidesAppNotificationSettings;
  if ([[UIDevice currentDevice].systemVersion floatValue] >= 8.0) {
    // 可以添加自定义 categories
    // NSSet<UNNotificationCategory *> *categories for iOS10 or later
    // NSSet<UIUserNotificationCategory *> *categories for iOS8 and iOS9
  }
  [MTPushService registerForRemoteNotificationConfig:entity delegate:self];
Swift
               // Required
let entity = MTPushRegisterEntity()
let types = MTPushAuthorizationOptions(rawValue: (MTPushAuthorizationOptions.alert.rawValue | MTPushAuthorizationOptions.sound.rawValue | MTPushAuthorizationOptions.providesAppNotificationSettings.rawValue))
entity.types = Int(types.rawValue)
if UIDevice.current.systemVersion.compare("8.0", options: .numeric) != .orderedAscending {
      // 可以添加自定义 categories
      // Set<UNNotificationCategory> for iOS10 or later
      // Set<UIUserNotificationCategory> for iOS8 and iOS9
}
MTPushService.register(forRemoteNotificationConfig: entity, delegate: self)
添加初始化 MTPush 代码
请将以下代码添加到
-(BOOL)application:(UIApplication *)application didFinishLaunchingWithOptions:(NSDictionary *)launchOptions
Objective-C
              // Optional
// 获取 IDFA
// 如需使用 IDFA 功能请添加此代码并在初始化方法的 advertisingIdentifier 参数中填写对应值
NSString *advertisingId = [[[ASIdentifierManager sharedManager] advertisingIdentifier] UUIDString];

// Required
// init Push
[MTPushService setupWithOption:launchOptions appKey:appKey
                      channel:channel
             apsForProduction:isProduction
        advertisingIdentifier:advertisingId];
Swift
              // Optional
// 获取 IDFA
// 如需使用 IDFA 功能请添加此代码并在初始化方法的 advertisingIdentifier 参数中填写对应值
let advertisingId = ASIdentifierManager.shared().advertisingIdentifier.uuidString

// Required
// init Push
MTPushService.setup(withOption: launchOptions, appKey: appKey, channel: channel, apsForProduction: isProduction, advertisingIdentifier: advertisingId)
部分参数说明
- appKey
- 请确保应用内配置的 appkey 与 Portal 上创建应用后生成的 appkey 一致。
- channel
- 指明应用程序包的下载渠道,为方便分渠道统计,具体值由你自行定义,如:App Store。
- apsForProduction
- 用于标识当前应用所使用的 APNs 证书环境。
- 0(默认值)表示采用的是开发证书,1 表示采用生产证书发布应用。
- 注:此字段的值要与 Build Settings的Code Signing 配置的证书环境一致。
注册 APNs 成功并上报 DeviceToken
温馨提示:
如果不调用此方法也可以登录 EngageLab。但是不能使用 APNs 通知功能,只可以使用 EngageLab 自定义消息。
请在 AppDelegate.m 实现该回调方法并添加回调方法中的代码:
Objective-C
              - (void)application:(UIApplication *)application
didRegisterForRemoteNotificationsWithDeviceToken:(NSData *)deviceToken {

  /// Required - 注册 DeviceToken
  [MTPushService registerDeviceToken:deviceToken];
}
Swift
              func application(_ application: UIApplication, didRegisterForRemoteNotificationsWithDeviceToken deviceToken: Data) {
    /// Required - 注册 DeviceToken
    MTPushService.registerDeviceToken(deviceToken)
}
实现注册 APNs 失败接口(可选)
Objective-C
              - (void)application:(UIApplication *)application didFailToRegisterForRemoteNotificationsWithError:(NSError *)error {
  //Optional
  NSLog(@"did Fail To Register For Remote Notifications With Error: %@", error);
  [MTPushService registerDeviceToken:deviceToken];
}
Swift
              func application(_ application: UIApplication, didFailToRegisterForRemoteNotificationsWithError error: Error) {
    // Optional
    print("did Fail To Register For Remote Notifications With Error: \(error)")
    // 注意:Swift 中这里不应该调用 registerDeviceToken,因为失败时没有 deviceToken
}
添加处理 APNs 通知回调方法
请在 AppDelegate.m 实现该回调方法并添加回调方法中的代码:
Objective-C
              #pragma mark- MTPushRegisterDelegate

// iOS 12 Support
- (void)mtpNotificationCenter:(UNUserNotificationCenter *)center openSettingsForNotification:(UNNotification *)notification{if (notification && [notification.request.trigger isKindOfClass:[UNPushNotificationTrigger class]]) {// 从通知界面直接进入应用}else{// 从通知设置界面进入应用}
}

// iOS 10 Support
- (void)mtpNotificationCenter:(UNUserNotificationCenter *)center willPresentNotification:(UNNotification *)notification withCompletionHandler:(void (^)(NSInteger))completionHandler {
  // Required
  NSDictionary * userInfo = notification.request.content.userInfo;
  if([notification.request.trigger isKindOfClass:[UNPushNotificationTrigger class]]) {[MTPushService handleRemoteNotification:userInfo];
  }
  completionHandler(UNNotificationPresentationOptionAlert);  // 需要执行这个方法,选择是否提醒用户,有 Badge、Sound、Alert、List、Banner几种类型可以选择设置
}

// iOS 10 Support
- (void)mtpNotificationCenter:(UNUserNotificationCenter *)center didReceiveNotificationResponse:(UNNotificationResponse *)response withCompletionHandler:(void (^)())completionHandler {
  // Required
  NSDictionary * userInfo = response.notification.request.content.userInfo;
  if([response.notification.request.trigger isKindOfClass:[UNPushNotificationTrigger class]]) {[MTPushService handleRemoteNotification:userInfo];
  }
  completionHandler();	// 系统要求执行这个方法}

- (void)application:(UIApplication *)application didReceiveRemoteNotification:(NSDictionary *)userInfo fetchCompletionHandler:(void (^)(UIBackgroundFetchResult))completionHandler {

  // Required, iOS 7 Support
  [MTPushService handleRemoteNotification:userInfo];
  completionHandler(UIBackgroundFetchResultNewData);
}

- (void)application:(UIApplication *)application didReceiveRemoteNotification:(NSDictionary *)userInfo {

  // Required, For systems with less than or equal to iOS 6
  [MTPushService handleRemoteNotification:userInfo];
}
Swift
              // MARK: - MTPushRegisterDelegate

// iOS 12 Support
func mtpNotificationCenter(_ center: UNUserNotificationCenter, openSettingsFor notification: UNNotification?) {
    if let notification = notification, notification.request.trigger is UNPushNotificationTrigger {
        // 从通知界面直接进入应用
    } else {
        // 从通知设置界面进入应用
    }
}

// iOS 10 Support
func mtpNotificationCenter(_ center: UNUserNotificationCenter, willPresent notification: UNNotification, withCompletionHandler completionHandler: @escaping (Int) -> Void) {
    // Required
    let userInfo = notification.request.content.userInfo
    if notification.request.trigger is UNPushNotificationTrigger {
        MTPushService.handleRemoteNotification(userInfo)
    }
    completionHandler(NSInteger(UNNotificationPresentationOptions.alert.rawValue) | NSInteger(UNNotificationPresentationOptions.sound.rawValue) | NSInteger(UNNotificationPresentationOptions.badge.rawValue) ) // 需要执行这个方法,选择是否提醒用户,有 Badge、Sound、Alert、List、Banner几种类型可以选择设置
}

// iOS 10 Support
func mtpNotificationCenter(_ center: UNUserNotificationCenter, didReceive response: UNNotificationResponse, withCompletionHandler completionHandler: @escaping () -> Void) {
    // Required
    let userInfo = response.notification.request.content.userInfo
    if response.notification.request.trigger is UNPushNotificationTrigger {
        MTPushService.handleRemoteNotification(userInfo)
    }
    completionHandler() // 系统要求执行这个方法
}

func application(_ application: UIApplication, didReceiveRemoteNotification userInfo: [AnyHashable : Any], fetchCompletionHandler completionHandler: @escaping (UIBackgroundFetchResult) -> Void) {
    // Required, iOS 7 Support
    MTPushService.handleRemoteNotification(userInfo)
    completionHandler(.newData)
}

func application(_ application: UIApplication, didReceiveRemoteNotification userInfo: [AnyHashable : Any]) {
    // Required, For systems with less than or equal to iOS 6
    MTPushService.handleRemoteNotification(userInfo)
}
添加处理 MTPush 自定义消息回调方法
如需使用 MTPush 的自定义消息功能,请参考 iOS API 来实现自定义消息的处理回调方法。
成功运行
真机调试该项目,如果控制台输出以下日志则代表您已经集成成功。
              2016-08-19 17:12:12.745823 219b28[1443:286814] | MTP | I - [MTCORETcpEventController]
----- login result -----
uid:123456
registrationID:171976fa8a8620a14a4
idc:0
高级功能
MTush SDK 相关事件监听
建议开发者加上 API 里面提供的以下类型的通知:
extern NSString *const kMTCNetworkIsConnectingNotification; // 正在连接中
extern NSString * const kMTCNetworkDidSetupNotification; // 建立连接
extern NSString * const kMTCNetworkDidCloseNotification; // 关闭连接
extern NSString * const kMTCNetworkDidRegisterNotification; // 注册成功
extern NSString *const kMTCNetworkFailedRegisterNotification; // 注册失败
extern NSString * const kMTCNetworkDidLoginNotification; // 登录成功
温馨提示:
Registration id 需要添加注册 kMTCNetworkDidLoginNotification 通知的方法里获取,也可以调用 [registrationIDCompletionHandler:] 方法,通过 completionHandler 获取
extern NSString * const kMTCNetworkDidReceiveMessageNotification; // 收到自定义消息(非 APNs)
其中,kMTCNetworkDidReceiveMessageNotification 传递的数据可以通过 NSNotification 中的 userInfo 方法获取,包括标题、内容、extras 信息等,请参考文档:iOS SDK API
通知送达统计
温馨提示:
iOS 10 新增的 Notification Service Extension 功能,用 mutable-content 字段来控制。
若使用 Web 控制台,需勾选 “可选设置”中 mutable-content 选项;若使用 RESTFul API 需设置 mutable-content 字段为 true。
开发者可使用 Notification Service Extension SDK 上报每条 APNs 信息的送达状态。 注意:集成后EngageLab控制台显示的展示数据取自此处上报的送达数据。

使用方法:
创建 Notification Service Extension
- 创建一个 Notification Service Extension 服务,详情参考 iOS 10 Service Extension。
导入 SDK
Cocoapods 导入
                 target 'NotificationService' do
    pod 'MTPushExtension'
   end

    注:如果无法导入最新版本,请执行 pod repo update master 这个命令来升级本机的 pod 库,然后重新 pod 'MTPushExtension'
- 如果需要安装指定版本则使用以下方式(以 MTPushExtension 4.3.8 版本为例):
                target 'NotificationService' do
    pod 'MTPushExtension', '4.3.8'
  end
手动导入
- 将 mtpush-extension-ios-xxx.xcframework 文件引入到您的 Service Extentsion 工程中。
- 添加 Framework:libz.tbd 和 libresolv.tbd。
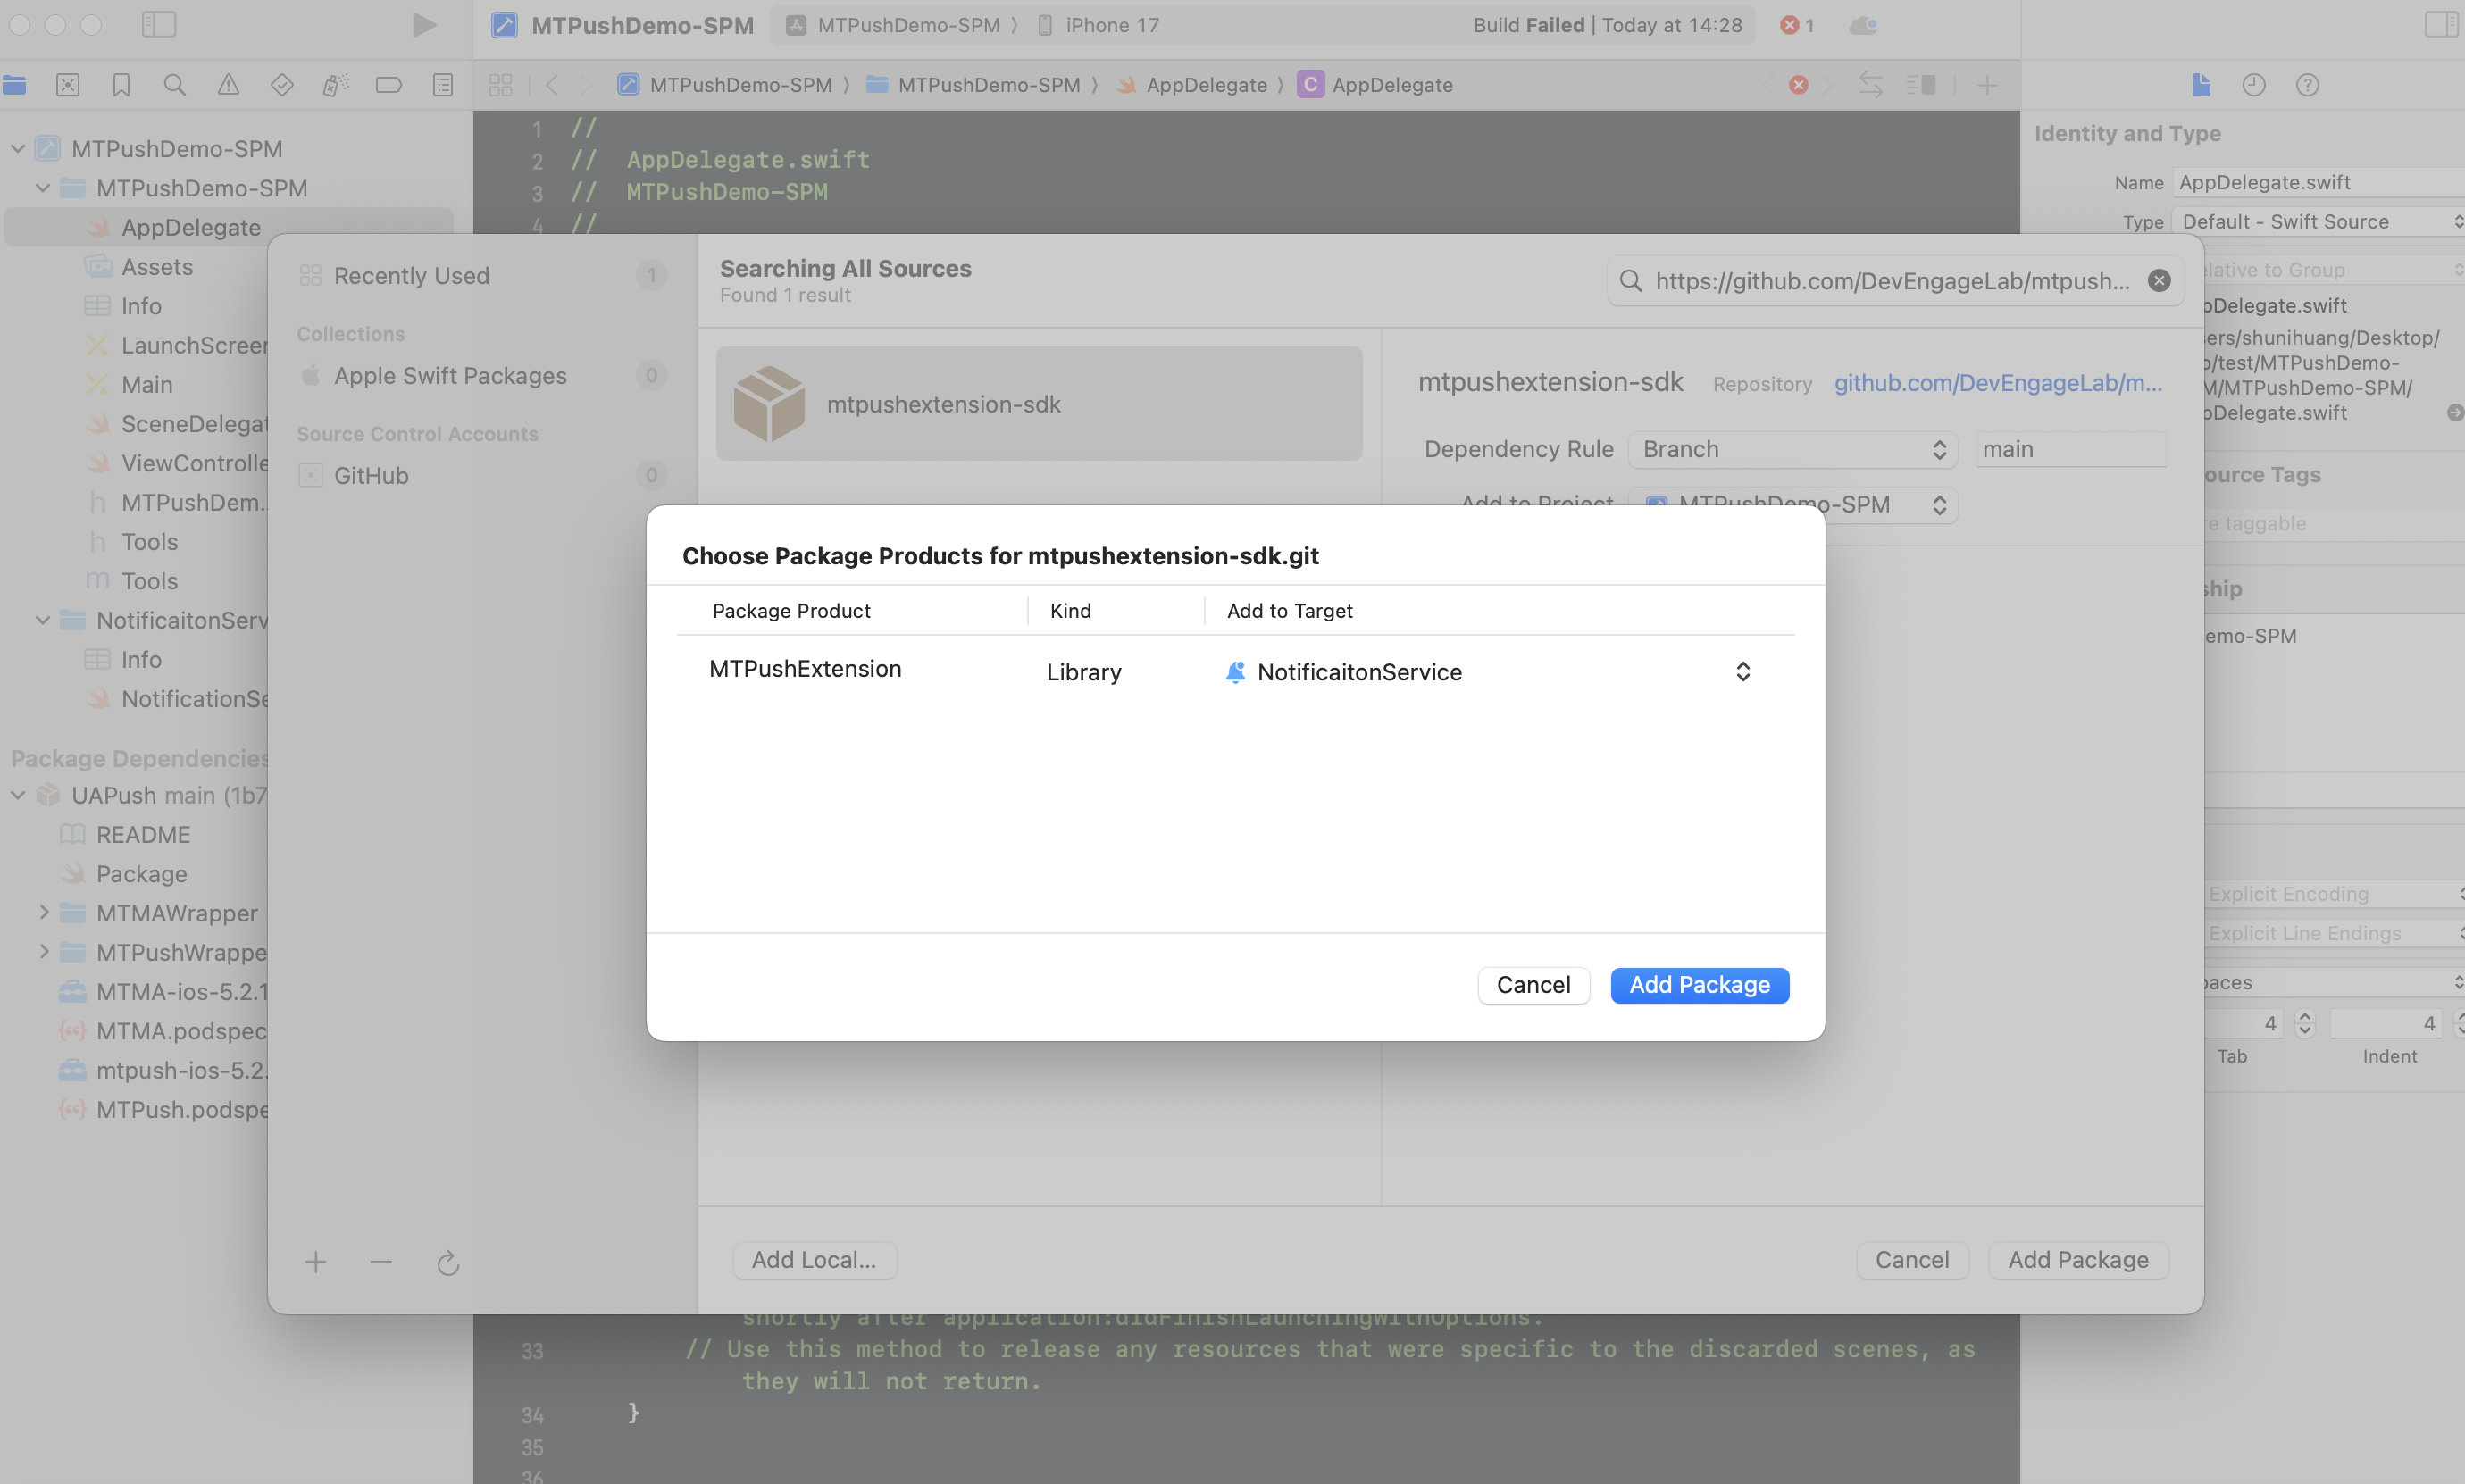
Swift Package Manager 导入
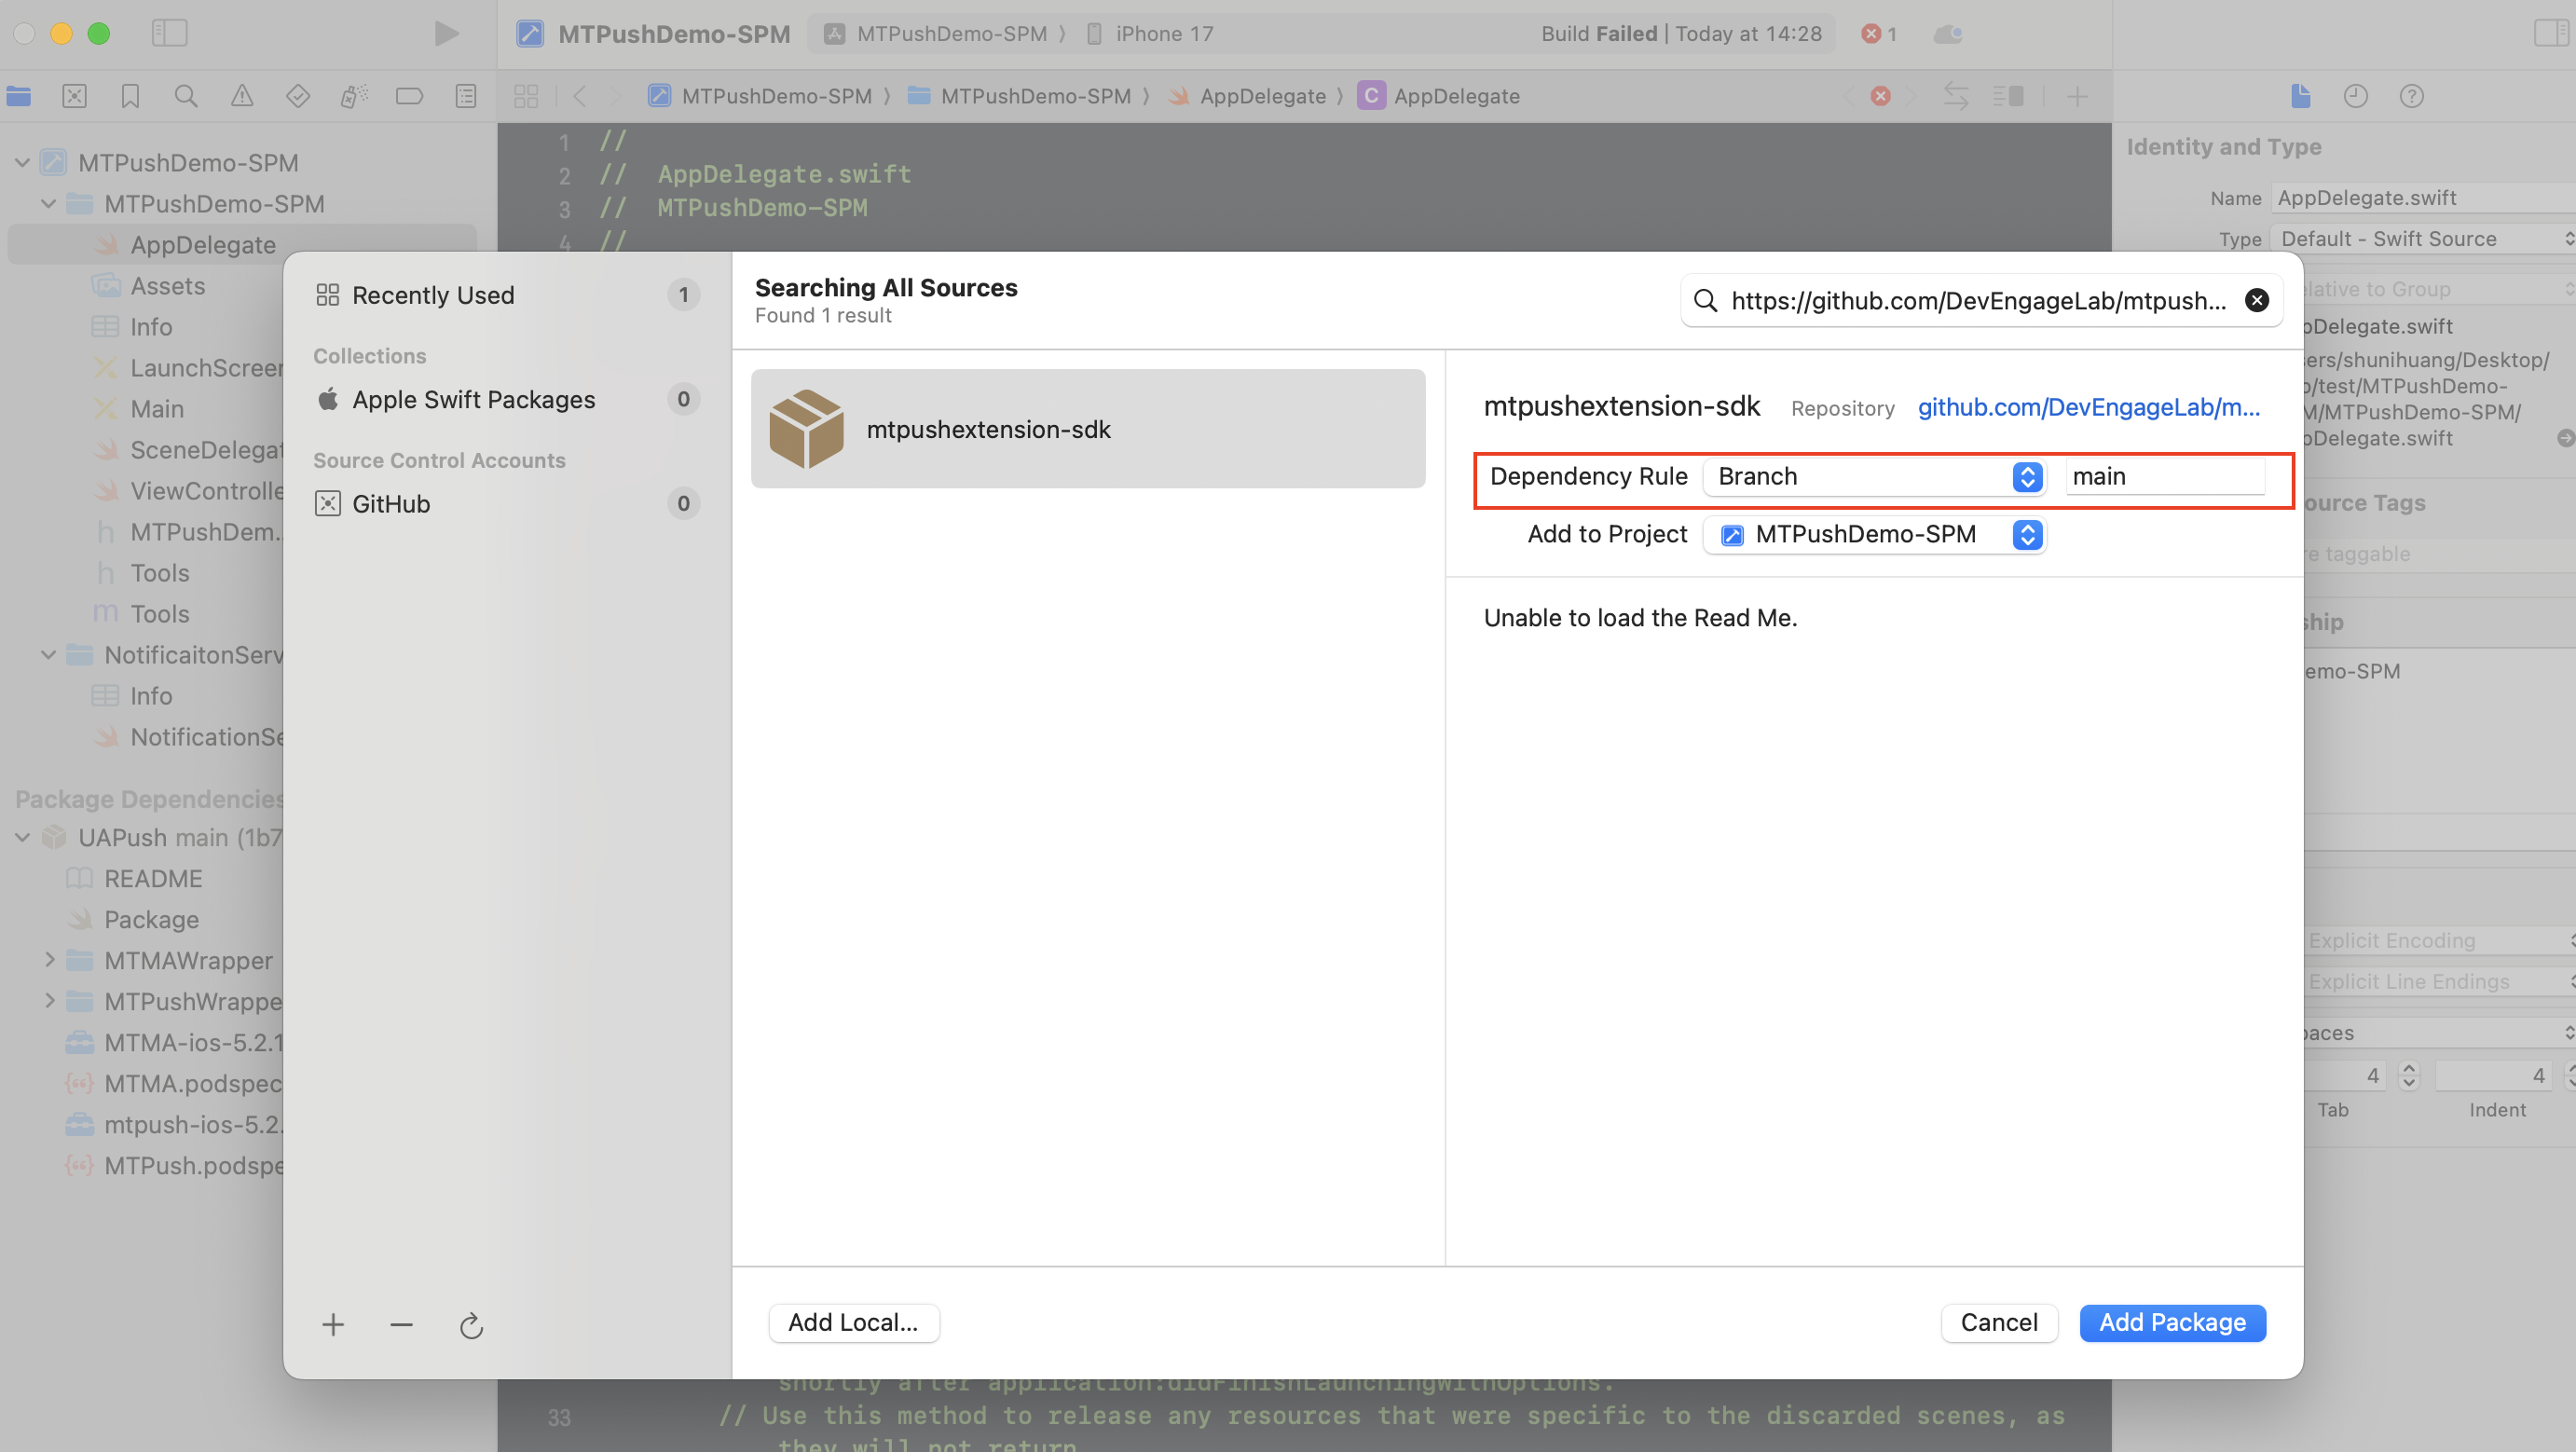
打开工程,选择菜单栏中的File > Add Packages...

在搜索框中输入MTPush的Github仓库地址:https://github.com/DevEngageLab/mtpushextension-sdk.git , 进行查找。
找到仓库之后,修改Dependency Rule为Branch=main, 点击Add Package。
 将MTPushExtension的 Target选择为对应的Target项目。
集成
- 调用 [mtpushSetAppkey:] 方法设置您的 appkey,请注意这里的 appkey 应该和您 Urora 应用的 appkey 相同。
- 调用 [mtpushReceiveNotificationRequest:] 方法上报您的 apns 消息,完成送达统计;在该方法的 block 回调中进行 apns 的显示。
更具体的使用示例请参考版本压缩包中附带的 Demo 代码。 参考文档:iOS SDK API
Voip推送
- 在 iOS 8 之后引入了一个基于 PushKit 框架的 Voip 推送,可以使得用户的 APP 在杀死的情况下唤醒 APP,并执行代码。
- Voip 不区分开发和生产证书,Apple Push Notification service SSL (Sandbox & Production) 和 VoIP Services Certificate 都支持 Voip 推送
添加 PushKit.Framework 库
- 在Xcode Build Phases - Link Bindary With Libraries 里引入 PushKit.framework 库
- 导入头文件 #import <PushKit/PushKit.h>
- AppDelegate 实现 PKPushRegistryDelegate 协议
添加 Voip 权限
在 Project-> Capabilities->Background Modes 里把 Voice over IP 选项打开
代码实现
- 在 didFinishLaunchingWithOptions 方法中实现 Voip 注册
Objective-C
              - (void)voipRegistration{
  dispatch_queue_t mainQueue = dispatch_get_main_queue();
  PKPushRegistry *voipRegistry = [[PKPushRegistry alloc] initWithQueue:mainQueue];
  voipRegistry.delegate = self;
  // Set the push type to VoIP
  voipRegistry.desiredPushTypes = [NSSet setWithObject:PKPushTypeVoIP];
}
Swift
              func voipRegistration() {
    let mainQueue = DispatchQueue.main
    let voipRegistry = PKPushRegistry(queue: mainQueue)
    voipRegistry.delegate = self
    // Set the push type to VoIP
    voipRegistry.desiredPushTypes = [.voIP]
}
- 提交 Token
Objective-C
              /// 系统返回VoipToken,上报给Engagelab服务器
- (void)pushRegistry:(PKPushRegistry *)registry didUpdatePushCredentials:(PKPushCredentials *)pushCredentials forType:(PKPushType)type{
   if (type == PKPushTypeVoIP) {
    [MTPushService registerVoipToken:pushCredentials.token];
   }
}
Swift
              /// 系统返回VoipToken,上报给Engagelab服务器
func pushRegistry(_ registry: PKPushRegistry, didUpdate pushCredentials: PKPushCredentials, for type: PKPushType) {
    if type == .voIP {
        MTPushService.registerVoipToken(pushCredentials.token)
    }
}
- 接收到 Voip 推送,调用回执接口,用户统计 Voip 送达。
Objective-C
              - (void)pushRegistry:(PKPushRegistry *)registry didReceiveIncomingPushWithPayload:(PKPushPayload *)payload forType:(PKPushType)type{
  if (type == PKPushTypeVoIP) {
    // 提交回执给Engagelab服务器
    [MTPushService handleVoipNotification:payload.dictionaryPayload];
  }
}

- (void)pushRegistry:(PKPushRegistry *)registry didReceiveIncomingPushWithPayload:(PKPushPayload *)payload forType:(PKPushType)type withCompletionHandler:(void(^)(void))completion{
   if (type == PKPushTypeVoIP) {
    // 提交回执给Engagelab服务器
    [MTPushService handleVoipNotification:payload.dictionaryPayload];
   }
}
Swift
              func pushRegistry(_ registry: PKPushRegistry, didReceiveIncomingPushWith payload: PKPushPayload, for type: PKPushType) {
    if type == .voIP {
        // 提交回执给Engagelab服务器
        MTPushService.handleVoipNotification(payload.dictionaryPayload)
    }
}

func pushRegistry(_ registry: PKPushRegistry, didReceiveIncomingPushWith payload: PKPushPayload, for type: PKPushType, completion: @escaping () -> Void) {
    if type == .voIP {
        // 提交回执给Engagelab服务器
        MTPushService.handleVoipNotification(payload.dictionaryPayload)
    }
}
技术支持
当出现问题时:
- 请仔细阅读文档,查看是否有遗漏。
- 你可以到 EngageLab 社区搜索类似问题。
为了更快速的解决问题,在寻求帮助时,请提供下列信息:
- 你需要咨询的产品是 MTPush,是否同时使用了 EngageLab 其他的产品 。
- 你所调用的是什么 API,所传参数,完整的报错信息,出现异常的时间点 。
- 如果收不到消息,提供应用的 Appkey,消息的 Message ID,设备的 registration ID 信息 。
- 如果是 SDK 问题请提供对应的 SDK 版本和完整的日志记录,日志信息请使用 TXT 文件上传 。
- 出现异常的设备是 iOS ,列出具体的机型和系统 。