


Overview Guide
After you choose to enter the WhatsApp service in the service center, you will jump to the [Overview] guidance page, where you can check the status of the whole process of using the WhatsApp service and the issues that you need to pay attention to in each process.
Register account
After entering the platform, you will see the following screen. First choose your registration method, then you will be redirected to Meta's official registration page to complete the authorization.
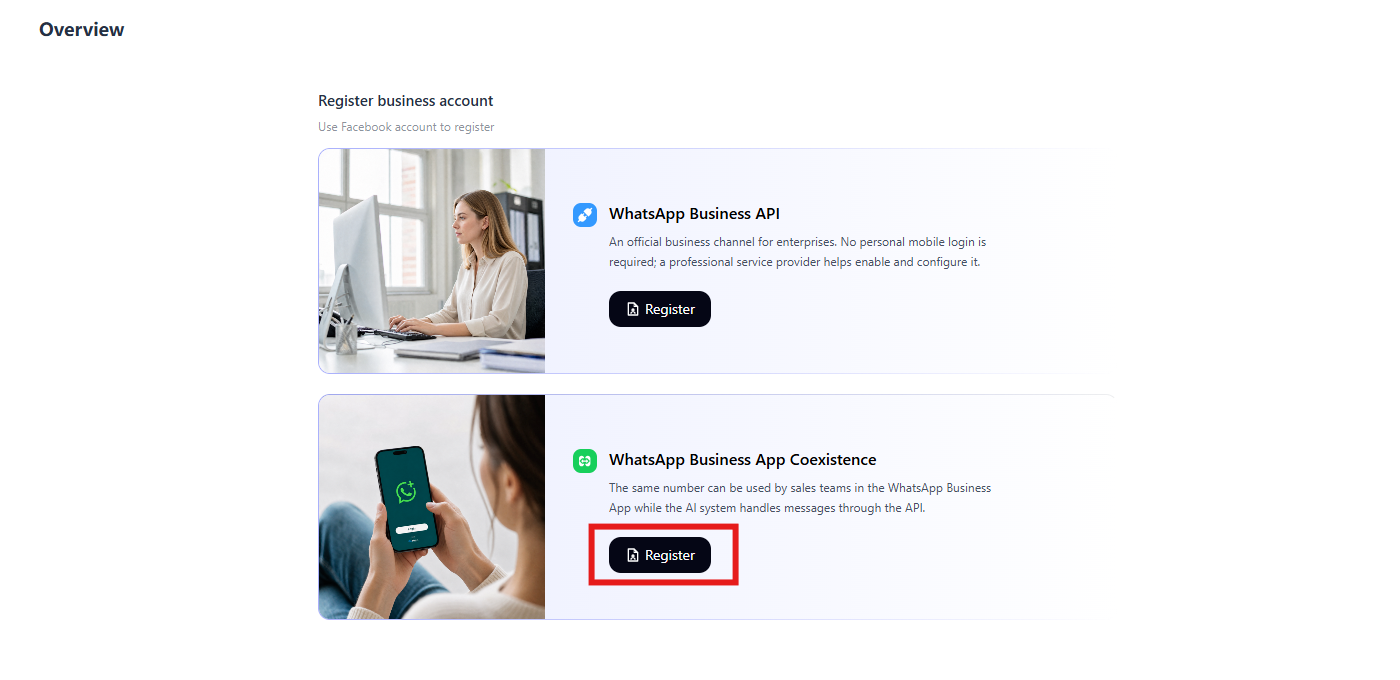
Haven't used the WhatsApp Business App and only want to use the API? 👉 Choose API mode to add a new number or select an existing registered number, with full support for large-scale messaging and automation.
Already using the WhatsApp Business App and also want to use the API? 👉 You can choose to onboard via App mode, keeping the App while gaining API capabilities, with messages synced across both ends.
This document explains the API mode onboarding process in detail, along with the points to note at each step. For the App mode onboarding process, see Coexistence feature guide.
What to prepare
Before registering, prepare the following information. You can select an existing business account or registered number during onboarding without creating it again.
| Item | Purpose and requirements |
|---|---|
| Personal Facebook account | Used to sign in to Meta's registration page and authorize access. Make sure you can sign in. |
| Phone number | Add a new number or select an existing registered number from the list. A new number must receive verification codes by SMS or voice call and meet the phone number requirements. |
| Business information | When creating a business account or new assets, provide the company name, country or region, website, and industry as requested. For an existing account, select it and check its details. |
| Business email | Provide it when creating a Meta business account if requested. A company email address is recommended. |
| WhatsApp account information | Prepare the account name, customer-facing display name, and time zone. You can also select an existing account. |
Process overview
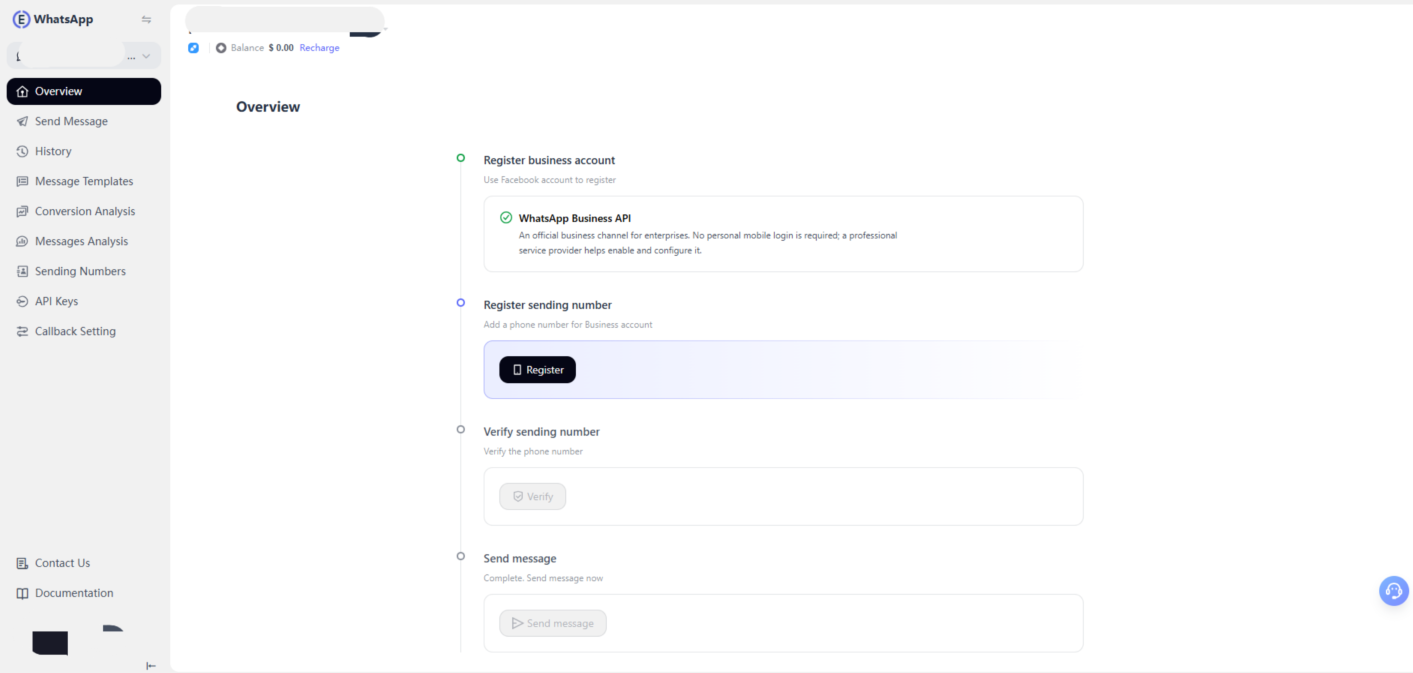
Complete the following 4 steps to start sending messages on WhatsApp using WhatsApp Business API mode:
① Register a business account — Log in and authorize with your Facebook account, then link your Meta business account with your WhatsApp Business account.
② Register a sending number — Add a new number or select an existing registered number to use as your customer-visible sending number.
③ Verify the sending number — Complete number activation on the platform; once verified, the status changes to "Connected".
④ Send messages — Send template messages or enter a conversation chat; the overview page switches from "Guide" to "Reports".
Log in Facebook account
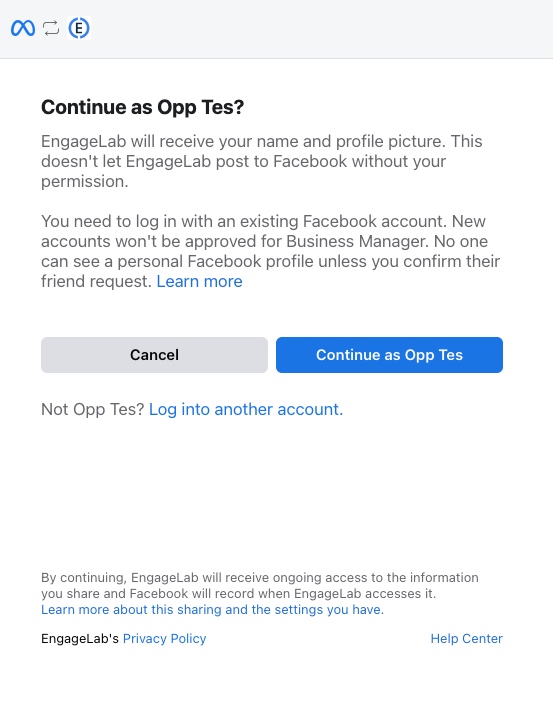
1.If you are already in the Facebook account login status, your login account will be displayed automatically, you can choose to continue the operation, or you can choose to switch to other accounts.
2.If you are not logged in, you will be reminded to log in.
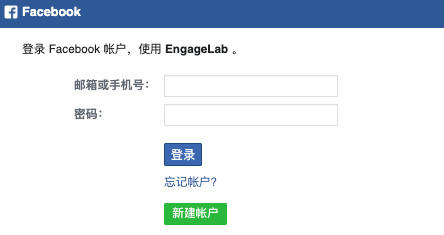
3.If you have not registered for a Facebook account, please create one first.
- Please do not use your newly registered Facebook account to register WhatsApp account right away. Please do some normal Facebook account login, post information, edit personal information, etc. first, and wait for a few days before registering again, otherwise, your account may be blocked.
- For more information about the use of Facebook account, please read: Facebook account exceptions.
Authorization reminder
After signing in to Facebook, review and accept the onboarding information and authorization terms.
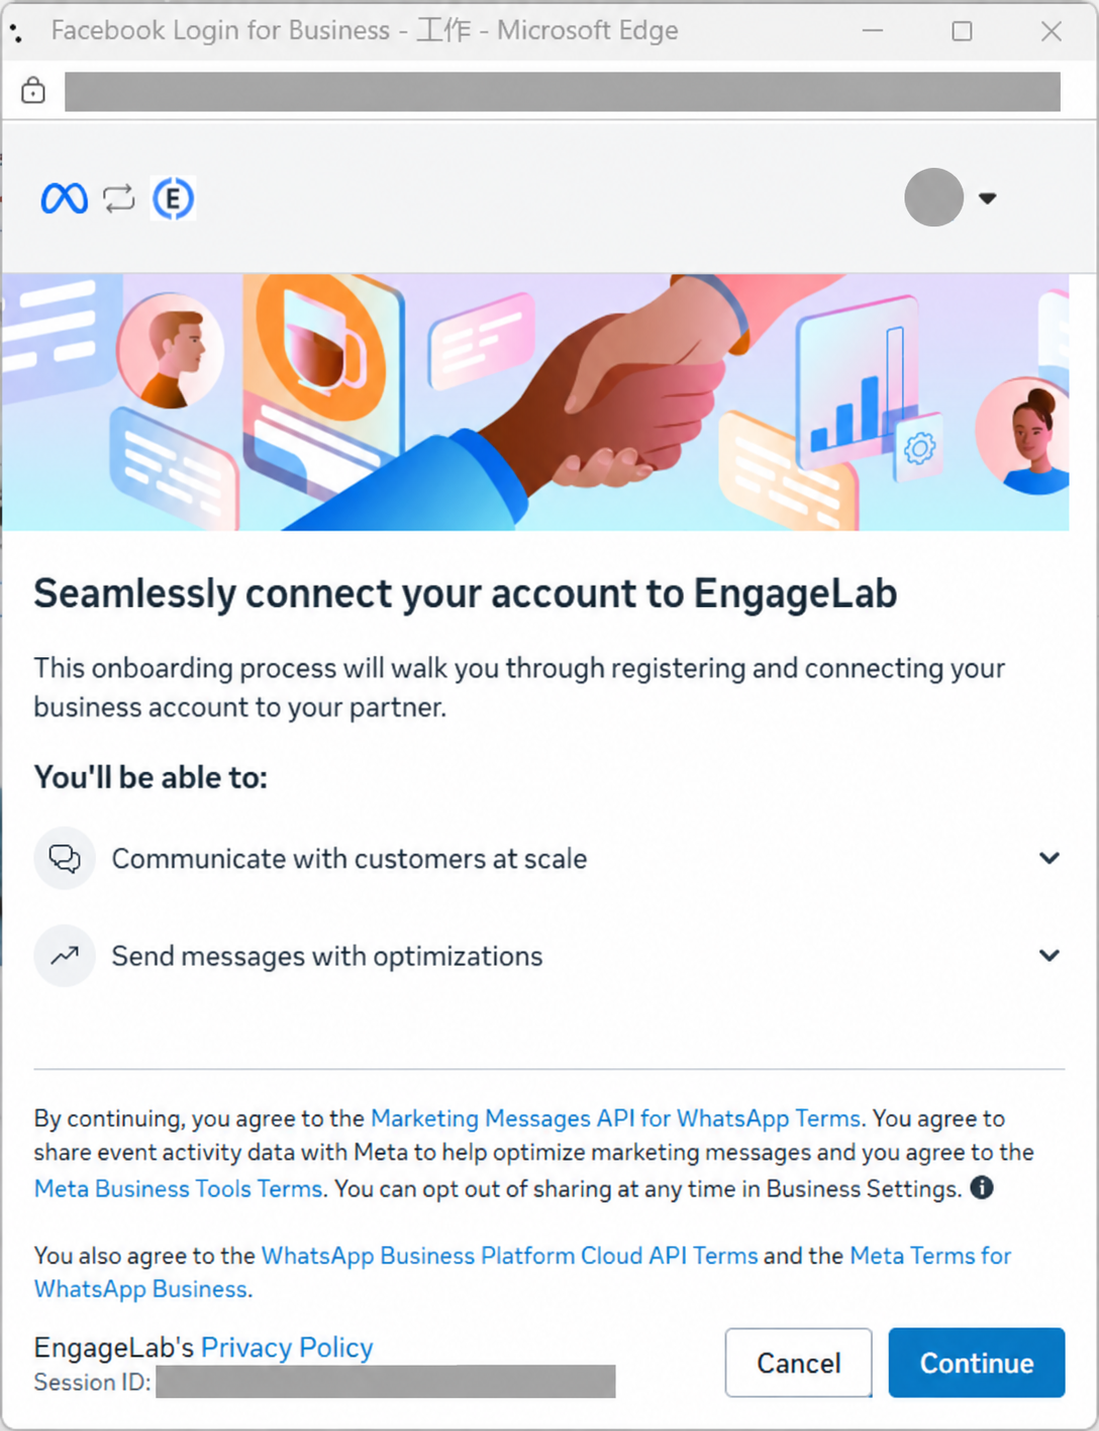
Add and verify phone numbers
Open the phone number dropdown and choose the number to connect:
- Add a new number: Select the option to enter a new phone number, then choose the country code and enter the number.
- Select an existing number: Choose a number marked as registered from the list.
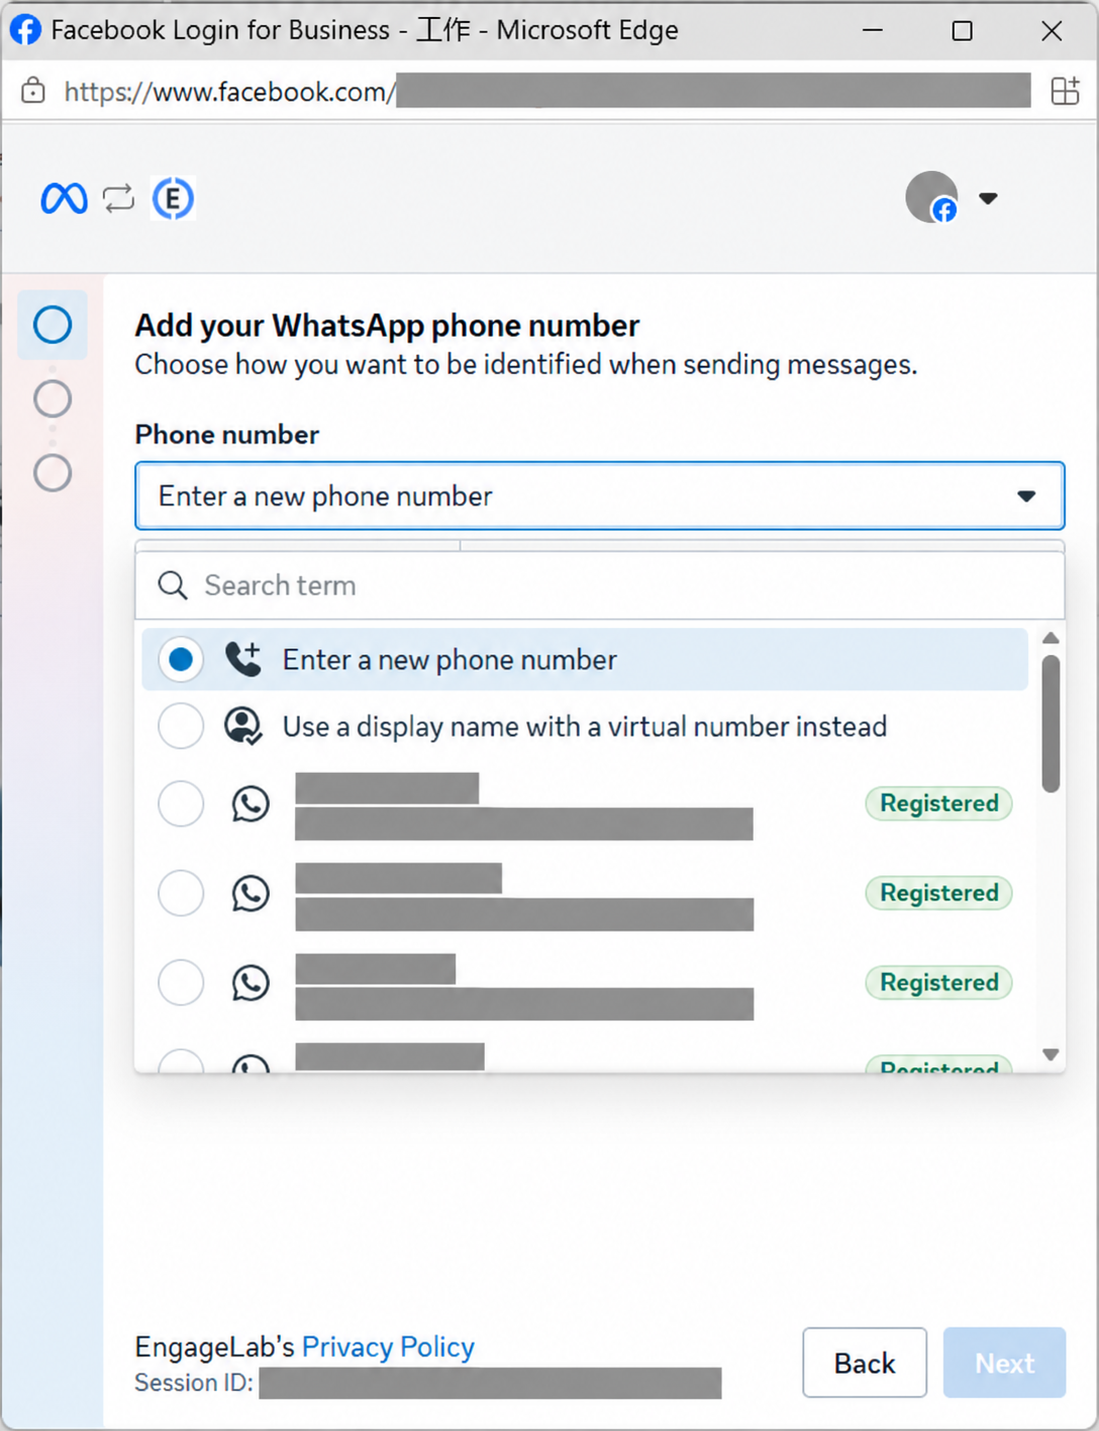
When adding a new number, it must be able to receive a verification code and must not have been used in the WhatsApp App or an existing WhatsApp Business account. See WhatsApp's phone number requirements.
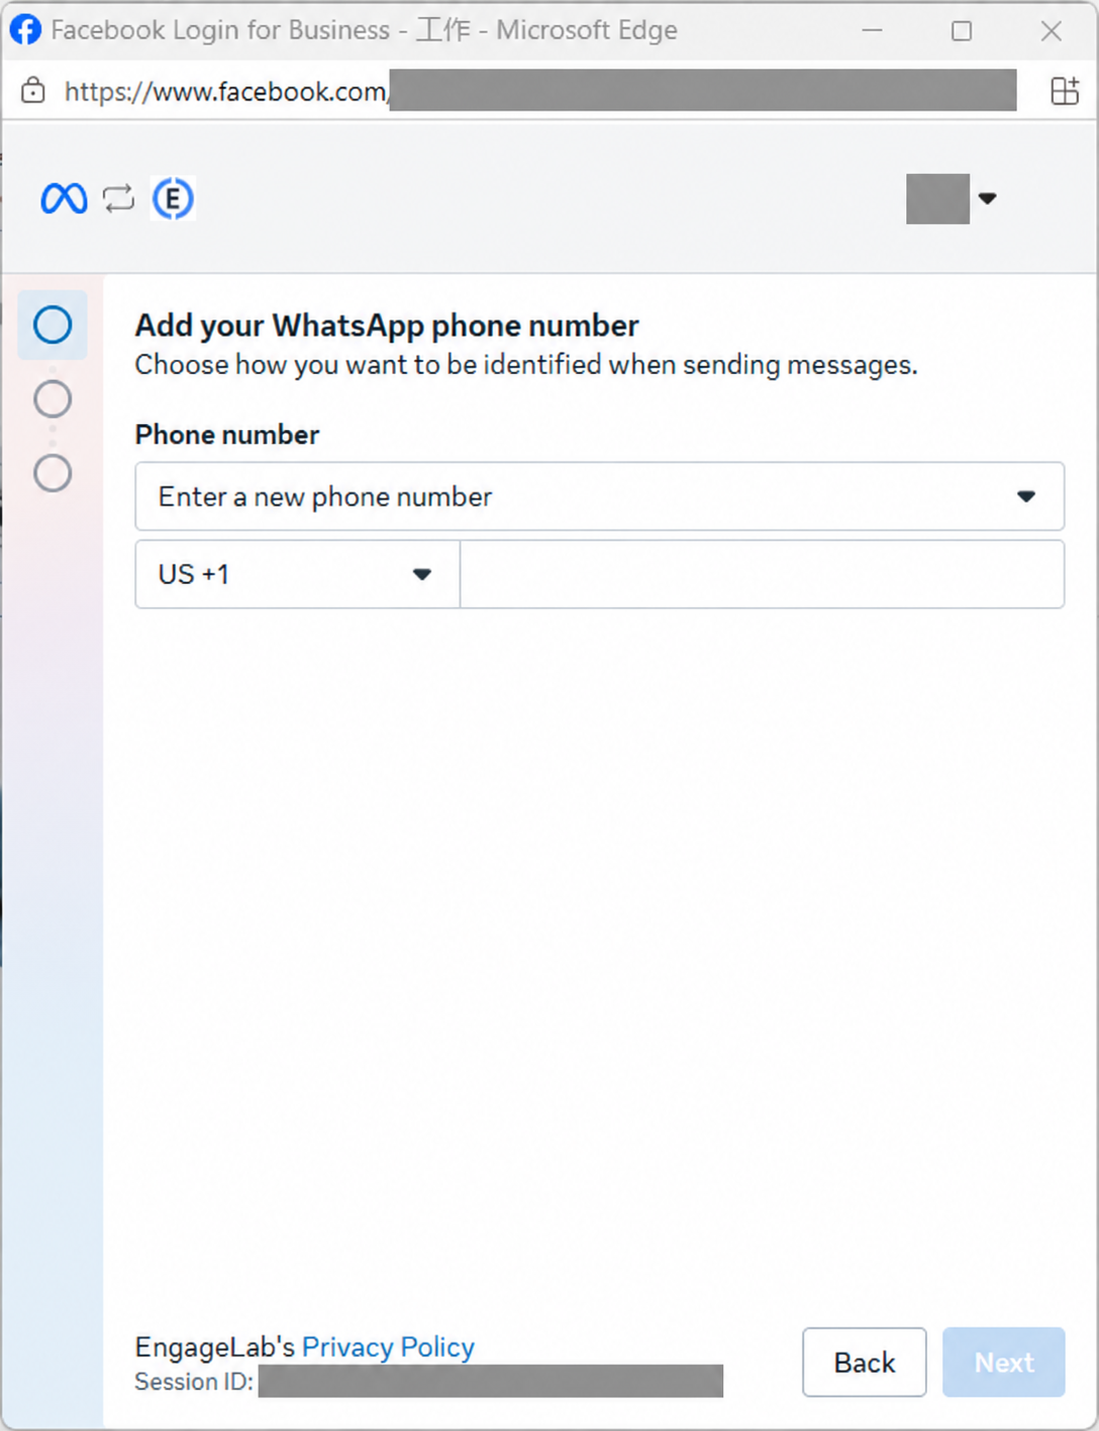
Follow the instructions on the page to verify the number. SMS and voice calls are supported. We recommend that you use voice calls. If multiple attempts still fail to receive:
- Quit registration and try again in a few days. Select an existing Meta business account, WhatsApp account, or business homepage (phone number), and try verification again.
- Quit registration - Select Add account on the Business account management page - Verify the number again on the Sending number management page.
Note:
- The phone number will be visible to users.
- Up to 25 phone numbers can be created under one WhatsApp Business account, and each number can be set with a different display name, profile, and URL information for users to view.
Create/select a Meta business account
On the business asset selection page, select an existing Meta business account or create one if you do not have one.
If you have already created a Meta business account, especially if it has already been authenticated as a merchant in the Meta Security Center, we recommend that you select it directly. If you have not yet created one, fill in the required information to create a new account.
Note:
- we recommend that you use the company email address instead of QQ email address.
- we recommend that you use a website address that can display your company's formal business, because it will be reviewed by Meta.
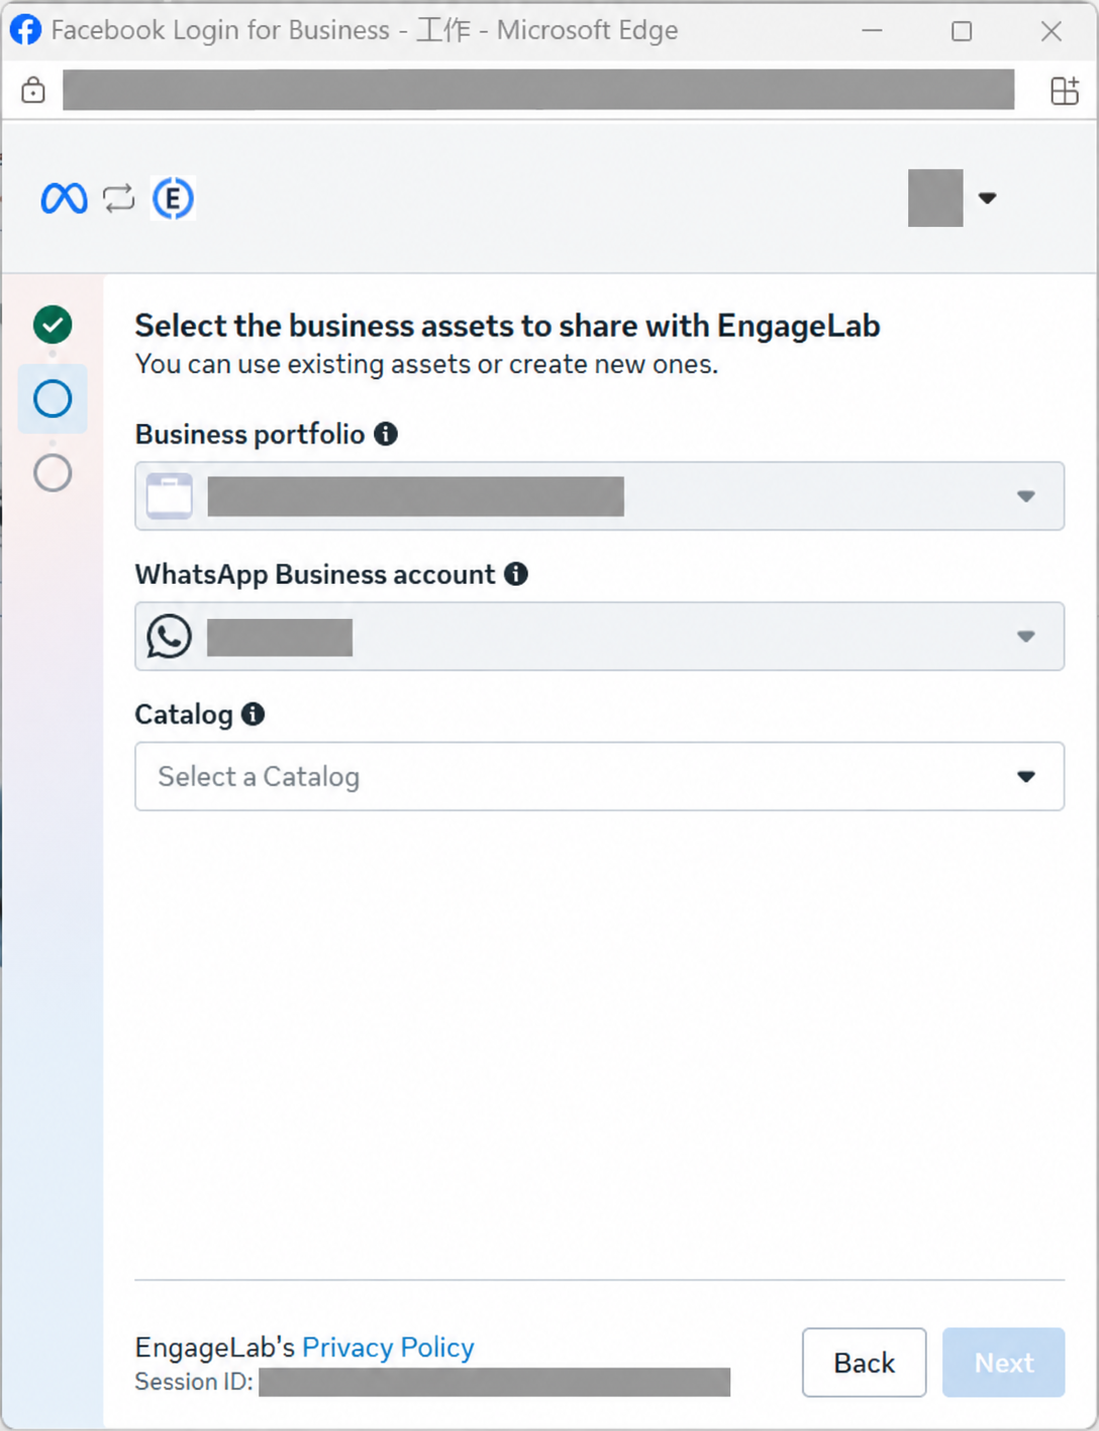
Create/select WhatsApp Business account
Select an existing WhatsApp Business account or create a new one. To add a new number to an existing account, select that account.
When creating an account, note the following:
- The account name will not be seen by your users.
- Business homepage display name (subject to naming convention), website, etc. will be seen by your users
- Please keep the time zone with the time zone of EngageLab organization and the time zone of your company location (user, business system), and information such as billing will be based on that time zone. It can be changed before the official launch.
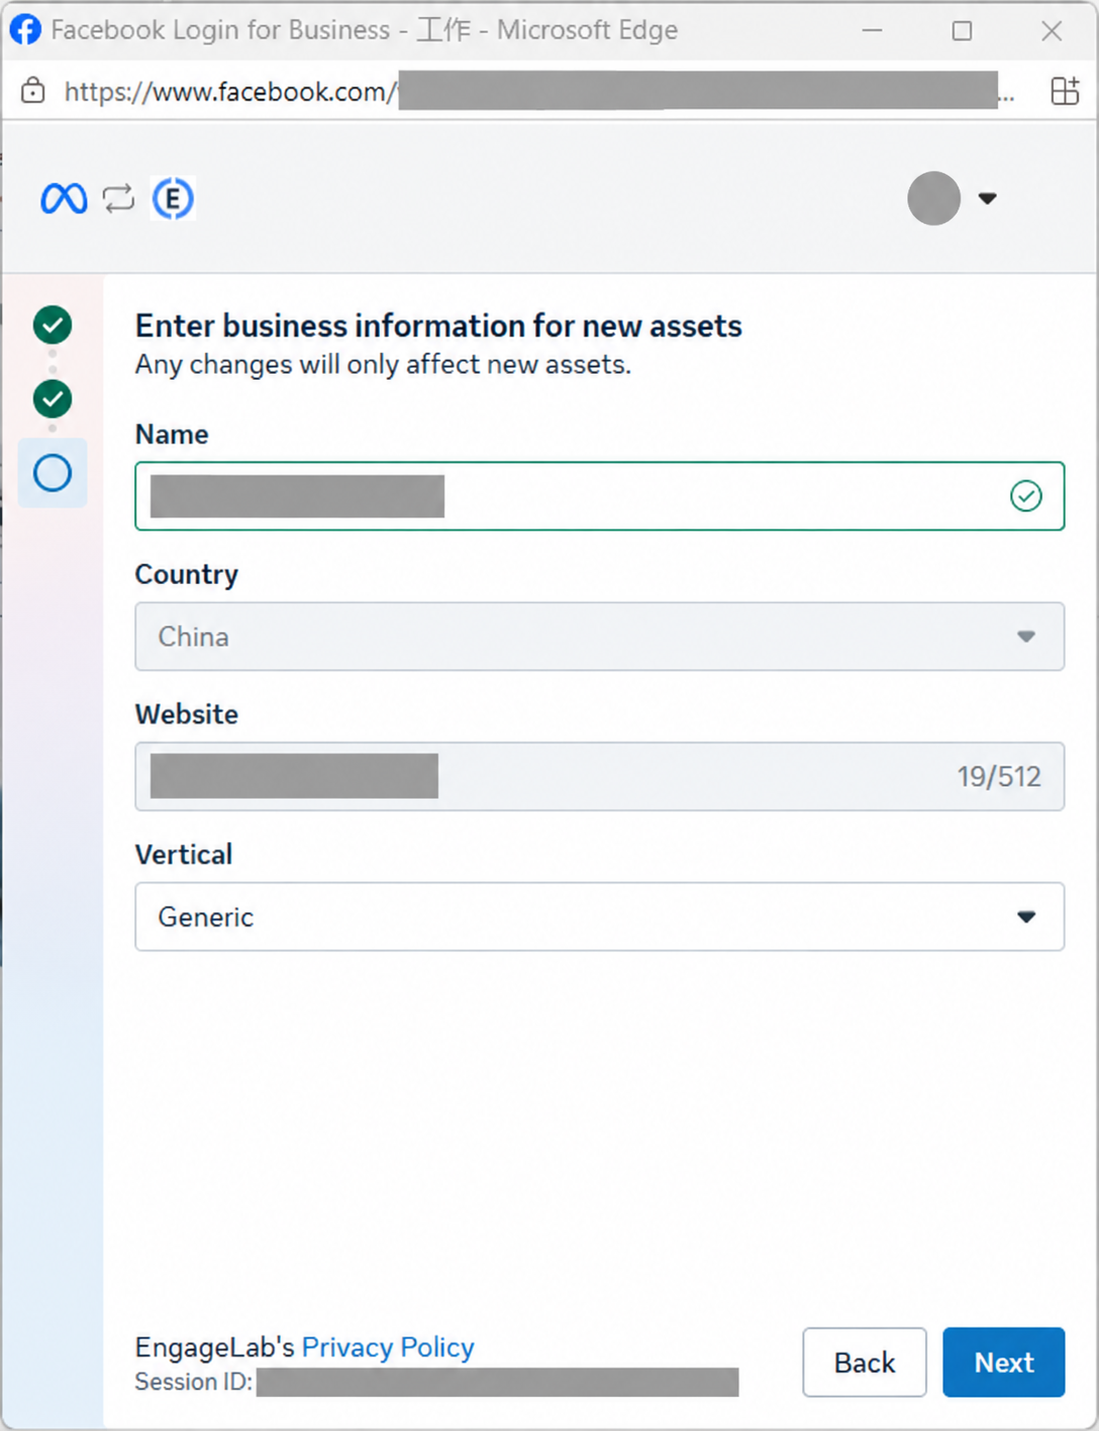
Enter business information
If the page requests business information, enter or check the company name, country or region, website, and industry. Changes here apply only to the new assets created during this registration.
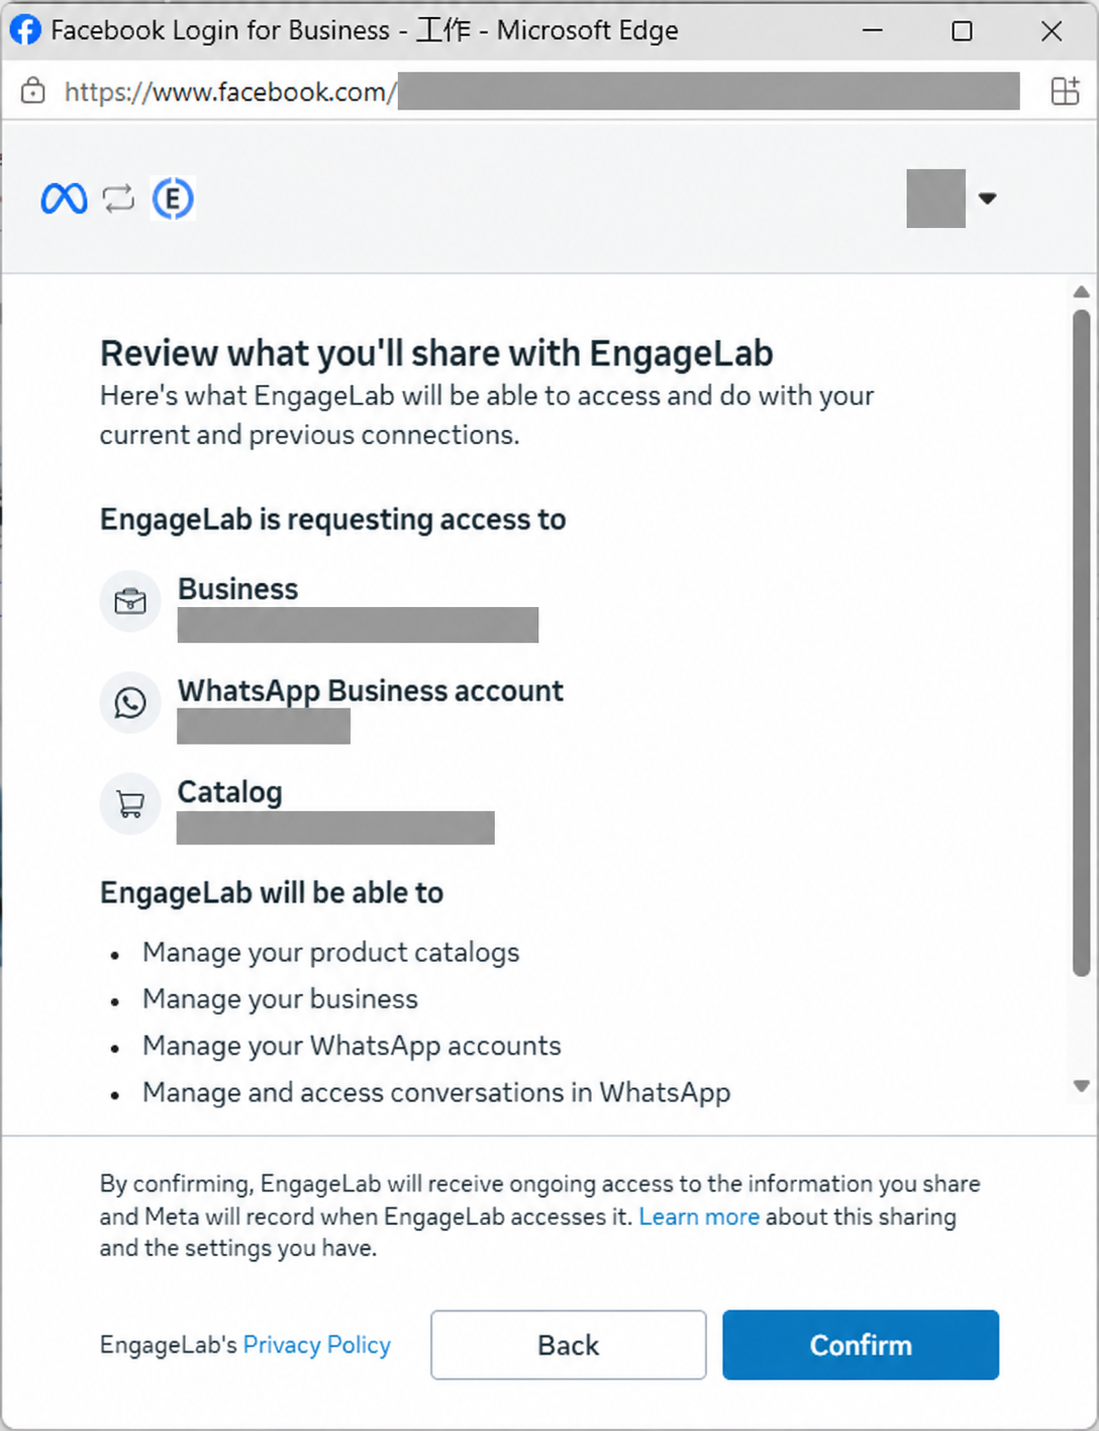
Confirm authorization
Review the business account, WhatsApp Business account, and other assets to be shared with EngageLab, along with the corresponding permissions, and complete the authorization.
After registration, you will automatically return to the Overview page. Business account and sending number registration are shown as complete, and the WhatsApp account you registered appears in the upper-left corner.
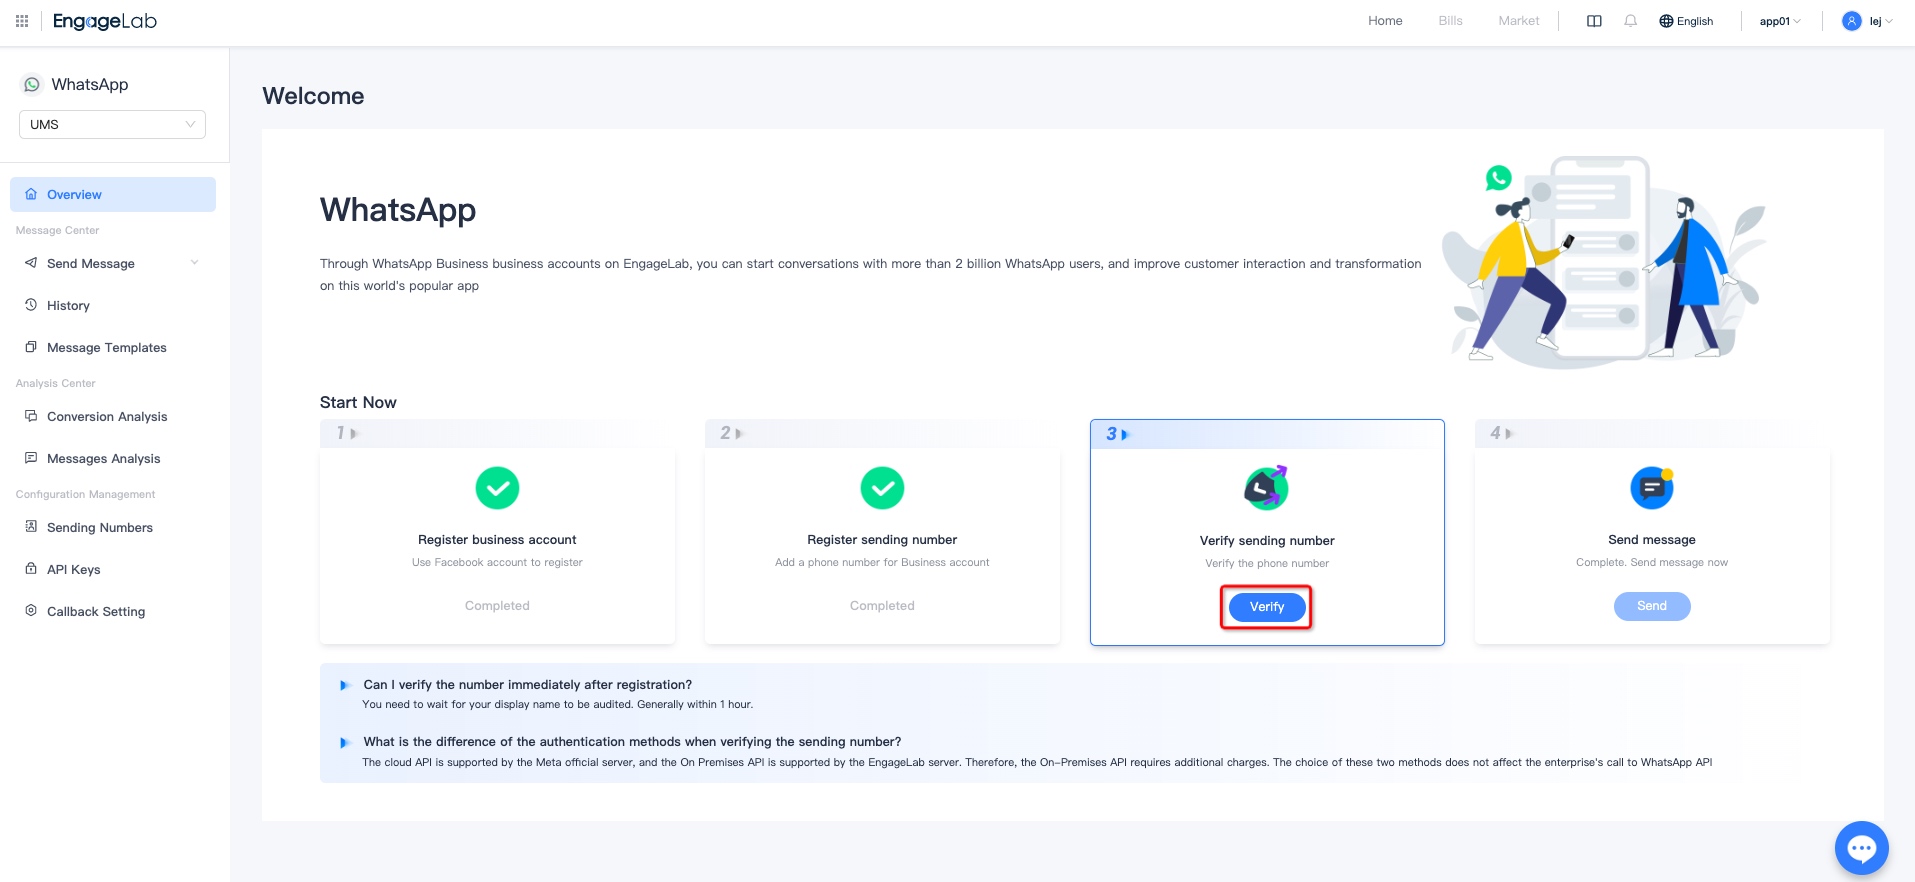
Verify sending number
Click "Verify sending number" in step 3 and you will be taken to the "Send Number Management" page. In this page, we need to verify the registered phone number in EngageLab once. See Sending Number Management to learn how to verify.
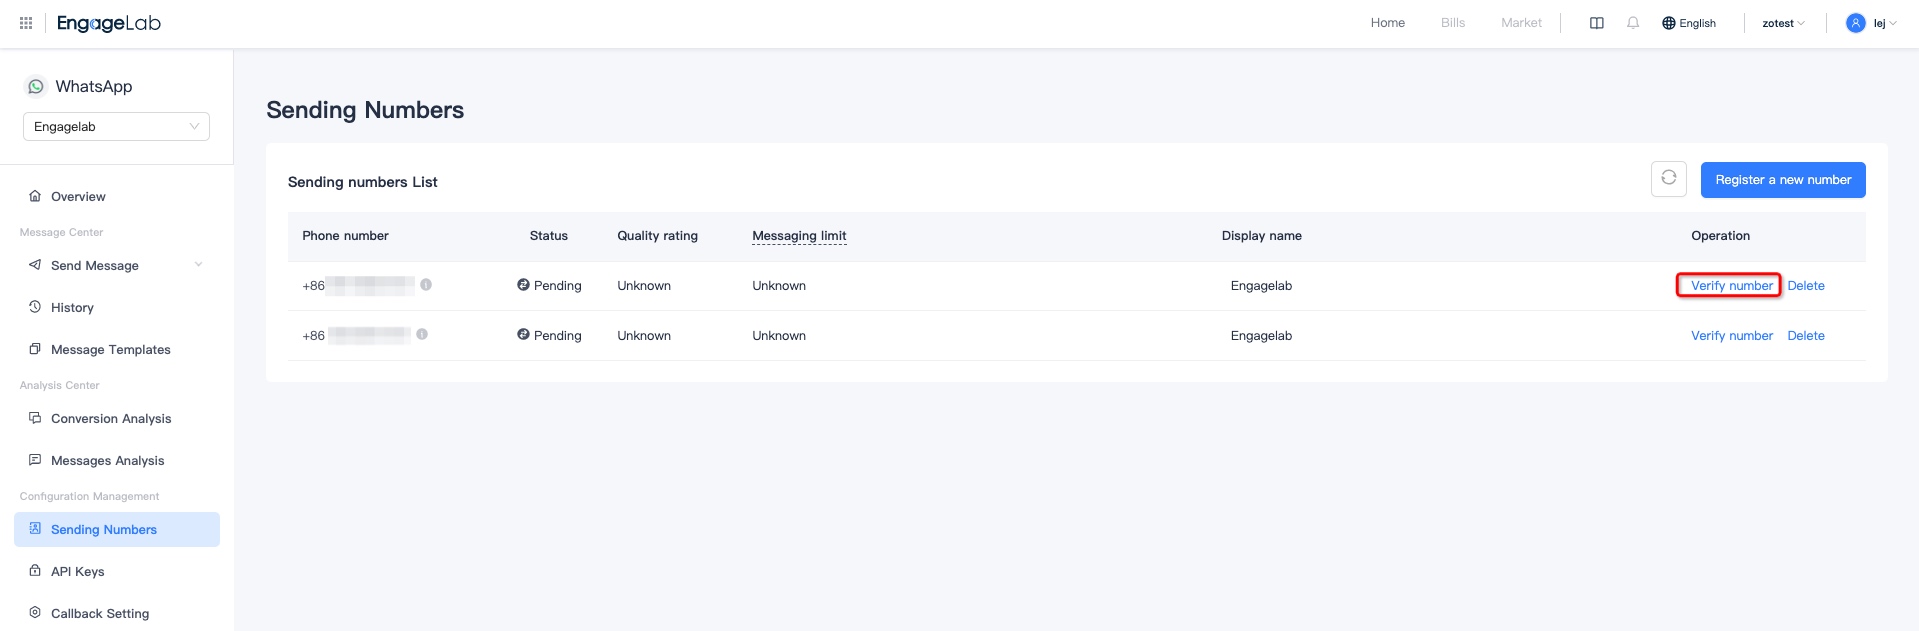
After the verification is passed, the running status changes to connected, and you can use the sending number to send messages.
Send messages
Now you can start sending messages, and the overview page will be updated from "Guidelines" to "Reports".
Click "Send Message" to go to the "Template Message" sending page, or you can switch to the "Session Chat" page to do so. Check the function description of message sending.

