Create Push
This article is intended to guide users through creating various push tasks in the EngageLab console, covering the full workflow for notification messages, custom messages, and in-app messages. The following sections introduce the creation steps, parameter configurations, and precautions for different message types to help you efficiently complete push task setup.
Create Notification Message
Go to [Push] - [Create Push] - [Notification Message] to create a push task. The parameter configuration instructions are as follows:
Basic Settings
- Notification Title: The title of the push message. Avoid meaningless content such as "test," "测试," or pure numbers whenever possible; otherwise, it may be blocked by vendors and the notification message may not be received.
- Notification Content: The content of the push message. Avoid meaningless content such as "test," "测试," or pure numbers whenever possible; otherwise, it may be blocked by vendors and the notification message may not be received.
- Supports adding push titles and push content in multiple languages. We automatically detect the end user's device language. If no other language is configured, content in the [Default] language will be sent to all target users.
- Supports one-click AI translation.

Target Audience: The EngageLab push platform supports multiple target audience selection methods, allowing developers and operations teams to precisely reach users based on different business needs. During testing, it is recommended to use the registration ID obtained from the registration logs for pushing.
- Broadcast to All: Push messages to all currently registered online users of the application and users who register online in the future.
- Registration ID: Specify up to 1,000 device IDs for pushing by manual entry or by uploading a TXT file.
- Set Tags: Filter target users for pushing based on device tags using multiple combinations such as union, intersection, and complement.
- Set Alias: Target push messages to specific user devices by entering or uploading aliases.
- User Segments: Divide users with the same attributes into groups through custom segmentation rules, and select target segments for targeted pushing.
Send Time: Select when to send the message.
- Immediate: Deliver the message immediately.
- Scheduled: Configure a scheduled send task based on organization time or end-user time.
- Recurring: Configure automatically recurring notifications within a specified time period.
- Smart: Each time a user accesses your service through a website or mobile app with the EngageLab SDK installed, we track the user's recent activity time. The system records this data and, based on the user's past usage habits, sends notifications to each user at an appropriate time according to the user's device time zone.
Rate-Limited Push: Complete delivery within the specified time to reduce server pressure.

Advanced Settings (Optional)
This section introduces the advanced settings for push messages. You can configure them flexibly according to business needs to improve push performance and user experience.
Push Plan Identifier
You can set a push plan to assign the same series of pushes under the same plan identifier, making subsequent statistics and performance analysis easier.Message Type
Supports selecting Operational Message or System Message. The platform will automatically adapt the message type for each vendor channel based on your selection.- System Message: Suitable for service scenarios and is usually not subject to vendor quota limits, such as important notifications about account changes or system maintenance.
- Operational Message: Suitable for marketing and operations scenarios and is usually subject to vendor push quota limits, commonly used for marketing campaigns and user re-engagement.
Offline Message Retention Duration
You can specify how long offline messages are retained. If the user is currently offline, the message will be saved as an offline message and pushed when the user comes online next time. If the user comes online within this duration, they will still receive the push; otherwise, it expires.- The default duration is 1 day.
- When set to 0, offline messages are not retained. Only users currently online can receive them, and offline users will not receive them.
Additional Fields
Supports setting custom parameters. The client can obtain the contents of these fields for custom event handling. You can add or delete additional parameters to meet diverse business needs.Silent Notification
When enabled, website users who receive a new notification can avoid default device behaviors such as vibration, sound, or screen wake-up, reducing user disturbance.Notification Delivery Strategy
You can choose different notification delivery methods:- System Channel Delivery: Does not depend on the user opening the site page. Notifications can be delivered as long as the browser exists in the operating system process.
- EngageLab Channel Delivery: Delivered through EngageLab's self-built WebSocket method and depends on the user having your site page open.
Notification Icon
Supports customizing the notification icon with real-time preview.- Recommended size: 192 × 192 px
- Maximum size: 1 MB
- Supported formats: JPG, PNG, GIF
- Compatible browsers: Chrome, Firefox, Opera, Edge
- The image link must be a web resource starting with
httporhttps
Notification Large Image
Supports customizing the notification large image with real-time preview.- Recommended size: 360 × 180 px
- Maximum size: 1 MB
- Supported formats: JPG, PNG, GIF
- Compatible platforms: Chrome, Opera, and Edge on Windows
- The image link must be a web resource starting with
httporhttps

Send Preview
The preview thumbnail is displayed on the right side of the page. After configuring the push parameters, click Send Preview to view the configured push parameters.

Confirm the send parameters, then click Confirm to successfully create the push task.

If there is no push target that meets the conditions, the following error will be returned:

Create Custom Message
Go to [Create Push] - [Custom Message] to create a push task. The parameter configuration instructions are as follows:

Basic Settings
- Notification Content: The content of the push message. Avoid meaningless content such as "test," "测试," or pure numbers whenever possible; otherwise, it may be blocked by vendors and the notification message may not be received.
- Supports adding push titles and push content in multiple languages. We automatically detect the end user's device language. If no other language is configured, content in the [Default] language will be sent to all target users.
- Supports one-click AI translation.
- Target Audience: Refer to Create Notification Message.
- Send Time: Refer to Create Notification Message.
Advanced Settings (Optional)
This section introduces the advanced settings for push messages. You can configure them flexibly according to business needs to improve push performance and user experience.
Push Plan Identifier
You can set a push plan to assign the same series of pushes under the same plan identifier, making subsequent statistics and performance analysis easier.Message Type
Supports selecting Operational Message or System Message. The platform will automatically adapt the message type for each vendor channel based on your selection.- System Message: Suitable for service scenarios and is usually not subject to vendor quota limits.
- Operational Message: Suitable for marketing and operations scenarios and is usually subject to vendor push quota limits.
Offline Message Retention Duration
You can specify how long offline messages are retained. If the user is currently offline, the message will be saved as an offline message and pushed when the user comes online next time. If the user comes online within this duration, they will still receive the push; otherwise, it expires.- The default duration is 1 day.
- When set to 0, offline messages are not retained. Only users currently online can receive them, and offline users will not receive them.
Additional Fields
Supports setting custom parameters. The client can obtain the contents of these fields for custom event handling. You can add or delete additional parameters to meet diverse business needs.

In-App Message
Go to [Push] - [Create Push] - [In-App Message] to create a push task. The parameter configuration instructions are as follows:
Basic Settings
- Message Name: Required and limited to 20 characters.
- Delivery Platform: Only Web is supported.
- Target Users: The EngageLab push platform supports multiple target audience selection methods, allowing developers and operations teams to precisely reach users based on different business needs. During testing, it is recommended to use the registration ID obtained from the registration logs for pushing.
- Broadcast to All: Push messages to all currently registered online users of the application and users who register online in the future.
- Registration ID: Specify up to 1,000 device IDs for pushing by manual entry or by uploading a TXT file.
- Set Tags: Filter target users for pushing based on device tags using multiple combinations such as union, intersection, and complement.
- Set Alias: Target push messages to specific user devices by entering or uploading aliases.
- User Segments: Divide users with the same attributes into groups through custom segmentation rules, and select target segments for targeted pushing.

Message Content
Image and Text Settings
Content: Enter text content and configure the title (optional) and body.
- Add Language: Supports adding push titles and push content in multiple languages. We automatically detect the end user's device language. If no other language is configured, content in the [Default] language will be sent to all target users.

- Font Settings:
The message title and content editing area supports basic rich-text formatting, including bold (B), italic (T), alignment (≡), font size (A), and underline (U).

Image: Enter a web image URL and choose the action when the image is clicked.

- Click Settings: You can choose to open a URL when clicked, or set no action. Common uses of URL links include:
- Use a web link or deep link: Guide users to an external page or a specific page in your application.
- Use push guidance: If the user previously denied permission in the native prompt, clicking will open the device settings for your application. (This in-app message will not be shown to users who have already allowed notifications.)
Either Content or Image must be selected. Based on these two content forms, a total of three message content types can be created. The following is a preview of how to configure each type:
Type 1: Text Content

Type 2: Image Content

- Click Load to check whether the image is available. If it is unavailable, the system will prompt you to replace the image URL.
- In Click Settings, choose whether clicking the image should redirect to a URL. If a redirect is needed, enter the web page link to open. If no redirect is needed, select No Action.
- After setting the redirect URL, you can click the image in the preview thumbnail to test the redirect behavior.
Type 3: Image and Text Content

- As shown, it contains both image and text content.
Button Settings
For demonstration purposes, the example images in button settings retain the Image and Text Content example from the Message Content section. Please focus on the changes in button settings based on that example.
Primary Button:
- Primary Button Text: You can configure the primary button text, whether it is bold, font size, font color (custom color values supported), and button color (custom color values supported).

- Click Settings: Configure whether clicking the primary button redirects to a specified URL. If a redirect is needed, enter the web page link to open. If no redirect is needed, select No Action.

Secondary Button:
- Optional to enable a secondary button.
- Secondary Button Text: Same as the primary button.
- Click Settings: Same as the primary button.

Close Button:
- You can choose the position of the close button in the pop-up (top right or bottom center).

One of the button settings must be selected. A total of three button function types can be created. The following is a preview of how to configure each type:
Type 1: Only button actions are configured, without a close button.

(If you are sending marketing promotions or advertisements, please ensure the page has a prominent one-click close function.)
Type 2: Only a close button is configured, without button actions.

Type 3: Both close button and button actions are configured.

HTML Editing
On the right side of the message content area, you can freely switch between Template Editing and HTML Editing modes through the drop-down menu. Template Editing is suitable for visual content configuration, while HTML Editing allows you to directly write and adjust the message HTML source code to meet more complex content and styling needs.

- Real-Time Preview: In HTML editing mode, click the Go to Preview button to view the rendered effect of the current HTML content in real time on the right side, helping you quickly verify and adjust message styles. The following figure shows the system's default example:

- Applicable Scenarios: HTML editing is suitable for users with front-end development experience who want to create highly customized message displays. If you only need regular content pushing, it is recommended to prioritize Template Editing mode.
Send Timing
- Send Immediately: Deliver the message immediately.
- Scheduled Send: Configure a scheduled send task based on organization time or end-user time.
- Rate-Limited Push: Complete delivery within the specified time to reduce server pressure.
New Page Preview
While editing message content, the preview panel on the right displays the message pop-up effect in real time.

If you click Open New Page Preview, it will open a new page displaying the currently configured web page pop-up effect. On the new page, you can click buttons configured with URL redirection to test the redirect action.

Advanced Settings
This section introduces the advanced settings for in-app message push. You can configure them flexibly according to actual operational needs to improve message reach and user experience.
Push Plan Identifier
You can set a push plan to assign the same series of pushes under the same plan identifier, making subsequent statistics and performance analysis easier.Delayed Pop-up
Supports selecting the timing of the message pop-up, which can be configured as immediate pop-up or delayed pop-up.- On the same page, the priority order of different types of in-app messages is: Fullscreen > Interstitial > Banner > In-App Reminder Message.
- Interstitial and fullscreen messages on the same page cannot be triggered multiple times; only the most recent one is displayed.
- Multiple banner messages can be displayed on the same page.
Disappearance Timing
Controls the automatic disappearance time of the message pop-up.- Banner messages are displayed for 5 seconds by default; interstitial and HTML messages are displayed for 30 seconds by default, with support for custom settings from 5 to 180 seconds.
- If a fullscreen message has a skip button and skip time configured, it is not controlled by this setting.
Message Display Validity Period
Set the offline validity period for the message.- If the user is currently offline, the message will be saved as an offline message and pushed when the user comes online next time.
- For messages already delivered to the app, if the end user never enters the specified page, the message will not be displayed if they enter the page after the display validity period has expired.
- The message will only be displayed normally if the user comes online and enters the display page within the validity period.
Additional Fields
Supports setting custom parameters. The client can obtain the contents of these fields for custom event handling. You can add or delete additional parameters to meet diverse business needs.
Send Preview
The preview thumbnail is displayed on the right side of the page. After configuring the push parameters, click Send Preview to view the configured push parameters.

Confirm the send parameters, then click Confirm to successfully create the push task. If there is no push target that meets the conditions, the following error will be returned:

If you have additional needs or encounter any issues, please contact EngageLab technical support.
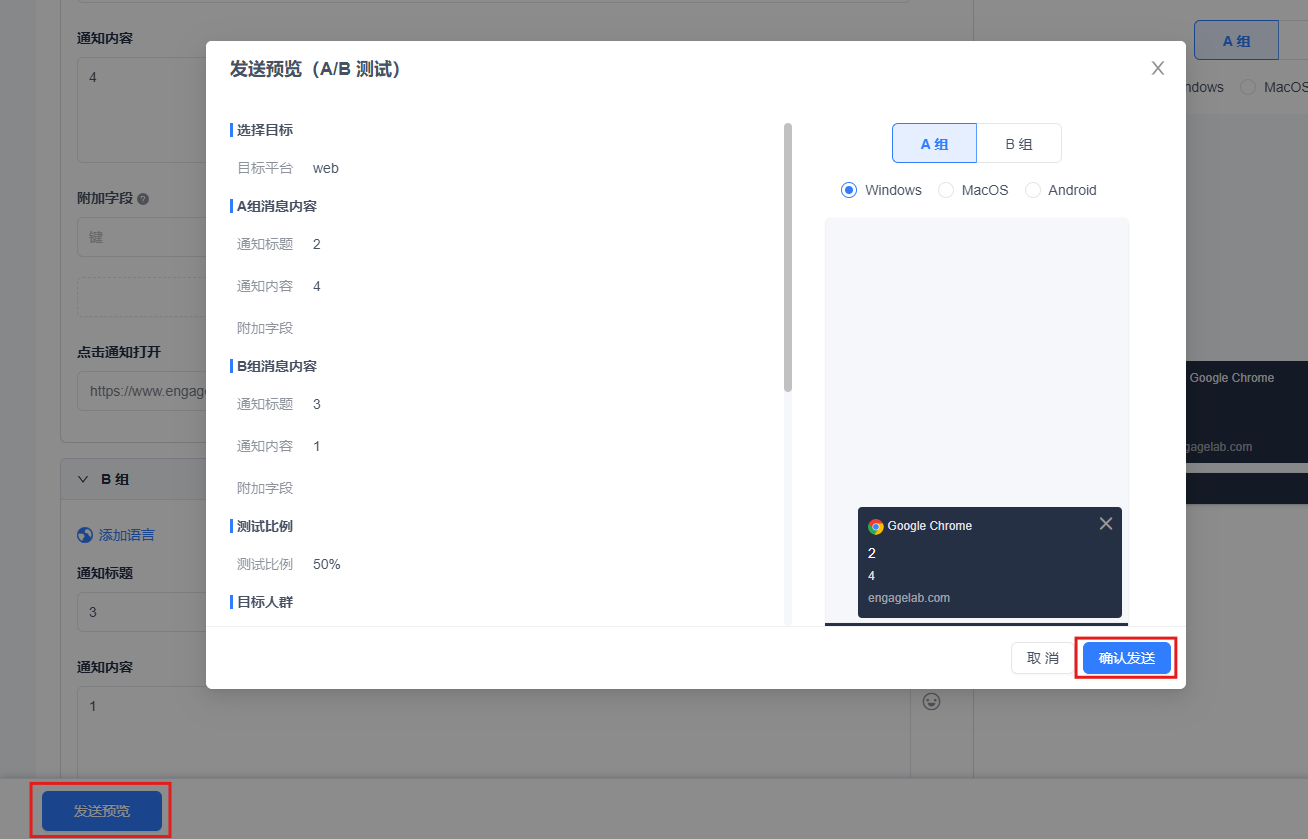
A/B Testing
Go to [Create Push] - [A/B Testing] to create a push task. The parameter configuration instructions are as follows:
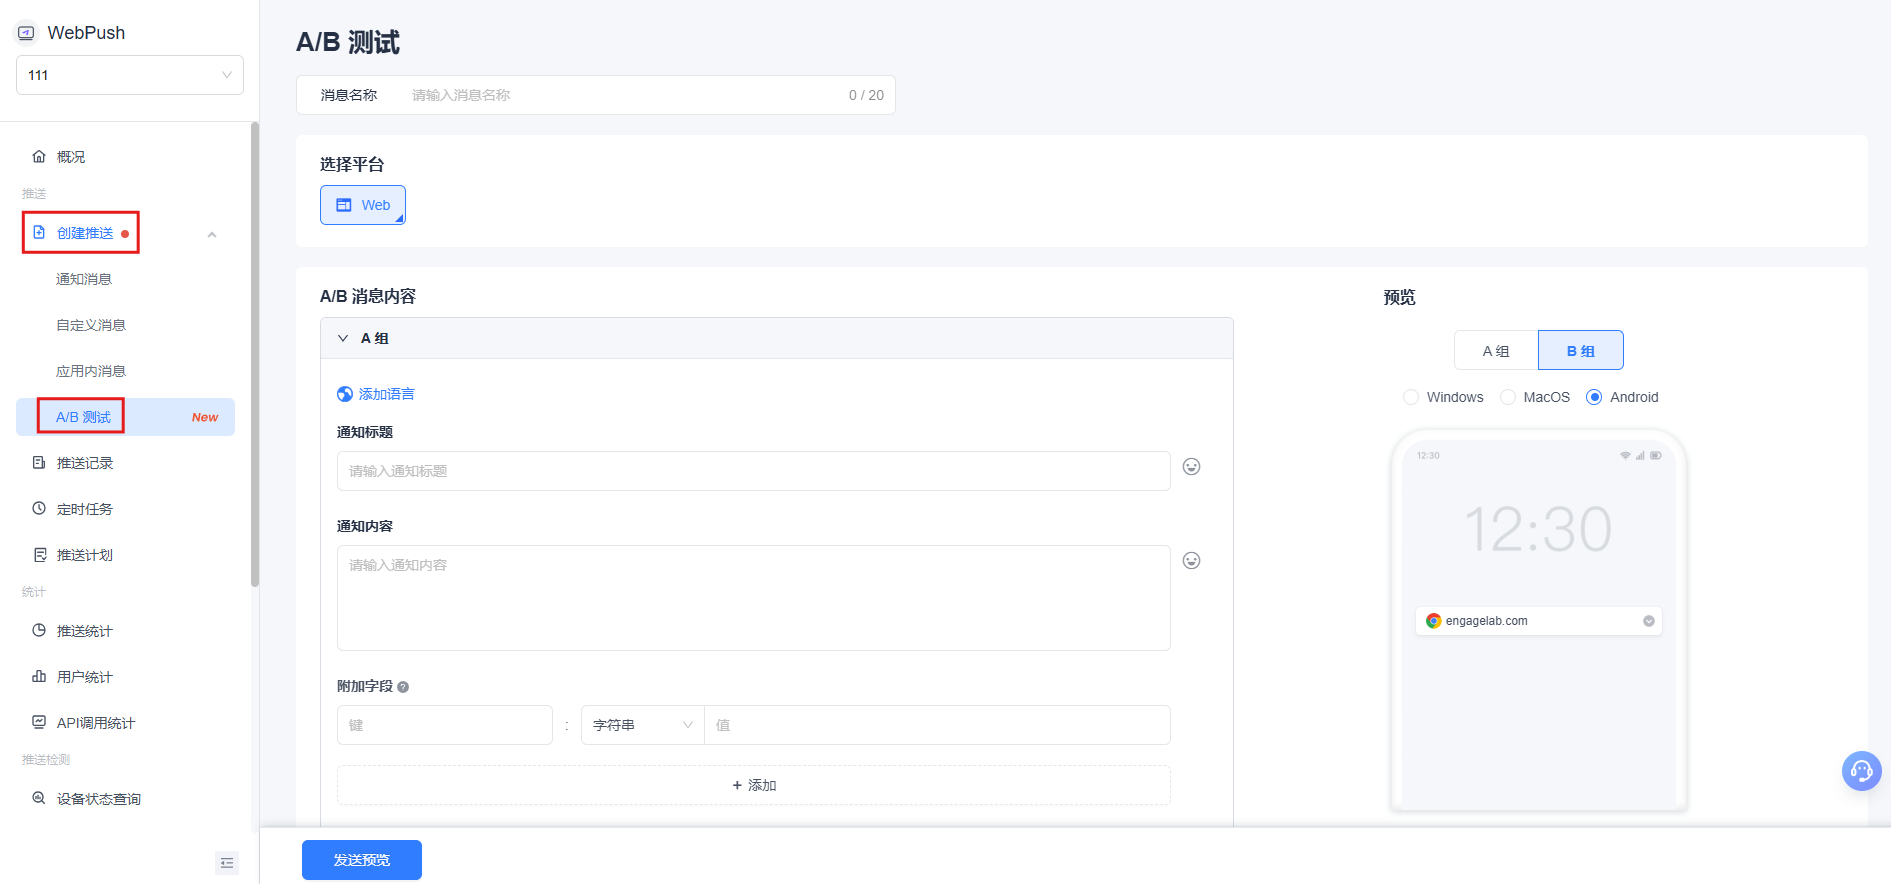
- Message Name: Customize the message name for this A/B test for easier subsequent management and retrieval.
- Select Platform: Currently supports Web push.
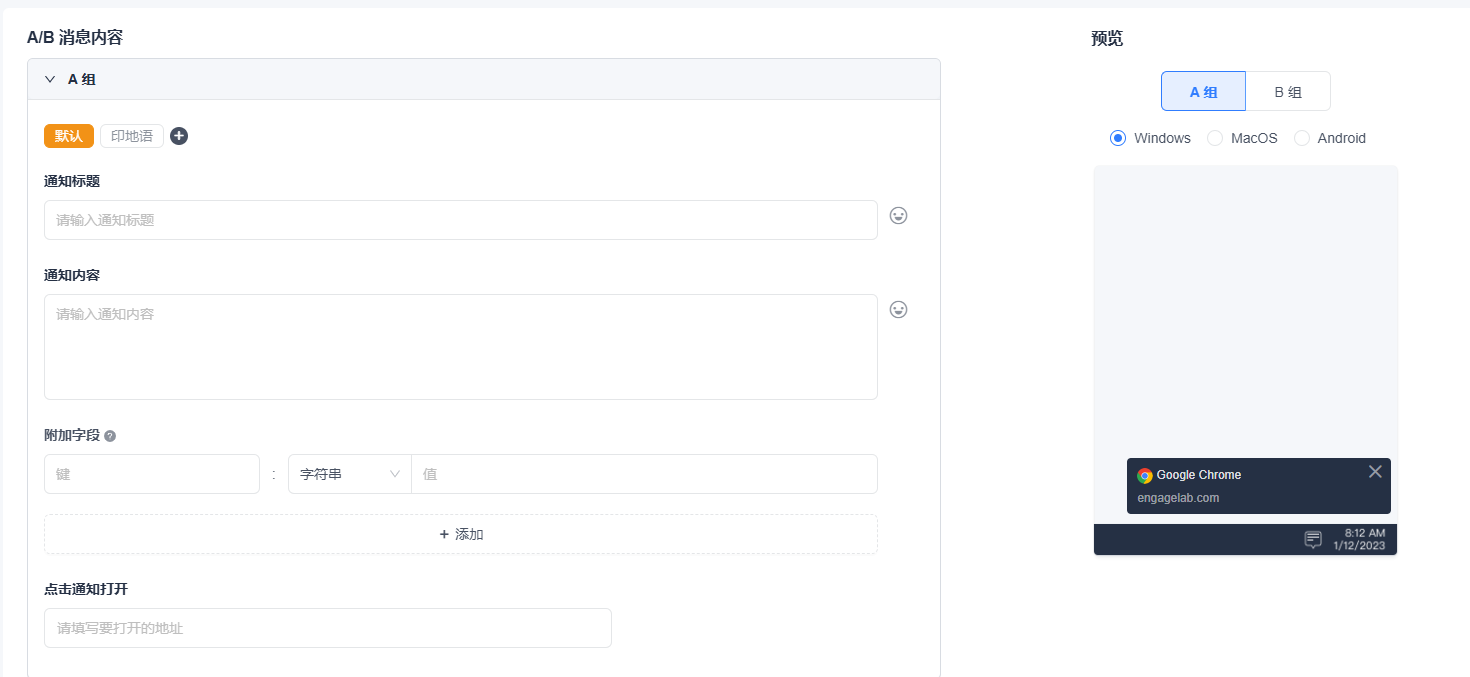
A/B Group Message Content Configuration
The message content configuration for A/B groups is the same as Notification Message, supporting settings such as multiple languages, notification title, subtitle, content, additional fields, click behavior, and advanced styles.
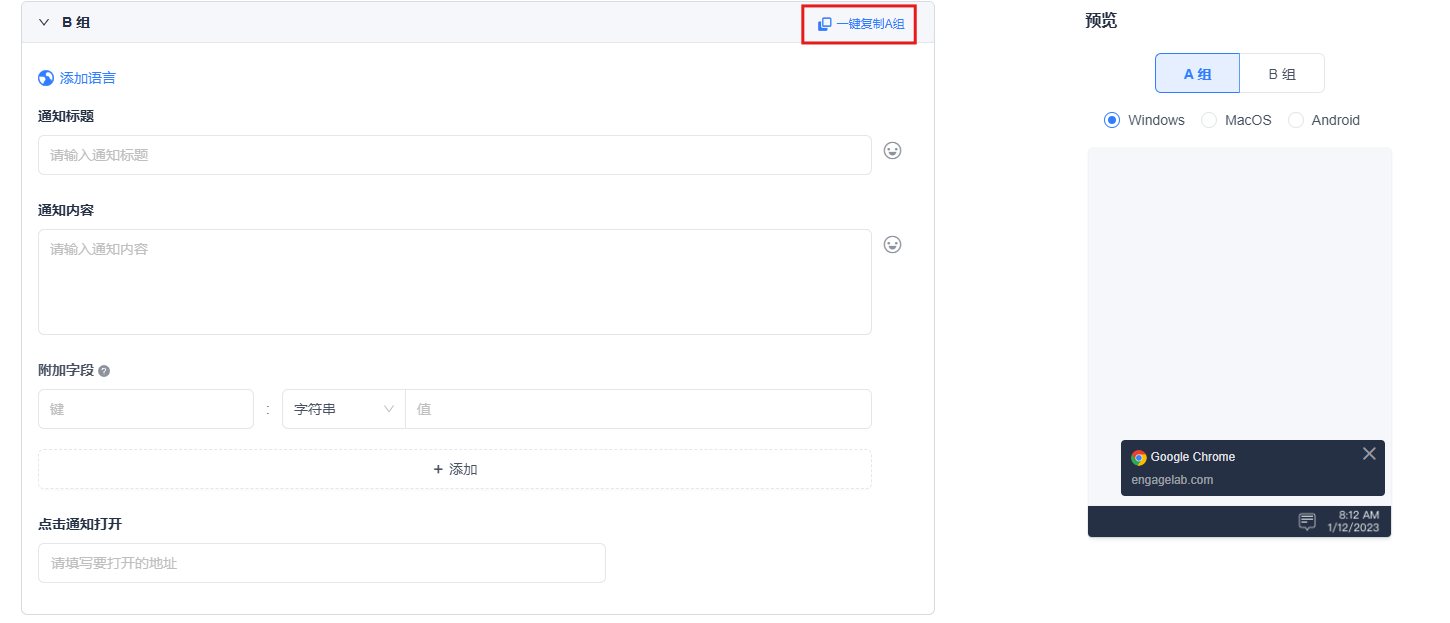
Group B supports one-click copying of all configurations from Group A, making it easy to quickly build control-group content.
Group B supports one-click copying of Group A settings. You can use one-click copy and then make modifications based on Group A.
Target Audience
The EngageLab push platform supports multiple target audience selection methods, allowing developers and operations teams to precisely reach users based on different business needs. During testing, it is recommended to use the registration ID obtained from the registration logs for pushing. For specific configuration details, refer to Notification Message.
A/B Test Settings
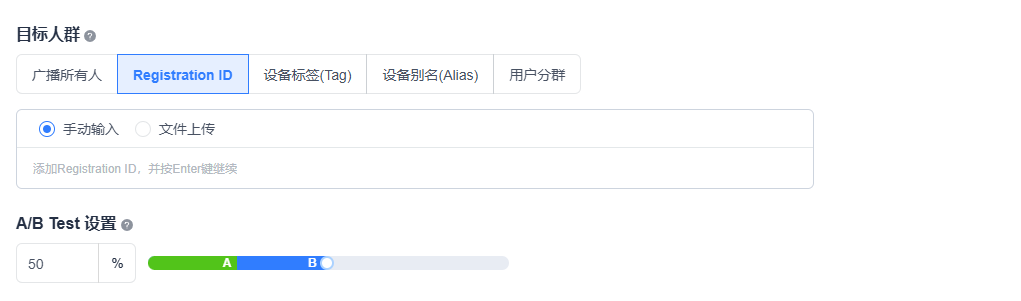
Among users who simultaneously meet the target audience conditions and platform conditions (Windows/macOS/Android), set the percentage of users participating in the A/B test.
The user ratio for Groups A and B participating in the test is equal. For example, if the user ratio is 40%, then the user ratio for Groups A and B is 20% each.
The final calculated number of users is rounded down to an integer. If the target number of users participating in the A/B test is fewer than 2, the push will fail.
Send Time and Advanced Settings
The send time and advanced settings for A/B group pushes are the same as those for Notification Message. For detailed configuration instructions, refer to Notification Message.
Send Preview
After completing all configurations, click the Send Preview button at the bottom of the page to first view the actual display effect of the current notification template. After confirming that everything is correct, click Confirm Send to send the push message to the test audience.
After the message is sent, you can view the detailed performance analysis of this A/B test on the Push Records page.