Compatibilidad de capacidad de entrega, visualización y clic en canales del proveedor
Para ayudar a los clientes a realizar el seguimiento y el análisis del rendimiento del push, y a mejorar, optimizar y perfeccionar continuamente las estrategias de push, Engagelab proporciona funciones de estadísticas y visualización de datos para las etapas de entrega, visualización y clic de los canales del proveedor. Sin embargo, los distintos canales del proveedor presentan diferentes niveles de compatibilidad con los acuses de recibo de datos de entrega, visualización y clic. Los datos de entrega de los canales del proveedor de Huawei, Meizu y Honor no se pueden obtener directamente y requieren que los desarrolladores realicen las configuraciones correspondientes para poder acceder a ellos.
Tabla comparativa de compatibilidad de capacidades
| Canal del proveedor | Entrega compatible | Visualización compatible | Clic compatible | Requiere configuración |
|---|---|---|---|---|
| Canal Huawei | Sí | No | No | Sí |
| Canal Meizu | Sí | No | Sí | Sí |
| Canal Honor | Sí | No | No | Sí |
| Canal Xiaomi | Sí | Sí | Sí | No |
| Canal OPPO | Sí | No | No | No |
| Canal vivo (acuse antiguo) | Sí | No | No | No |
| Canal vivo (acuse nuevo) | Sí | Sí | No | Sí |
| Canal FCM | Sí | No | No | No |
Guía de configuración del acuse de recibo de entrega del canal Huawei
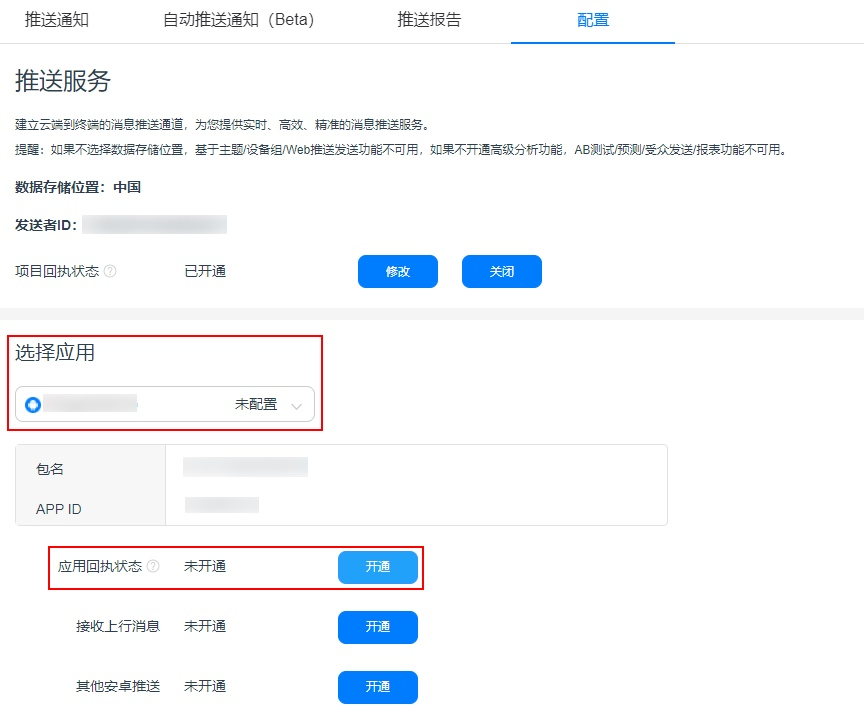
Tras completar la integración del SDK del canal del proveedor de Huawei, los desarrolladores deben habilitar y configurar los acuses de recibo de mensajes en la plataforma Huawei Open Platform para devolver mediante callback a la plataforma de Engagelab las estadísticas de entrega de Huawei y otros datos. Los pasos específicos son los siguientes:
Iniciar sesión en el sitio web de Huawei AppGallery Connect.
Hacer clic en “My Projects”, localizar su proyecto en la lista de proyectos y acceder a la pestaña “Configuration” mediante “Growth > Push Service > Configuration”.
En esta página, se puede elegir configurar acuses de recibo a nivel de proyecto o a nivel de aplicación. Se debe tener en cuenta que la URL de recepción de mensajes del acuse de recibo a nivel de proyecto se aplica a todas las aplicaciones del proyecto. Si se configuran tanto la dirección de acuse de recibo a nivel de proyecto como la de nivel de aplicación, la información de la dirección de acuse de recibo a nivel de aplicación tiene prioridad.
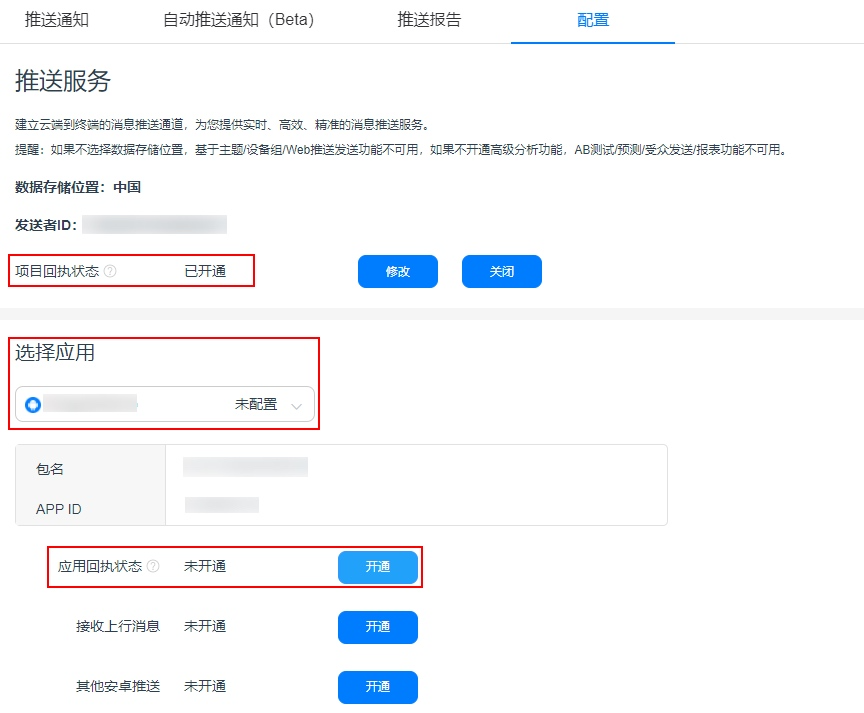
Tomando como ejemplo los acuses de recibo a nivel de aplicación, seleccionar la aplicación para la que se van a configurar los acuses de recibo y hacer clic en “Enable” en el estado de acuse de recibo de la aplicación.
Introducir la configuración de parámetros del acuse de recibo y hacer clic en “Create New Receipt”.
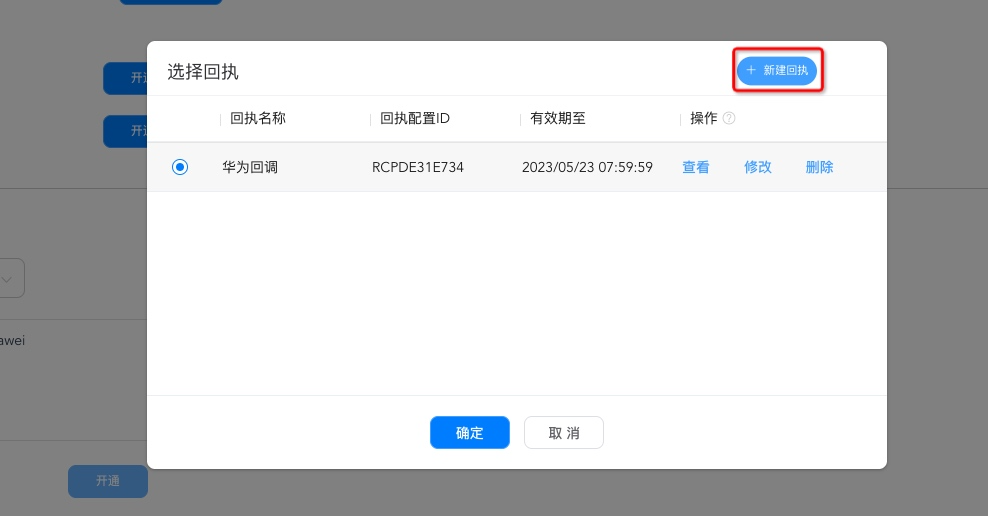
Tras hacer clic en “Create New Receipt”, configurar los siguientes parámetros:
- Receipt Name: Introducir un nombre personalizado.
- Callback Address (seleccionar según el centro de datos en el que se encuentre la aplicación):
https://pushcb-sgp.engagelab.com/callback/hwhttps://pushcb-hk.engagelab.com/callback/hwhttps://pushcb-usva.engagelab.com/callback/hwhttps://pushcb-defra.engagelab.com/callback/hwhttps://pushcb-jpn.engagelab.com/callback/hwhttps://pushcb-bra.engagelab.com/callback/hw
- Supported Versions: Engagelab es compatible con tanto las versiones Huawei V1 como V2. Huawei recomienda oficialmente la versión V2 y se recomienda a los desarrolladores configurar la versión V2 en función de la información proporcionada.
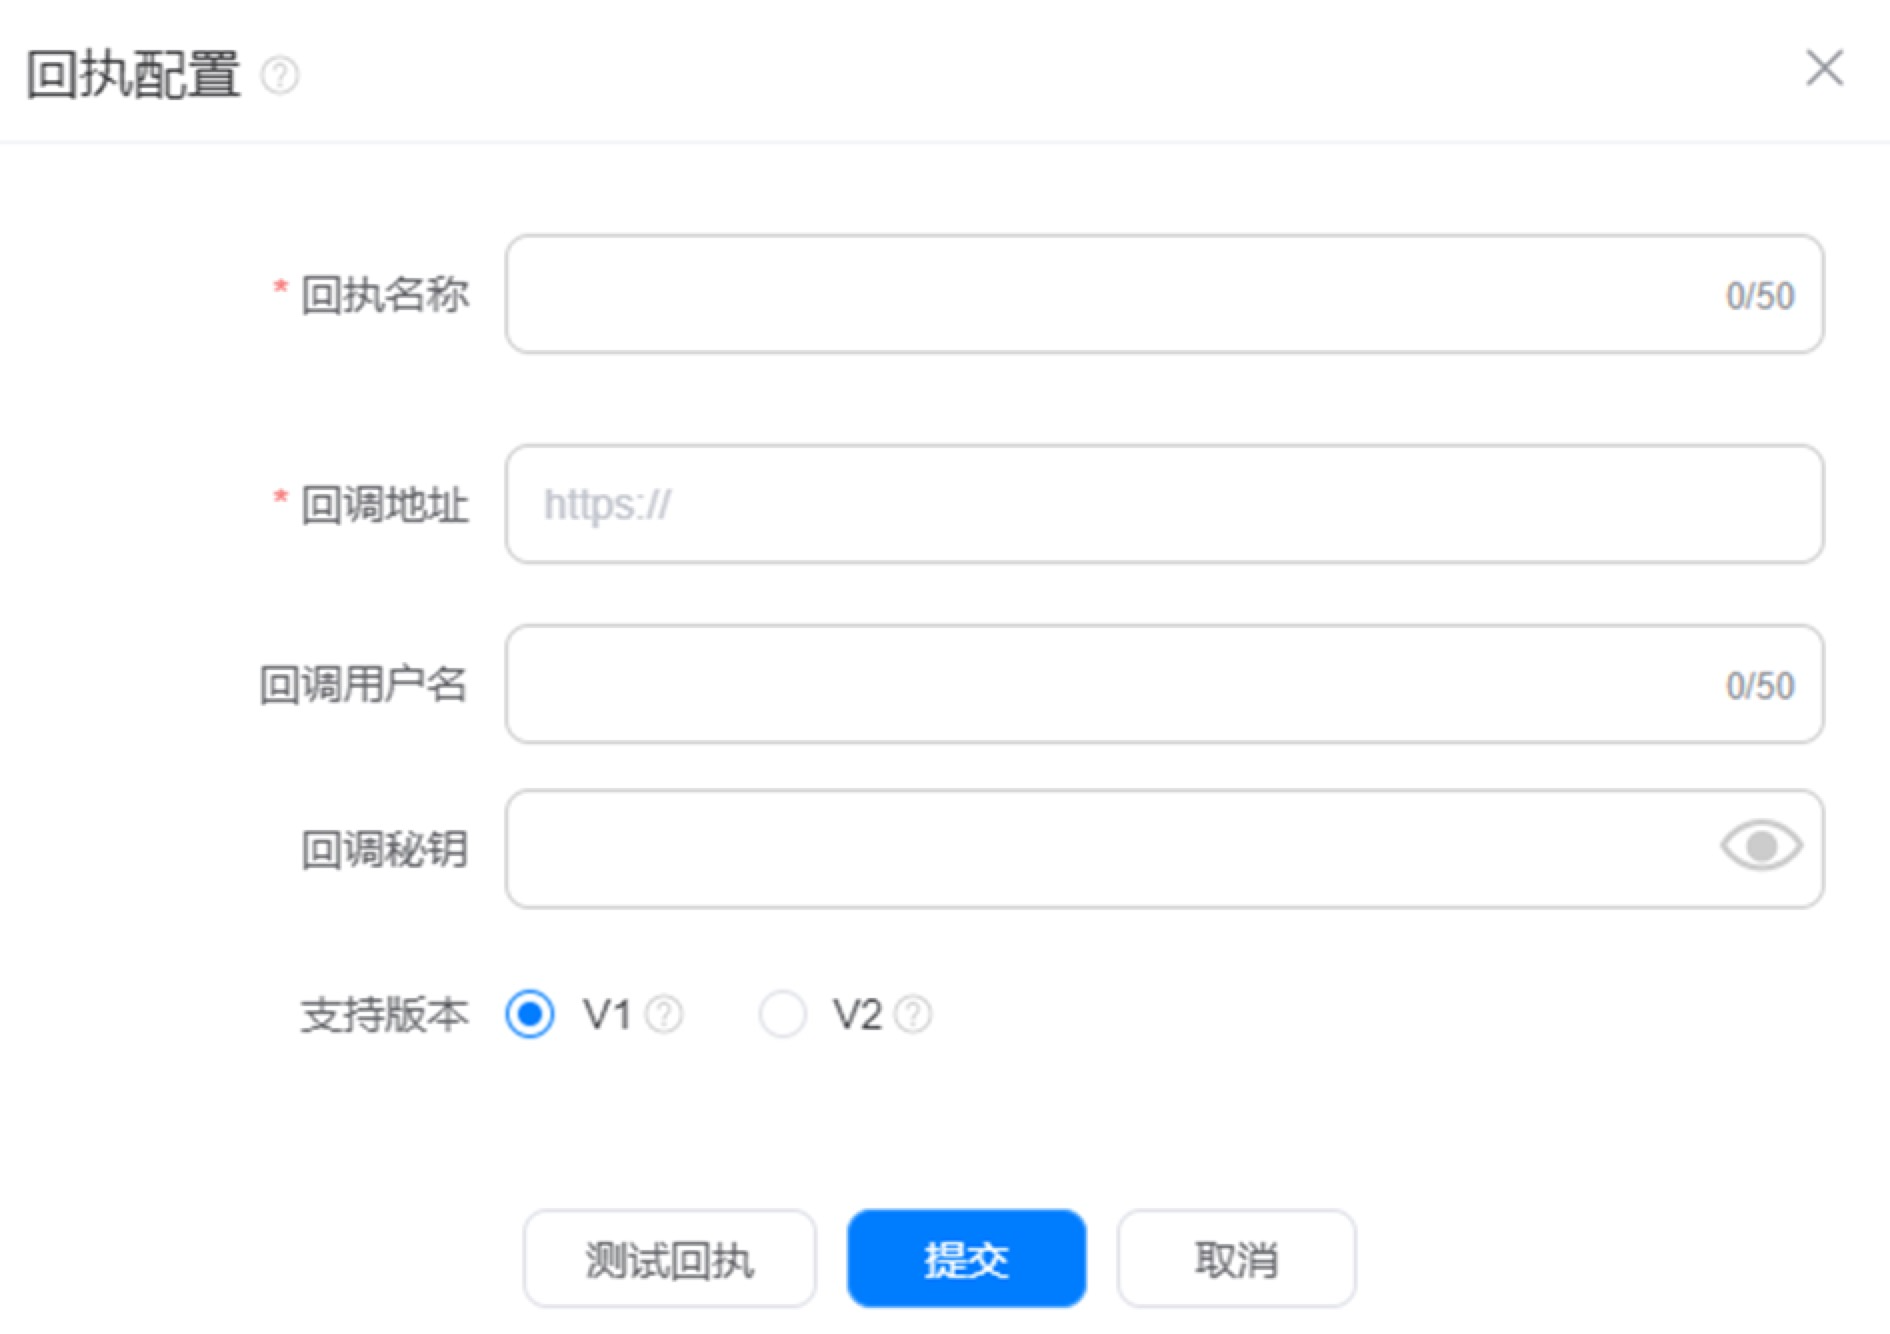
Hacer clic en “Test Receipt” para probar la funcionalidad de la dirección de acuse de recibo y hacer clic en “Submit” para completar la creación del acuse de recibo.
Guía de configuración del acuse de recibo de entrega del canal Meizu
Tras completar la integración del SDK del canal del proveedor de Meizu, los desarrolladores deben habilitar y configurar los acuses de recibo de mensajes en la plataforma Flyme Push Platform para devolver mediante callback a la plataforma de Engagelab las estadísticas de entrega de Meizu y otros datos. Los pasos específicos son los siguientes:
Iniciar sesión en Meizu Flyme Push Platform, seleccionar la aplicación para la que se desea habilitar los servicios push y hacer clic para abrir la aplicación.
En la página, seleccionar “Open Application > Configuration Management > Receipt Management” para acceder a la página de gestión de acuses de recibo.
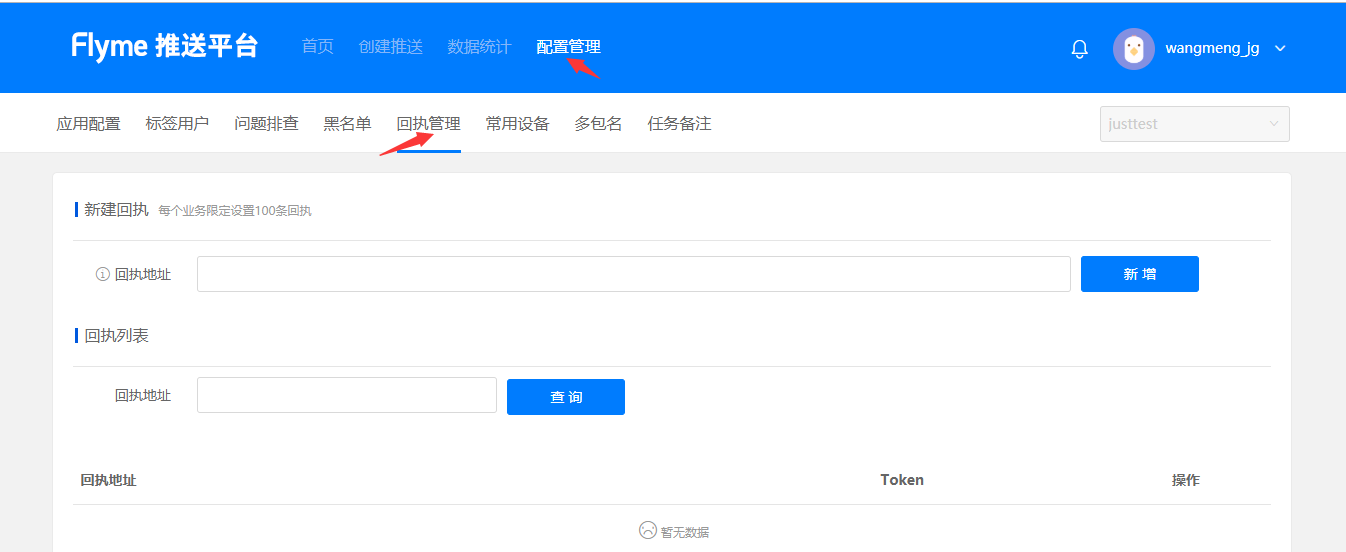
Rellenar la dirección de callback (seleccionar según el centro de datos en el que se encuentre la aplicación):
https://pushcb-sgp.engagelab.com/callback/mzhttps://pushcb-hk.engagelab.com/callback/mzhttps://pushcb-usva.engagelab.com/callback/mzhttps://pushcb-defra.engagelab.com/callback/mzhttps://pushcb-jpn.engagelab.com/callback/mzhttps://pushcb-bra.engagelab.com/callback/mz
Activar el acuse de recibo: Tras completar los pasos anteriores, ponerse en contacto con el soporte técnico de Engagelab por correo electrónico en
support@engagelab.compara activar la función de acuse de recibo.- Nota: Para activar los acuses de recibo de Meizu, primero se debe configurar la dirección de callback en el backend de Flyme Push. Tras completarlo, ponerse en contacto con el soporte técnico oficial de Engagelab por correo electrónico para la activación en backend.
- El contenido del correo electrónico debe incluir la siguiente información:
- AppKey: Su AppKey de Engagelab
- Request: Activate Meizu Receipt
- Attachment: Captura de pantalla de la configuración completada en el sitio web oficial de Meizu
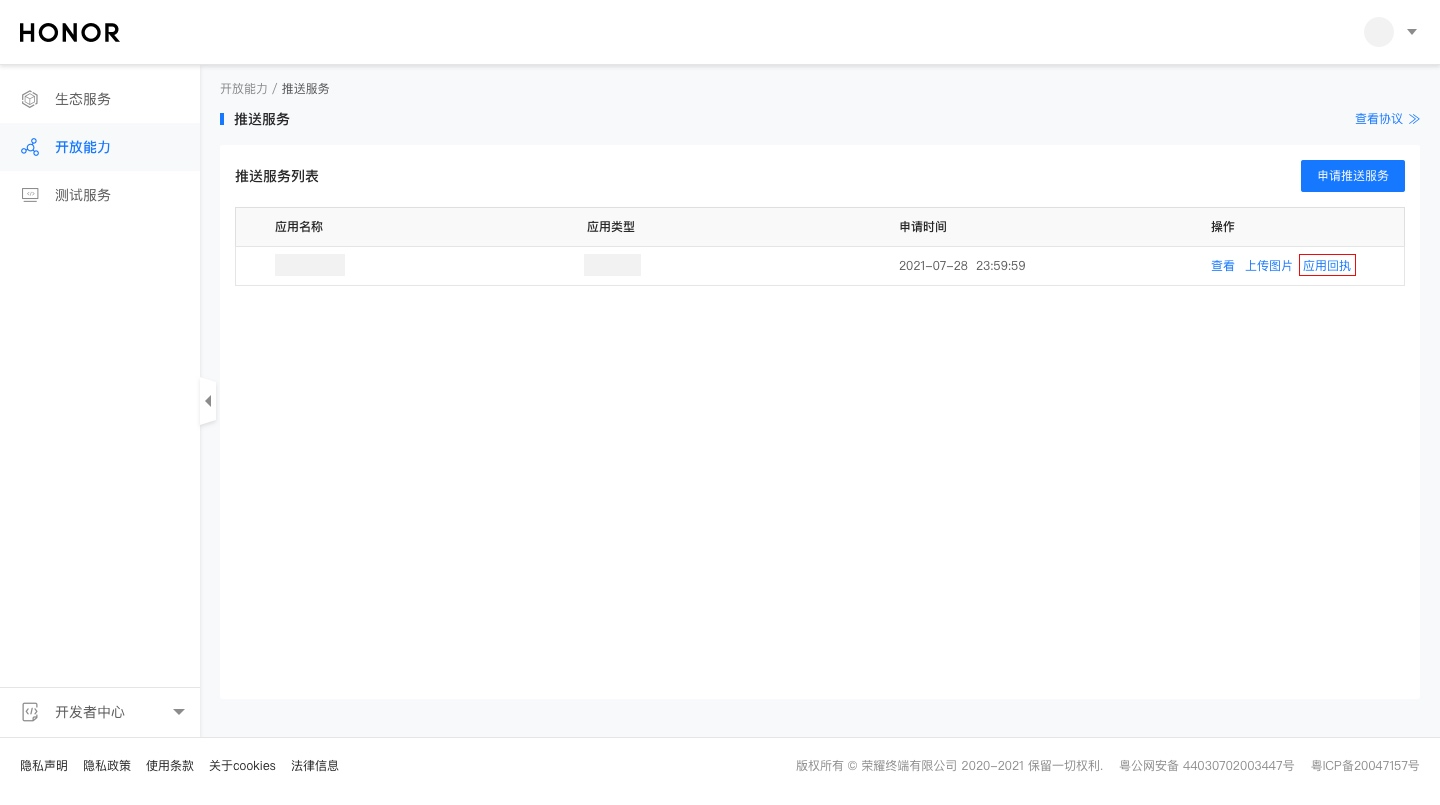
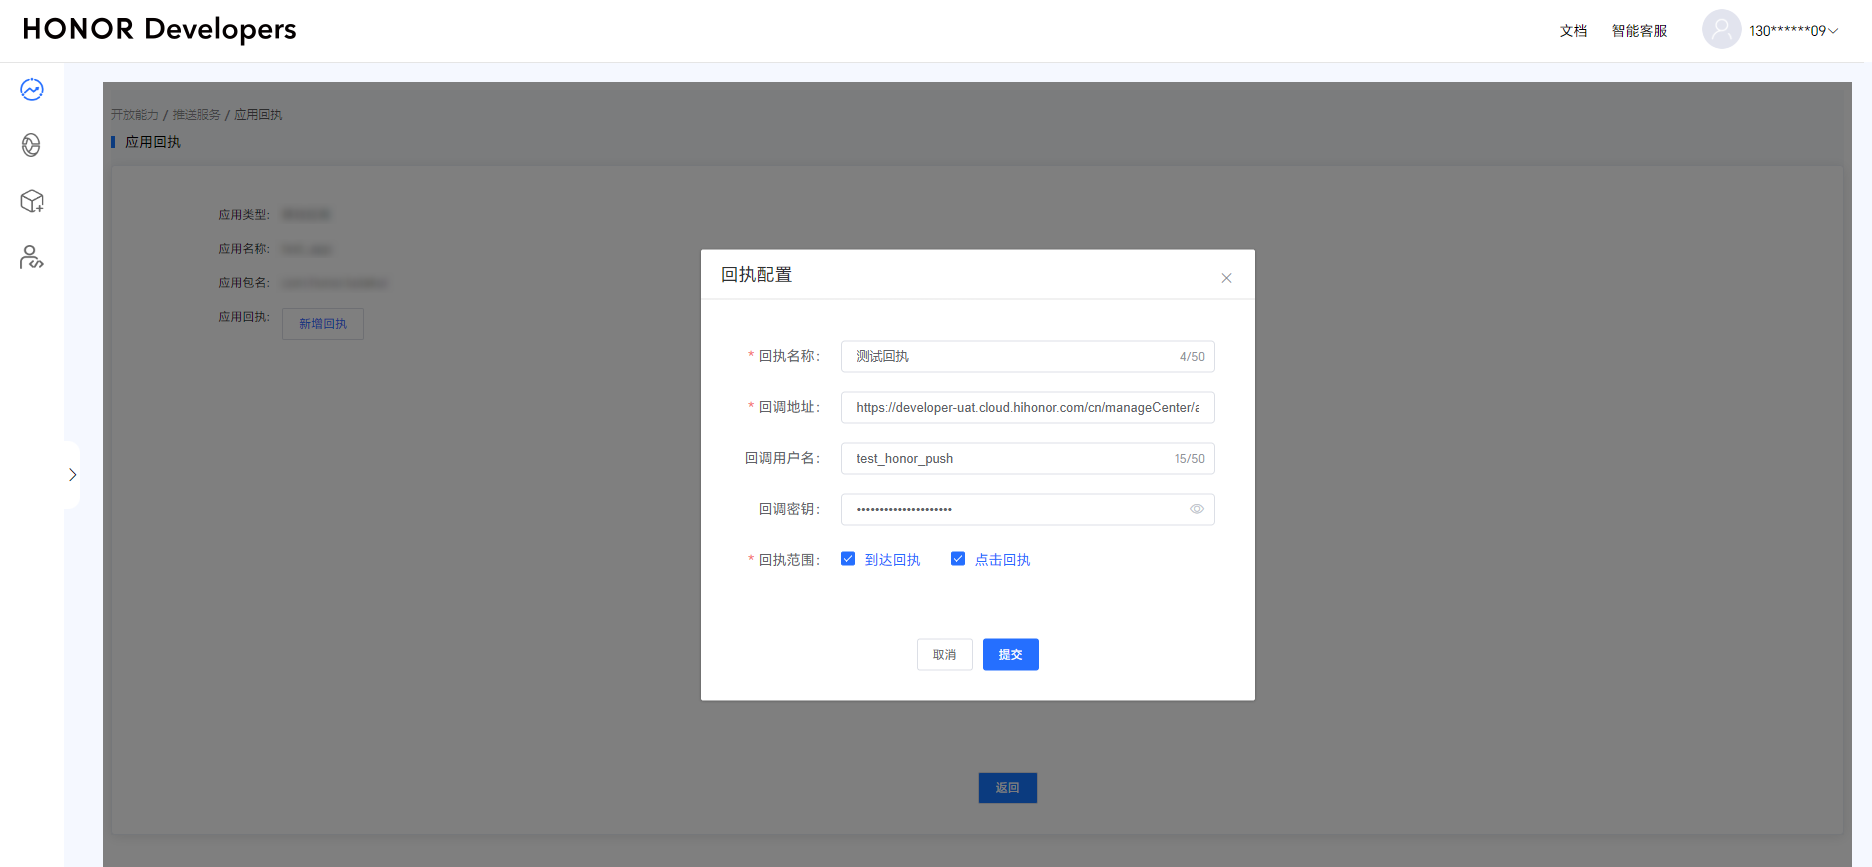
Guía de configuración del acuse de recibo de entrega del canal Honor
Tras completar la integración del SDK del canal del proveedor de Honor, los desarrolladores deben habilitar y configurar los acuses de recibo de mensajes en el Honor Developer Service Desk para devolver mediante callback a la plataforma de Engagelab los datos estadísticos de entrega de Honor. Los pasos específicos son los siguientes:
Iniciar sesión en el Honor Developer Service Desk.
Seleccionar “Open Capabilities > Push Service” para acceder a la página del servicio push.
Seleccionar la aplicación para la que se van a configurar los acuses de recibo y hacer clic en “Application Receipt” para acceder a la página de acuse de recibo de la aplicación.
Hacer clic en “Add Receipt” para acceder a la página de configuración del acuse de recibo.
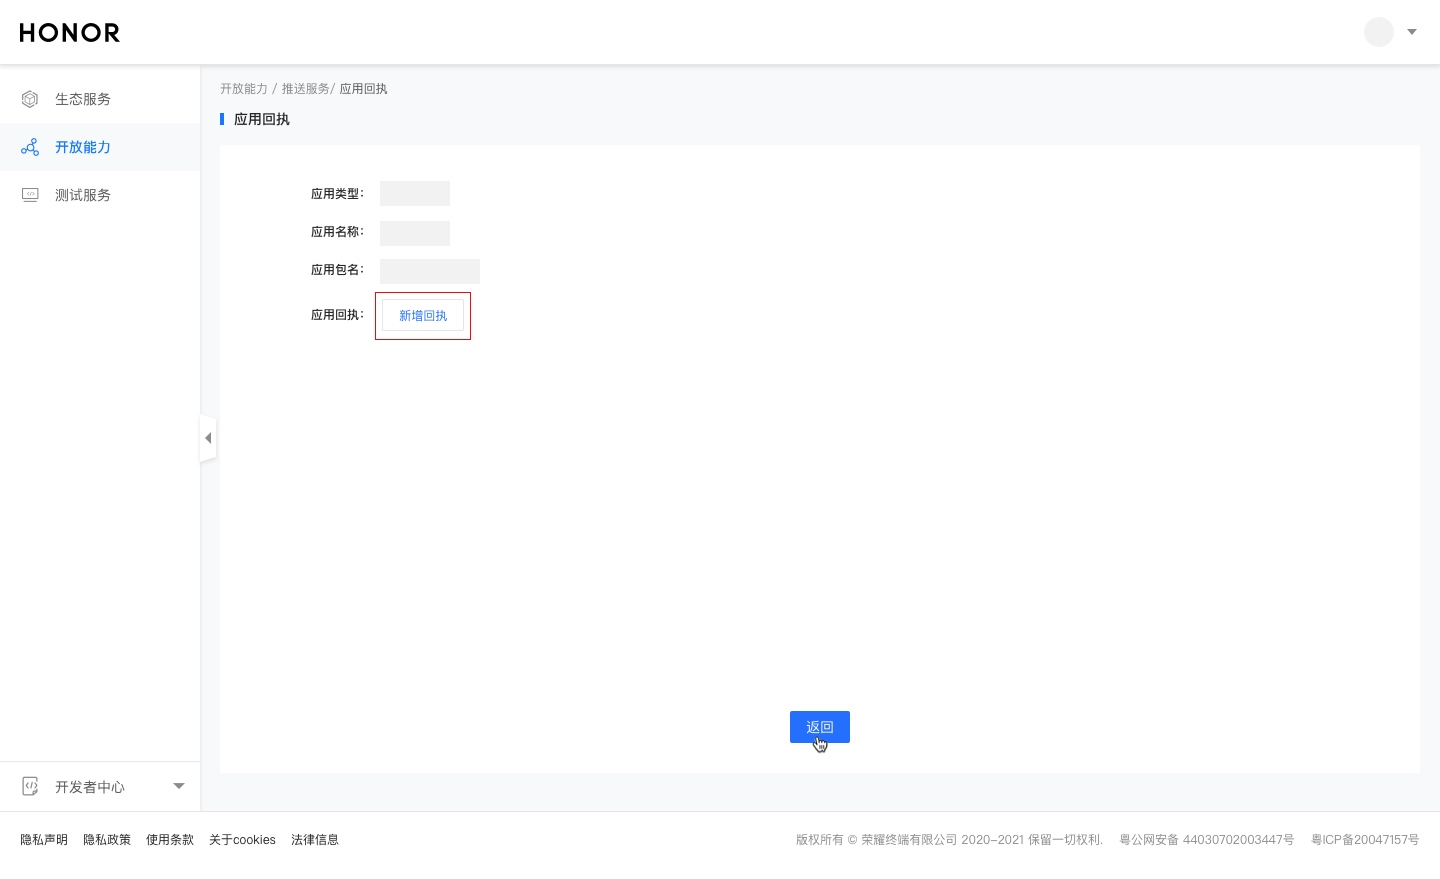
Tras acceder a la página de configuración del acuse de recibo, rellenar los siguientes parámetros:
- Receipt Name: Introducir un nombre personalizado.
- Callback Address (seleccionar según el centro de datos en el que se encuentre la aplicación):
https://pushcb-sgp.engagelab.com/callback/honorhttps://pushcb-hk.engagelab.com/callback/honorhttps://pushcb-usva.engagelab.com/callback/honorhttps://pushcb-defra.engagelab.com/callback/honorhttps://pushcb-jpn.engagelab.com/callback/honorhttps://pushcb-bra.engagelab.com/callback/honor
- Receipt Scope: Asegurarse de que estén marcadas tanto “Delivery Receipt” como “Click Receipt”.
Guía de configuración del acuse de recibo de entrega del canal vivo (acuse nuevo)
El proveedor vivo proporciona una nueva interfaz de funcionalidad de acuse de recibo, que ofrece datos de acuse de recibo más completos y permite realizar el seguimiento de más métricas de datos. Se recomienda actualizar a la nueva funcionalidad de acuse de recibo lo antes posible. Una vez se utilice el acuse nuevo, la funcionalidad de acuse antigua quedará inhabilitada. Consultar las instrucciones de acuse de recibo de mensajes de vivo.
La nueva funcionalidad de acuse de recibo requiere que los desarrolladores habiliten y configuren los acuses de recibo de mensajes en la plataforma vivo Open Platform (la interfaz antigua no lo requiere) para devolver mediante callback a la plataforma de Engagelab las estadísticas de entrega del acuse de recibo del proveedor vivo y otros datos. Los pasos específicos son los siguientes:
- Iniciar sesión en la plataforma vivo Open Platform.
- Localizar su aplicación en la lista “All Applications” y acceder a “Application Management > Application Information > APP Receipt Address”; a continuación, seleccionar “Enable” para habilitar la función de acuse de recibo de la aplicación.
- Configurar los siguientes parámetros:
- Callback Address (seleccionar según el centro de datos en el que se encuentre la aplicación):
https://pushcb-sgp.engagelab.com/callback/vivohttps://pushcb-hk.engagelab.com/callback/vivohttps://pushcb-usva.engagelab.com/callback/vivohttps://pushcb-defra.engagelab.com/callback/vivohttps://pushcb-jpn.engagelab.com/callback/vivohttps://pushcb-bra.engagelab.com/callback/vivo
- Callback Address (seleccionar según el centro de datos en el que se encuentre la aplicación):

Paso importante: especificar el ID de acuse de recibo de vivo durante el envío del push
Tras completar todos los pasos de configuración anteriores, se debe especificar el valor del ID de acuse de recibo de vivo durante el envío del push. El valor del ID marcado en el Paso 2 anterior se debe rellenar según su valor real.
- Al realizar un envío desde la consola (WebPortal), también se debe rellenar este valor de
callback_id; de lo contrario, no se podrán obtener los datos del acuse de recibo del proveedor vivo.
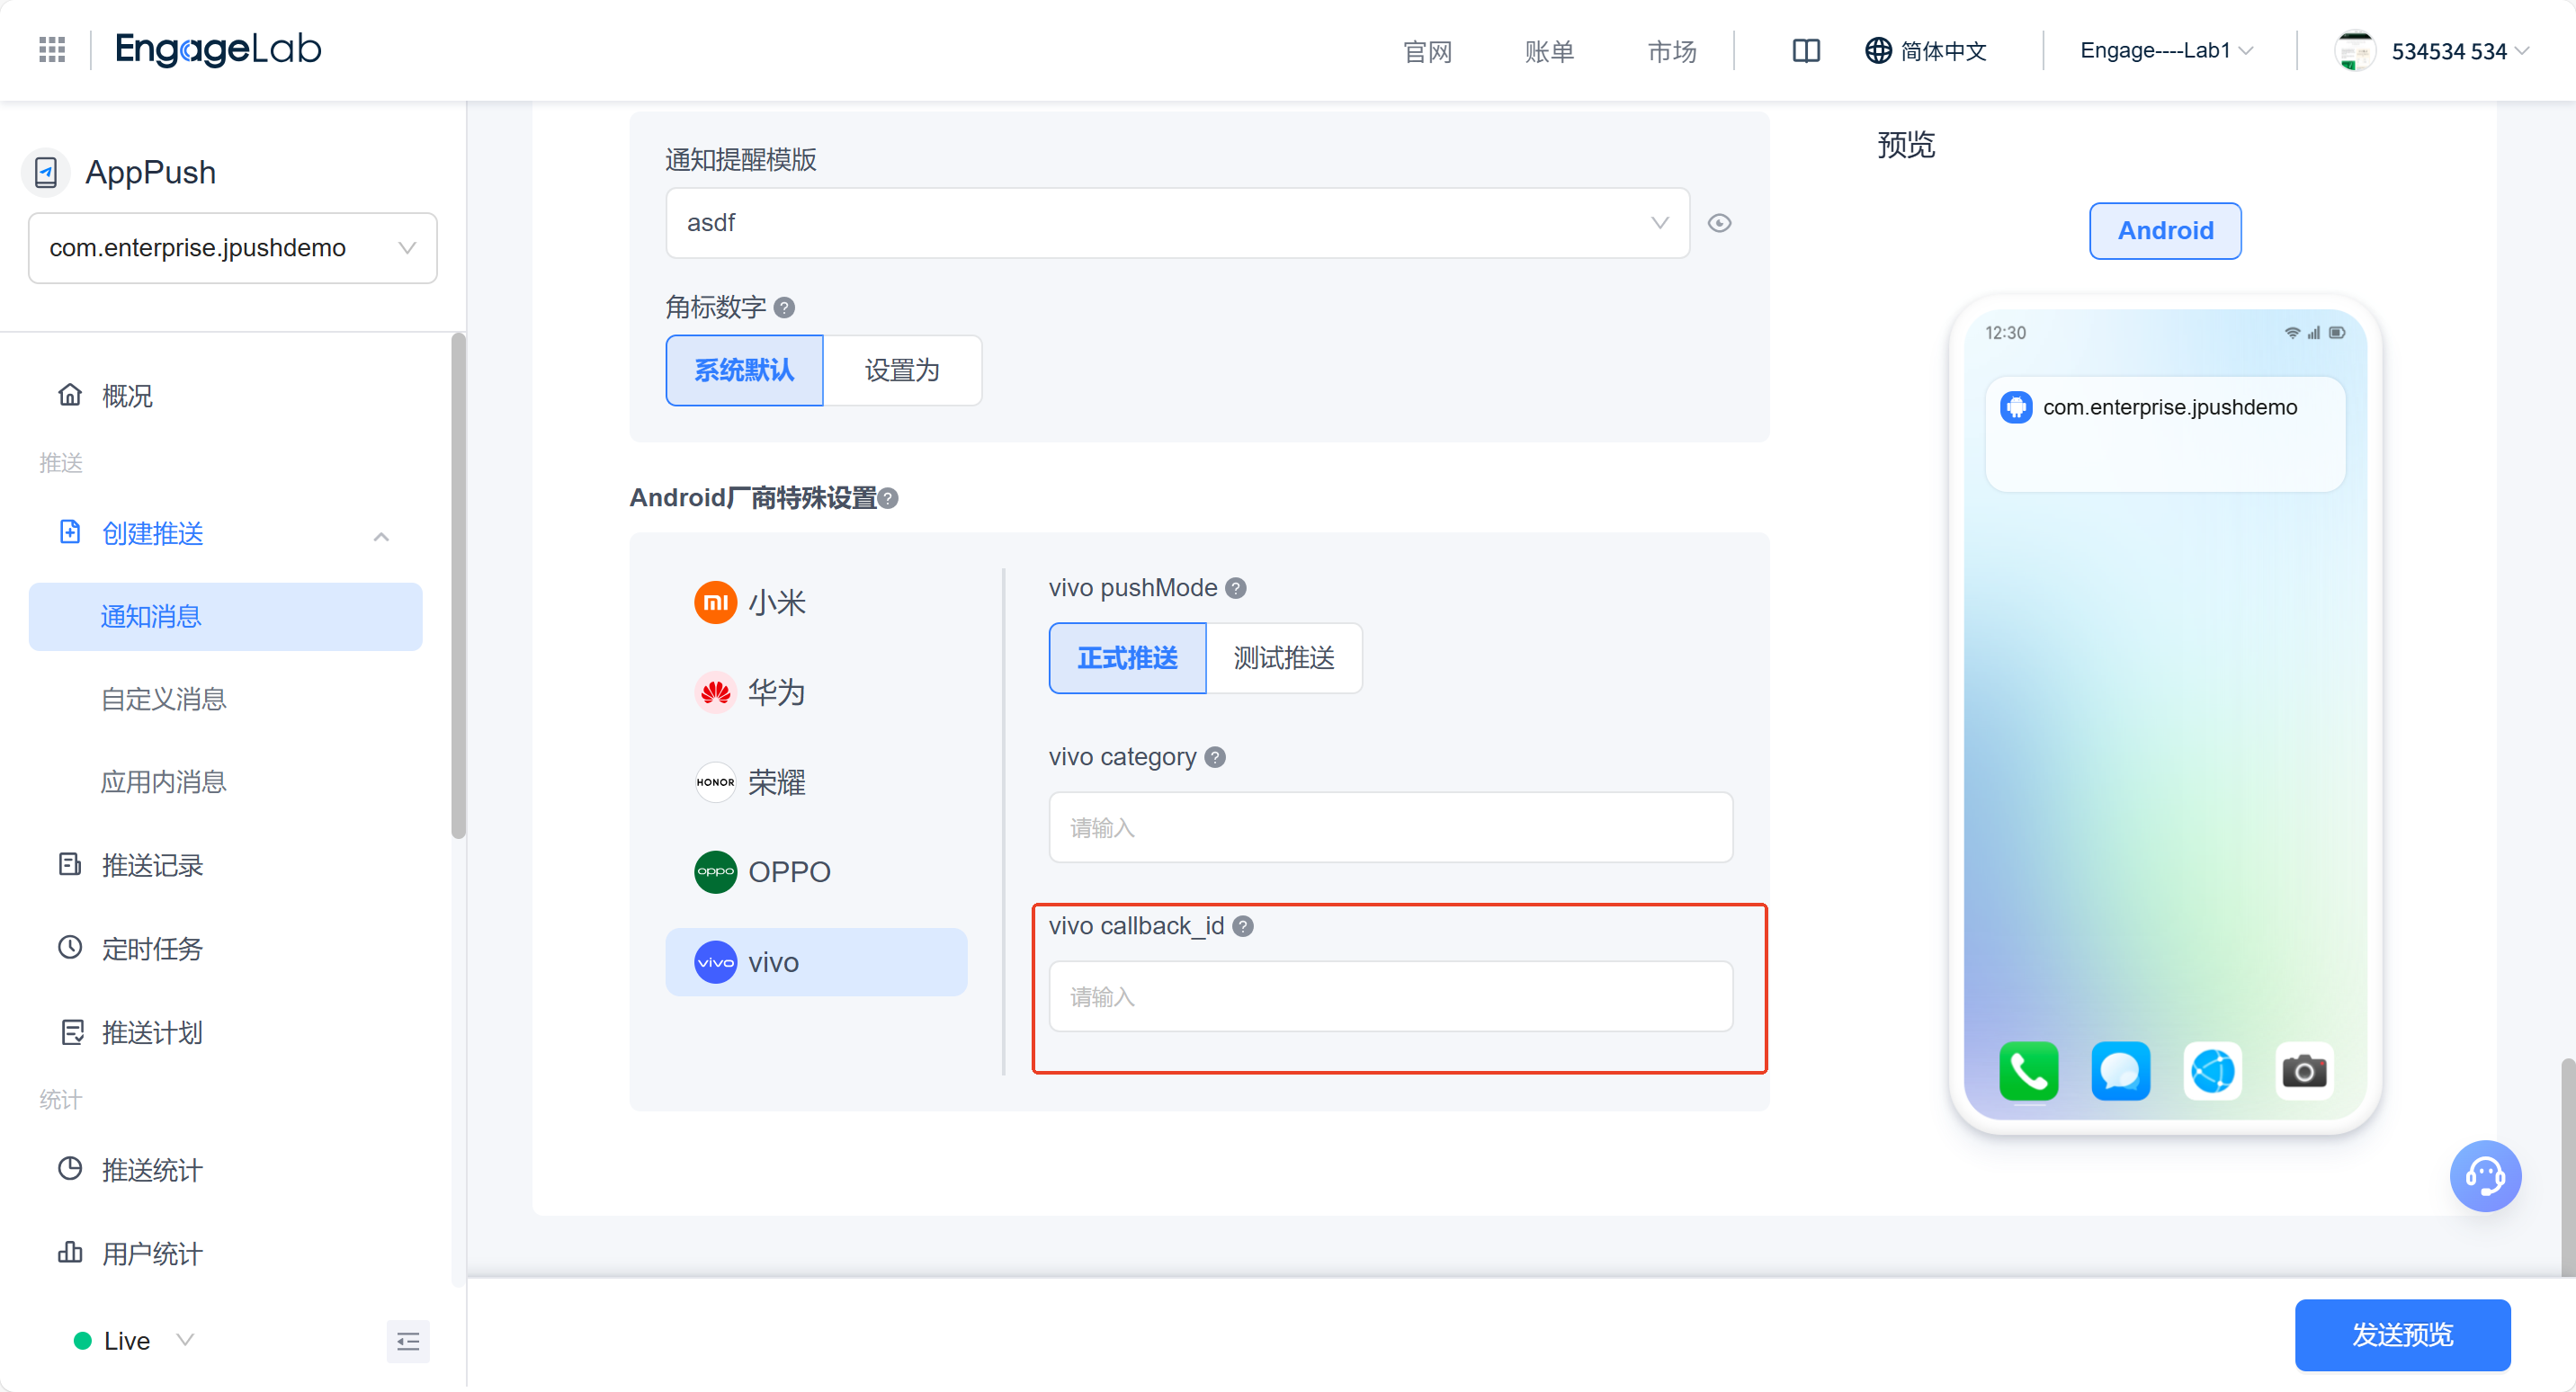
- Correspondiente al campo
options.third_party_channel.vivo.callback_iden la Engagelab Push API.
Tabla de explicación de palabras clave
| Palabra clave | Tipo | Opción | Significado | Descripción |
|---|---|---|---|---|
| callback_id | string | Opcional | ID de acuse de recibo de vivo | ● Válido solo para canales vivo. ● Introducir un ID de acuse de recibo único para especificar la dirección y la configuración del acuse de recibo para este mensaje downstream. ● El ID de acuse de recibo se puede consultar en la configuración de parámetros del acuse de recibo de vivo. |
Ejemplo:
              {
  "options": {
    "third_party_channel": {
      "vivo": {
        "callback_id": "Receipt ID value generated by the vivo push platform"
      }
    }
  }
}