


Rule Agent Getting Started and Configuration Guide
This guide explains how to use Rule Agent. In this document, you will learn which problems Rule Agent is suited to solve and complete the configuration of your first Flow, from creation and testing to activation. Rule Agent automation can replace and simplify existing manual procedures, such as adding tags and assigning conversations to the most suitable customer service representative. This allows customer service team members to focus on current conversations and tasks while reducing the time spent on routine work.
If you are using Rule Agent for the first time, follow the steps in this article in order. To learn about a specific node, refer directly to "Rule Agent Node Reference."
Overview: What Is Rule Agent?
Rule Agent is an automated processing agent that integrates different Flows, while a Flow is an automated workflow that continuously operates around real conversations.
It is not a traditional automation rule that ends immediately after a match. Instead, it is a process that can:
- Be started by a trigger
- Continue progressing around a conversation
- Evaluate conditions and route users multiple times during the workflow
- Wait for user actions or a timeout
- Continue with subsequent steps based on the result
You can think of it as a configurable conversation flowchart: when a user or conversation meets the entry conditions, the Flow starts from the beginning and proceeds node by node until the goal is reached or the workflow ends.
Differences Between Flows and Traditional Automation Rules
| Comparison | Traditional Automation Rules | Flow |
|---|---|---|
| Operation | Executes once immediately after a match | Creates a continuously running workflow |
| Lifecycle | Short and immediate | Can continue across different periods |
| Branching | Usually evaluates conditions only once | Can branch continuously at multiple nodes |
| Waiting | Limited | Supports waiting for replies, clicks, and timeouts |
| Testing | Rule-level checks | Flow-level testing, path tracking, and result review |
| Use cases | Adding tags, changing statuses, and sending notifications | Welcome routing, timeout follow-ups, satisfaction surveys, AI fallback, and conversion experiments |
Select the Right Use Case
When your business process cannot be completed through a single match and execution, a Flow is more suitable.
Common use cases include:
- Welcoming and routing new visitors
- Following different reception paths based on country, source, or tags
- Automatically following up with or escalating visitors who do not reply or when no customer service representative has joined
- Sending a satisfaction survey after a delay following the end of a conversation
- Testing different copy or conversion paths through A/B routing
- Automatically transferring a conversation to a human agent and sending an explanatory message when an AI service encounters an exception
- Calling external systems, writing back variables, or synchronizing information during the workflow
Before You Start: Understand the Core Concepts
Flow
A Flow is an editable, testable, and activatable automation workflow.
Trigger (Trigger Event)
A trigger is the workflow entry point. It determines:
- When the workflow starts
- Who can enter
- How often someone can enter
Node
A node is the smallest functional unit in a workflow.
Sending messages, branching based on conditions, waiting for replies, assigning customer service representatives, and updating information are all handled by nodes.
Exit
An exit is the output path of a node.
Different nodes can have different exits, such as:
- Continue by default
- Conditional branches
- Success/failure
- Occurred/timed out
- Button clicked/not clicked
Audience
An audience is the scope used to limit which customers or conversations this Flow applies to.
Goal (Goal Event)
A goal is the target event used to measure whether a Flow has achieved its business objective.
Examples include delivering the first message, receiving a reply, completing a rating, and achieving a conversion.
Create and Publish Your First Flow
1. Choose How to Get Started
You can start in either of two ways:
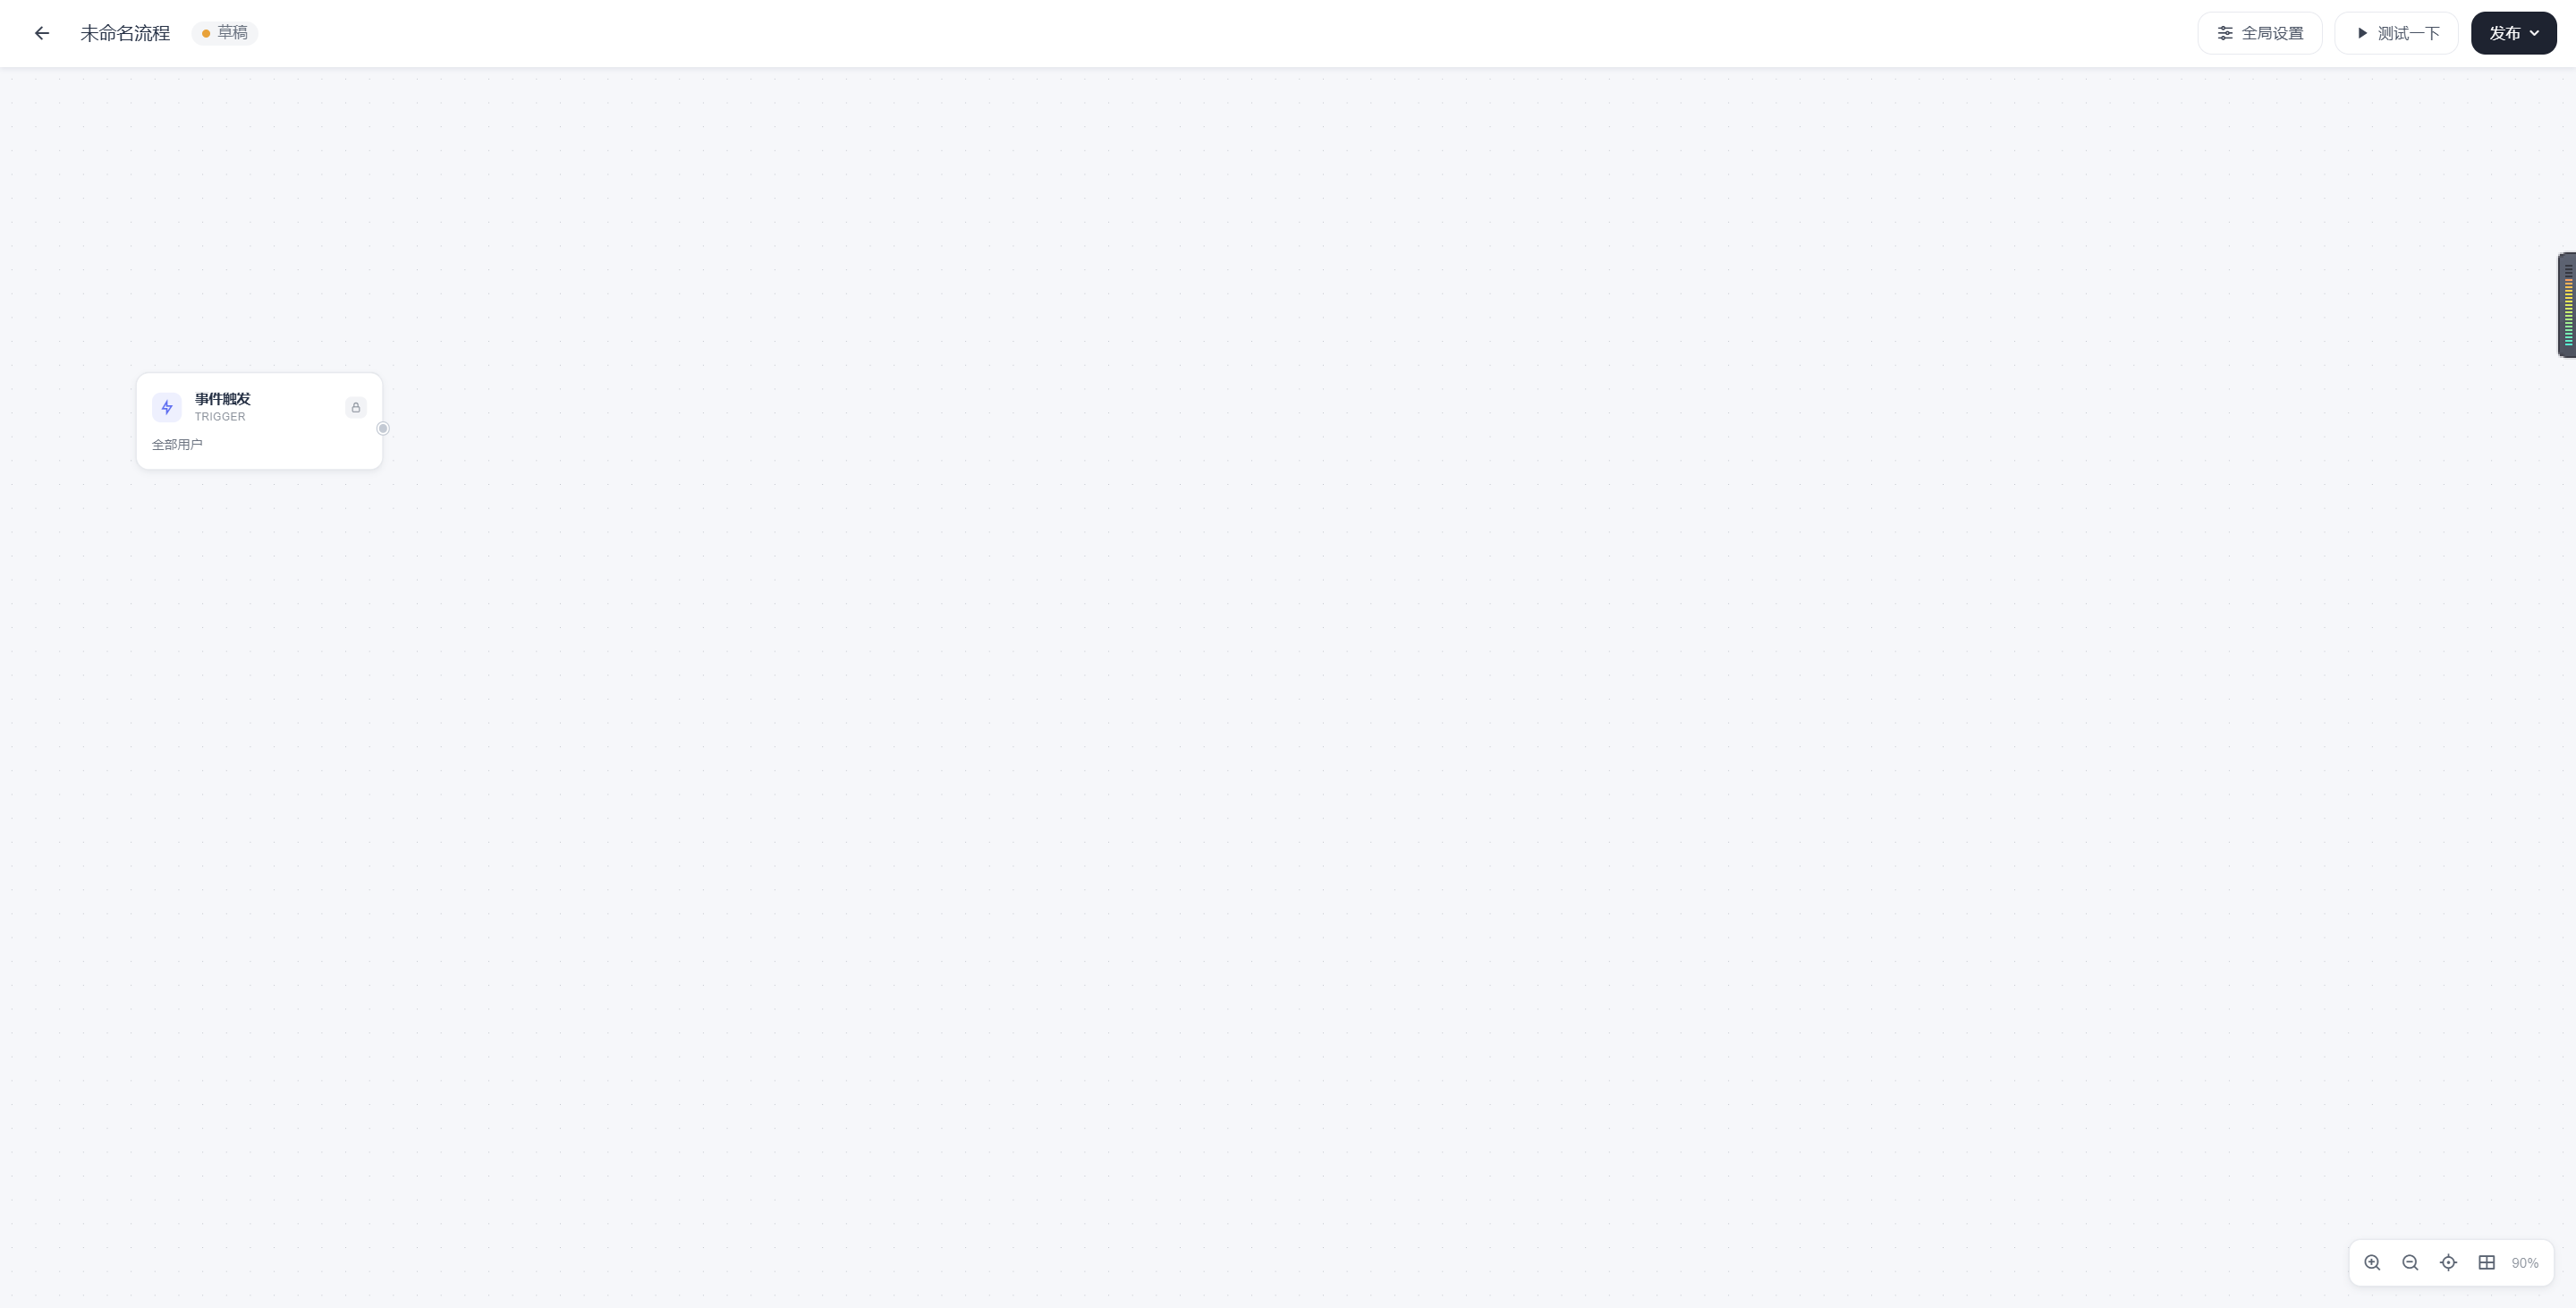
- Create a new Flow from a blank canvas
- Start from a scenario template
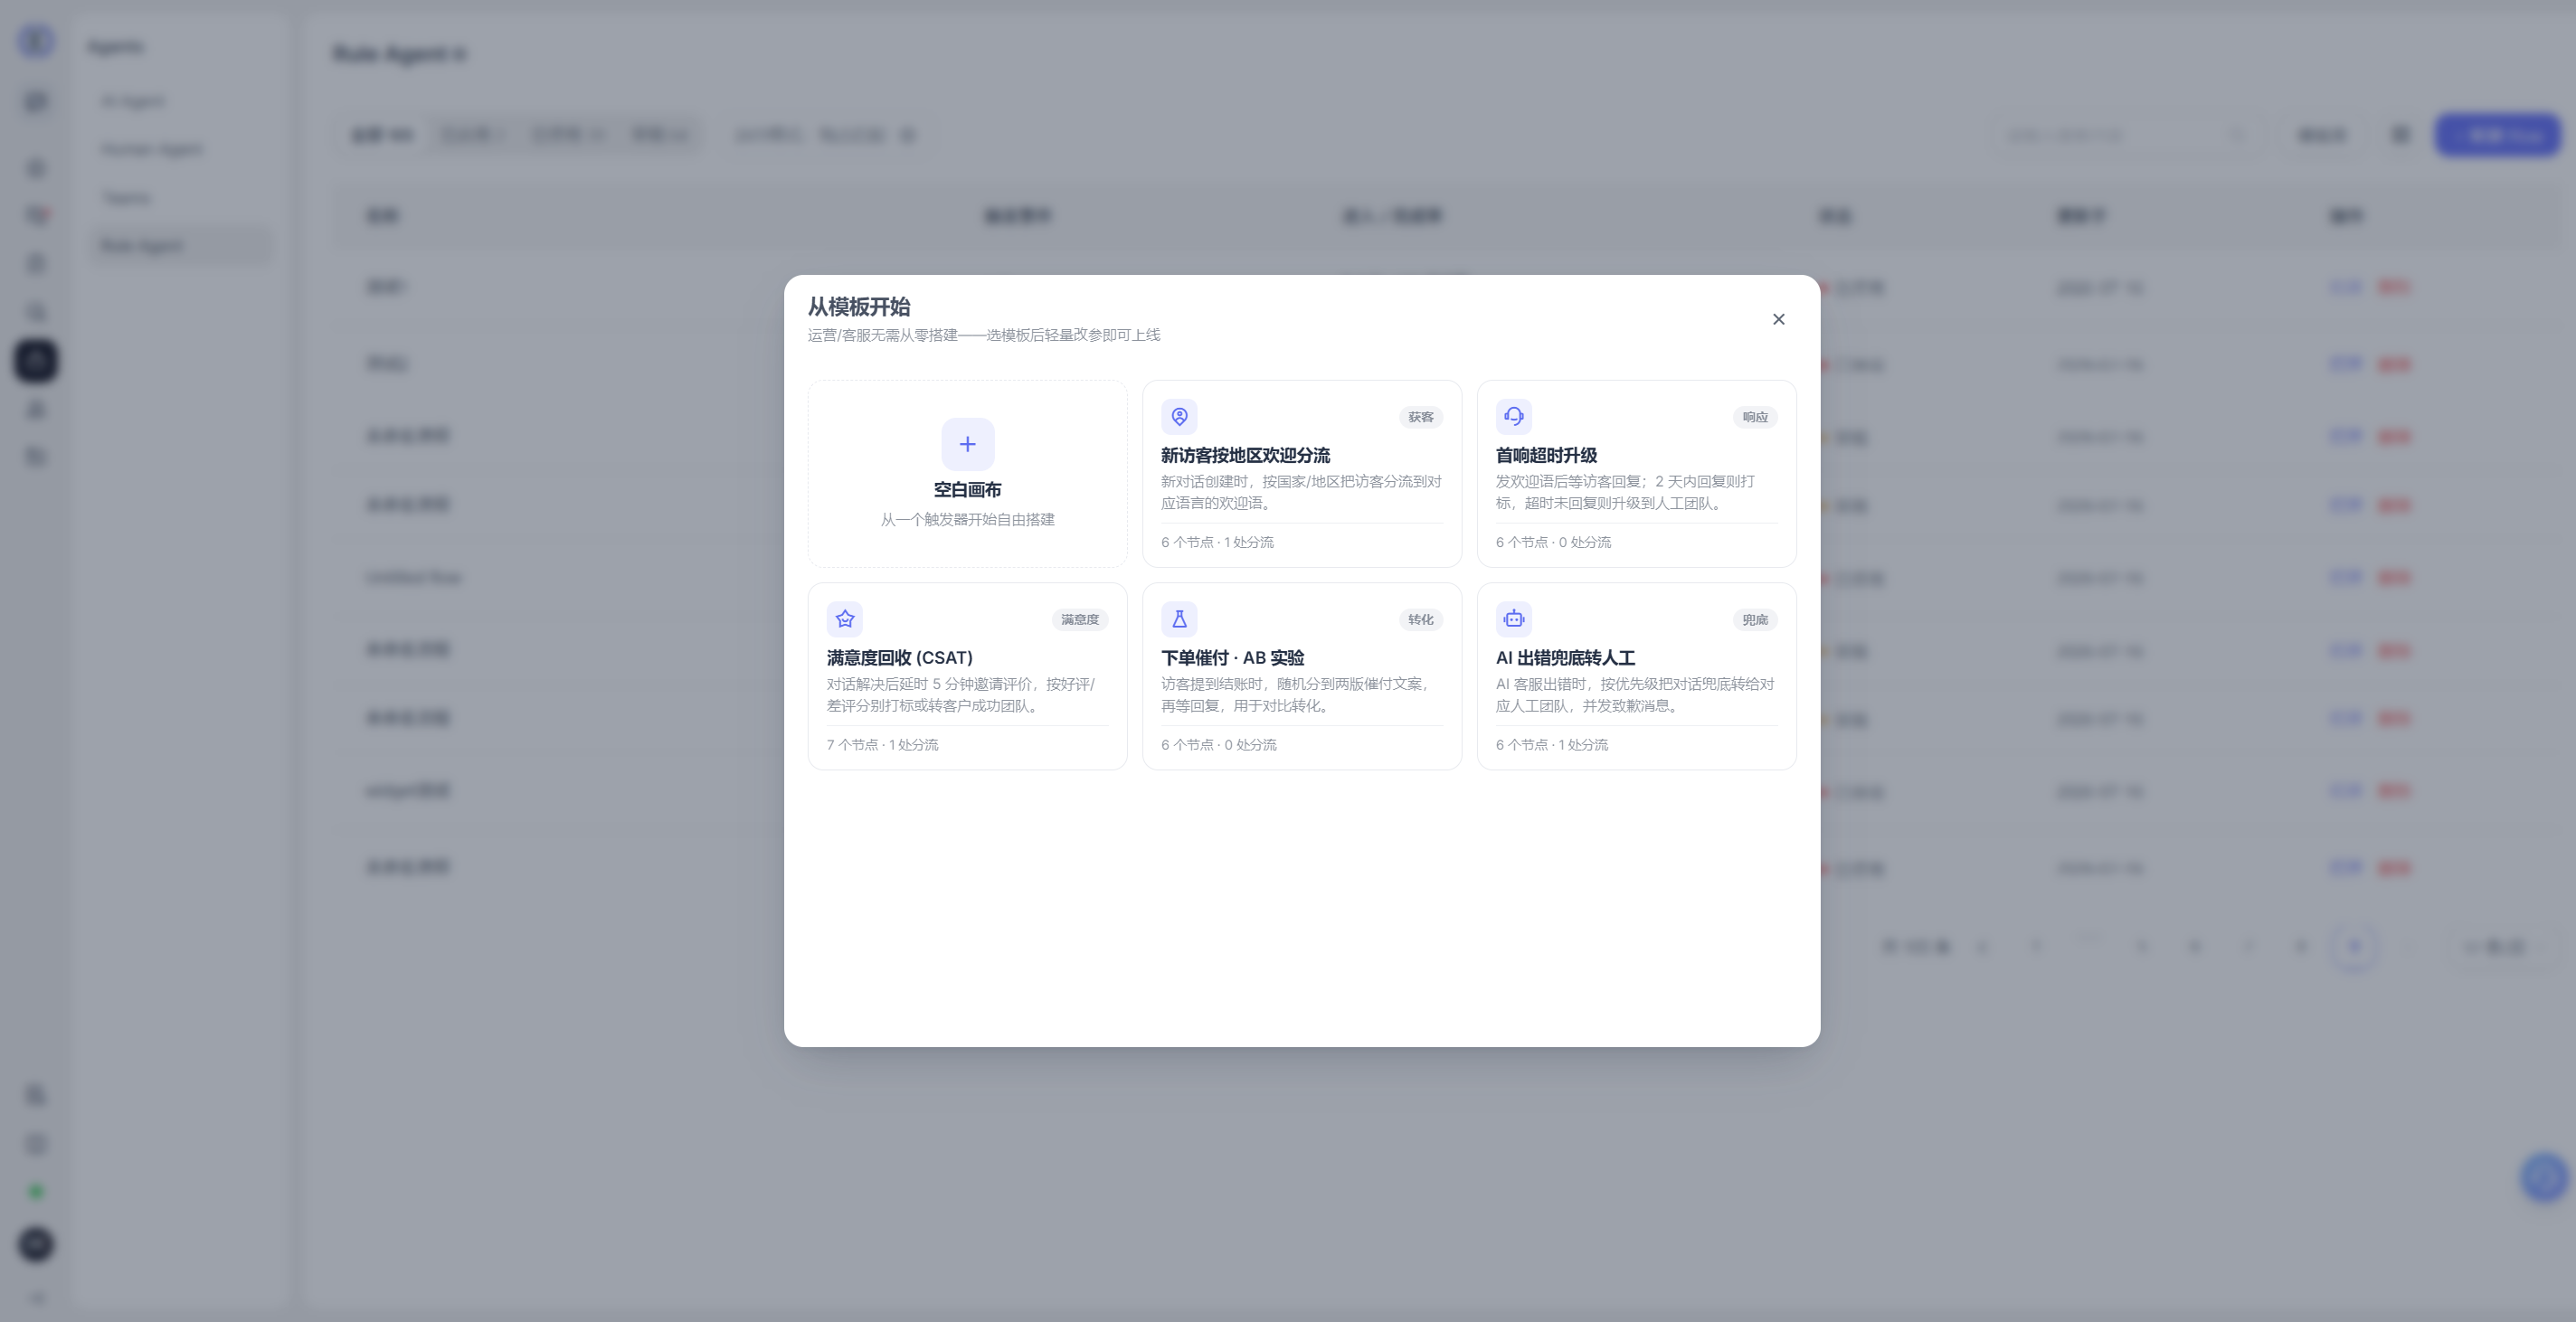
If this is your first configuration, we recommend starting with a template and then replacing the template parameters with your own business content.
2. Configure Event Triggers
First, determine which event starts this Flow.
Common entry points include:
- Visitor sends a message
- Conversation is created
- A specified event occurs
- Timeout
- AI or system event
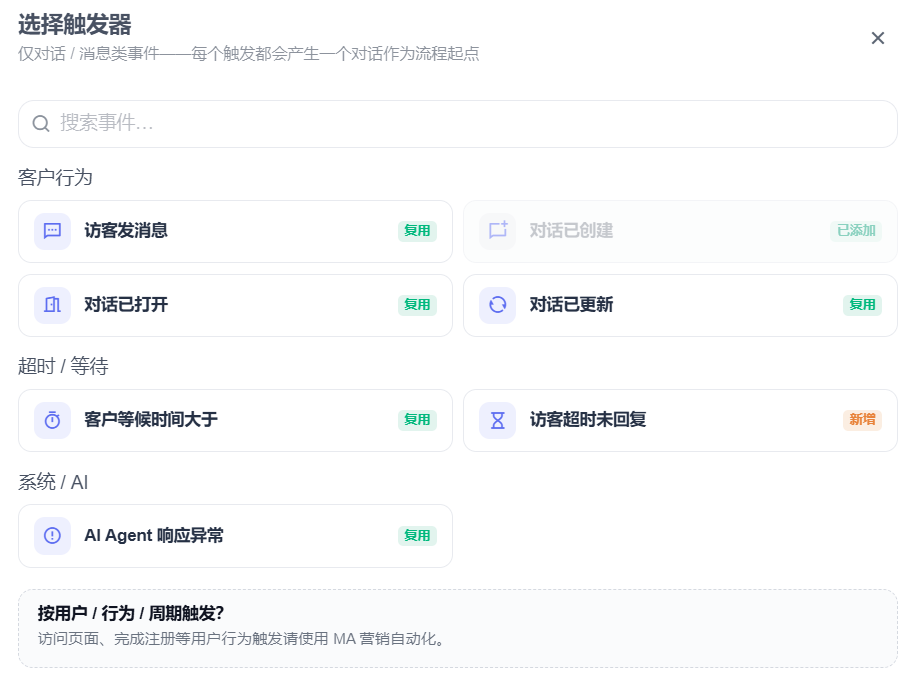
When configuring the trigger, we recommend confirming the following at the same time:
- Target channel
- Target audience
Entry conditions: The current event matches any of the configured events, and both the channel and audience are the specified targets.
3. Orchestrate Workflow Nodes
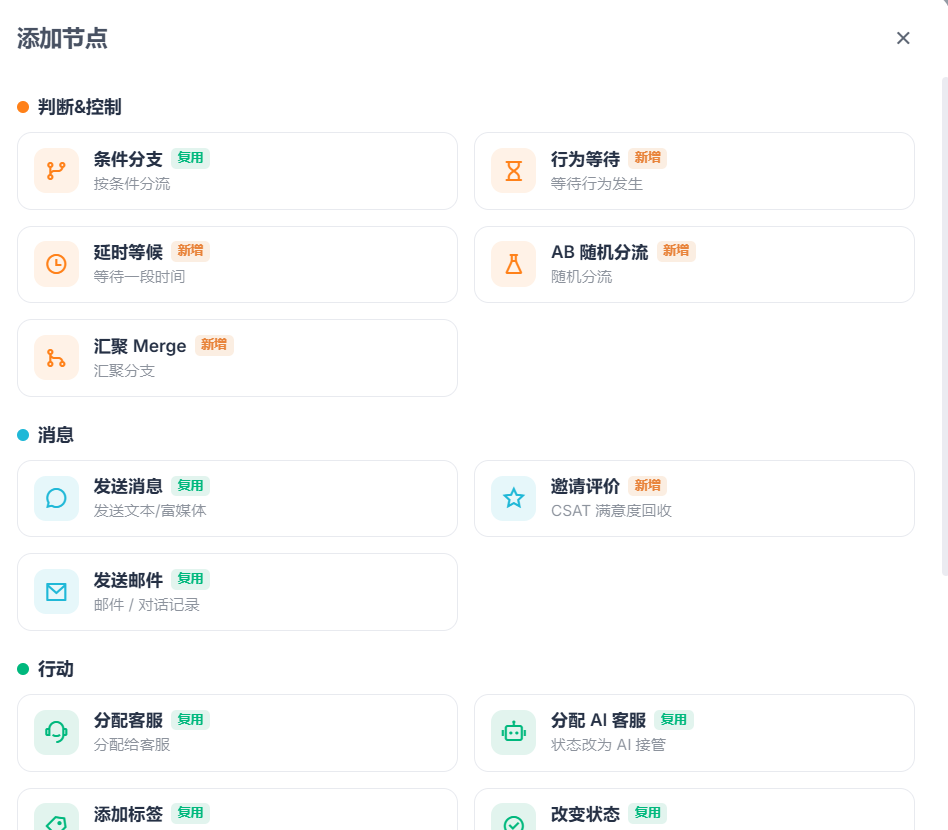
Build nodes on the canvas in the order required by your business process. Node types are divided into three categories: judgment and control, messages, and actions. After you click a node, the configuration panel opens on the right.
This is where you enter parameters, configure branches, and view summaries for each node.
Common workflow design principles:
- Entry nodes define the entry point.
- Judgment and control nodes determine the path and timing.
- Message nodes handle external outreach or collect feedback.
- Action nodes update information, assign customer service representatives, and synchronize with external systems.
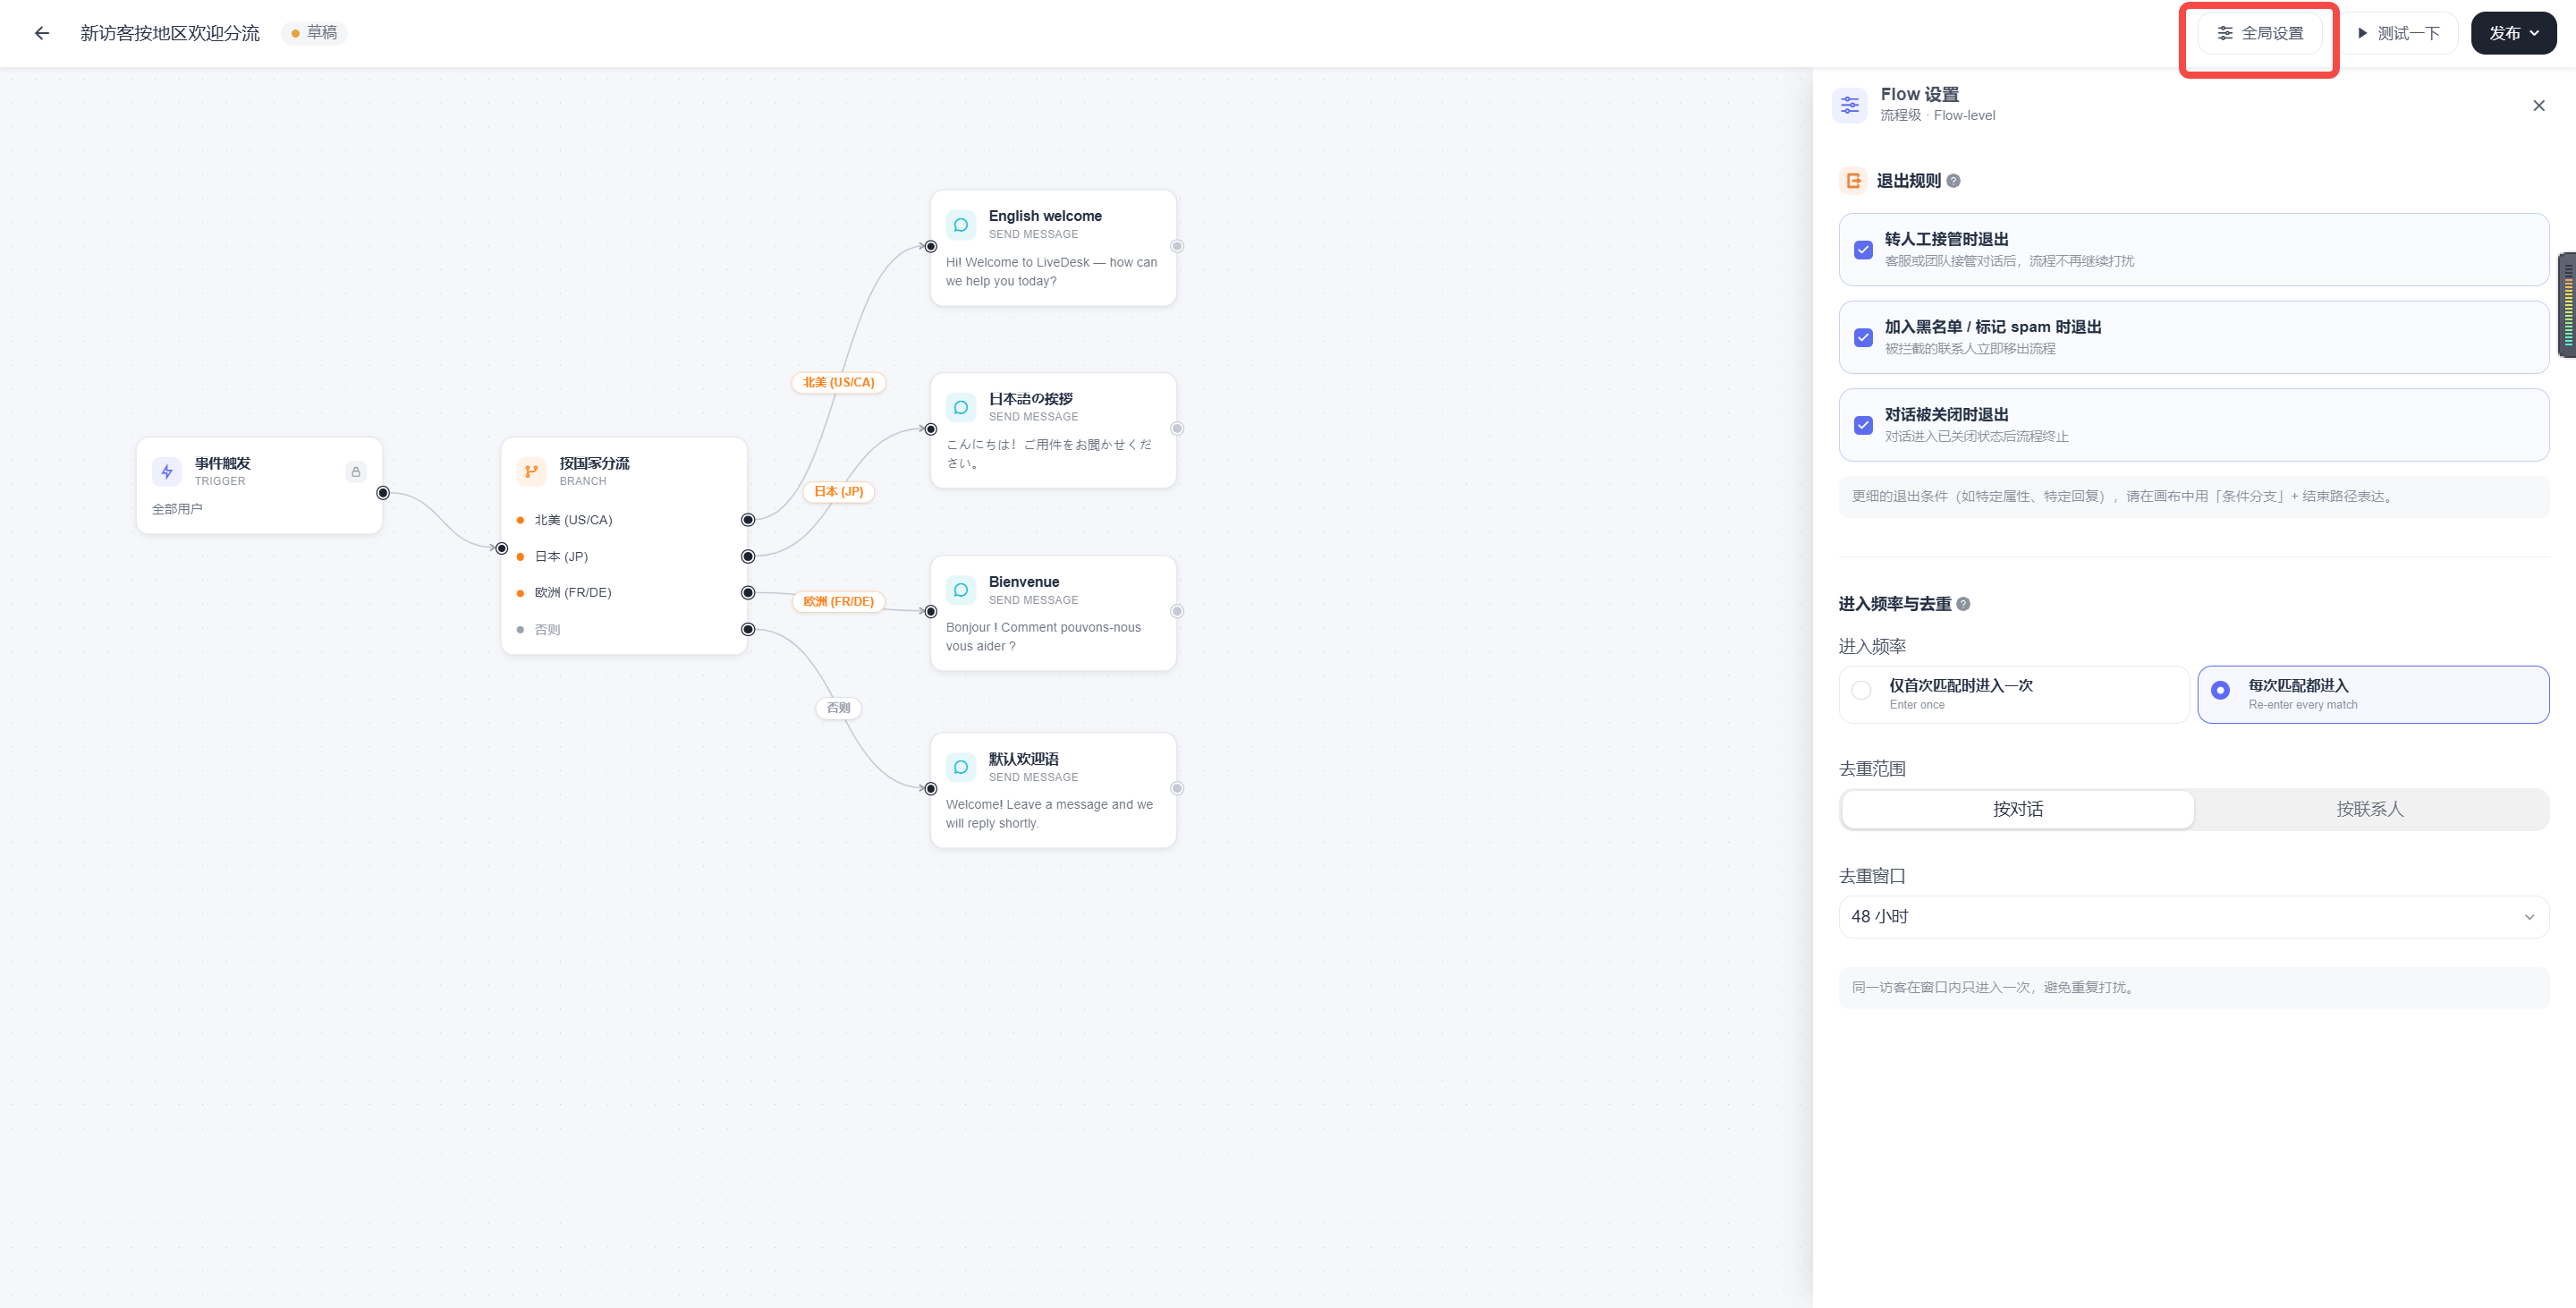
4. Set Flow-Level Rules
In addition to the nodes themselves, you also need to configure Flow-level information, such as:
- Flow name
- Activation status
- Exit rules
- Deduplication settings
- Entry frequency
5. Test the Flow
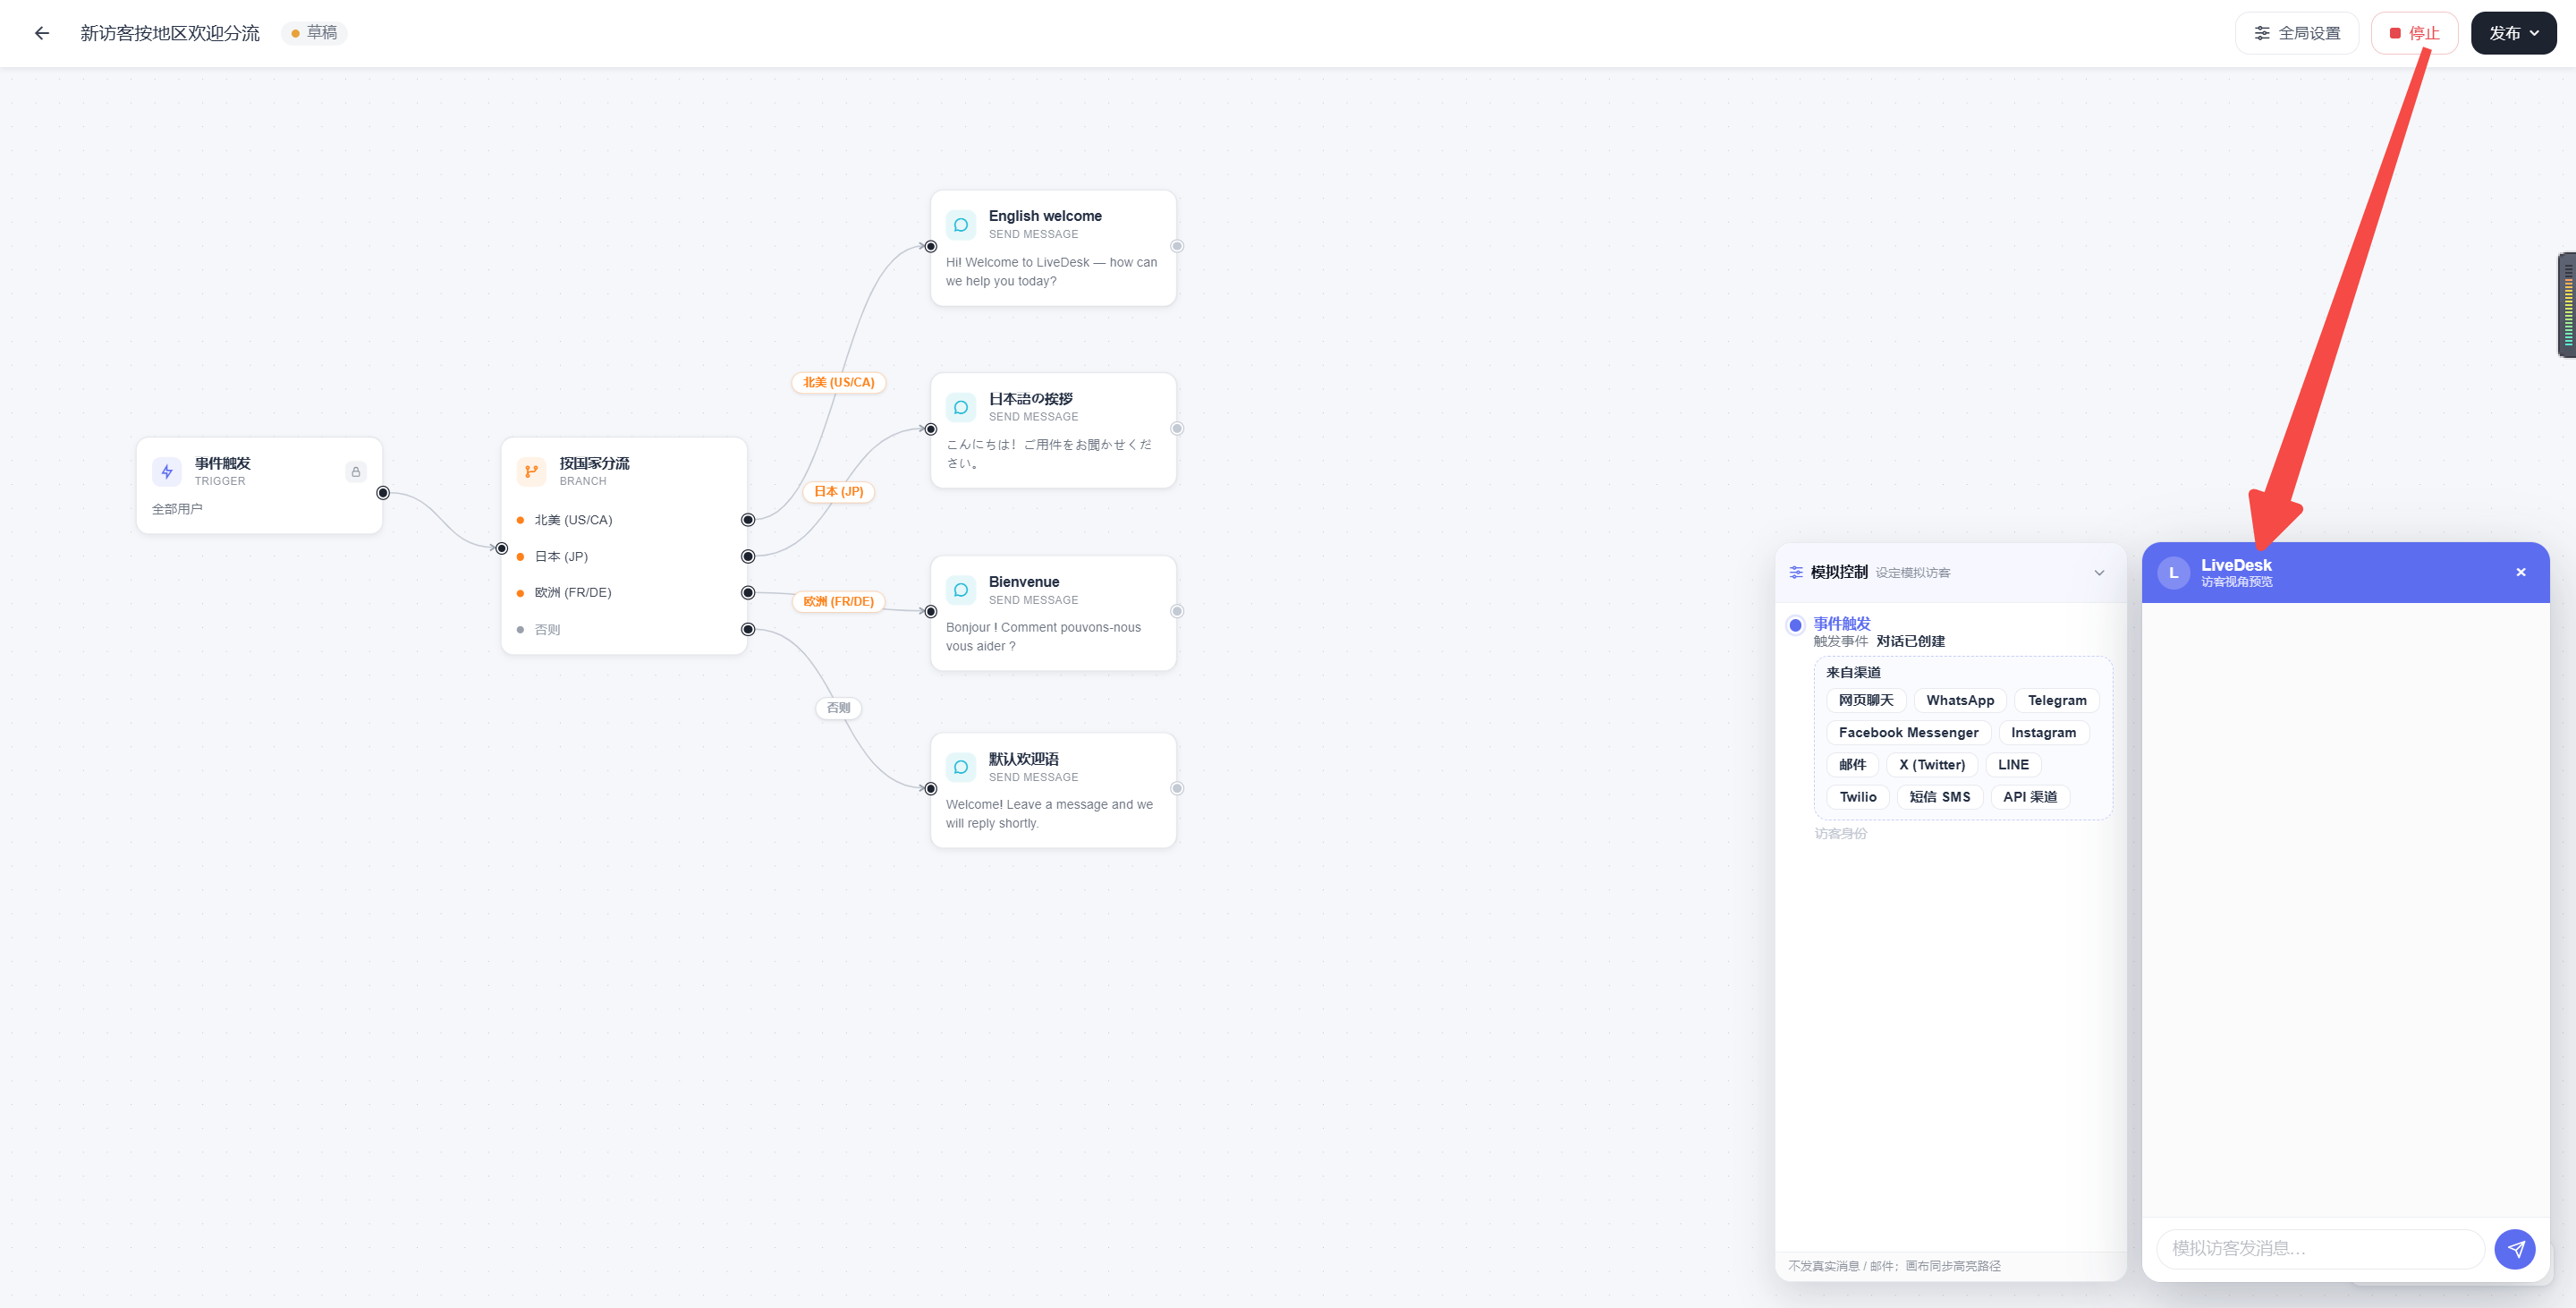
Testing is an important Flow capability and is available before official publication. In the conversation window below, you can simulate and verify how events trigger and execute the Flow. The simulation control panel on the left provides condition options, while the conversation window on the right displays the execution results.
Before activation, we recommend verifying at least the following:
- Whether the trigger matches correctly
- Whether conditional branches follow the expected paths
- Whether waiting and timeout exits are correct
- Whether copy, buttons, and links are correct
- Whether information updates, assignments, and external calls are appropriate
6. Activate and Monitor Results
After launch, we recommend continuously monitoring:
- Whether there is sufficient match volume
- Whether actual paths meet expectations
- Whether any nodes frequently fail or are skipped
- Whether the target event is actually improved
7. Manage the Flow
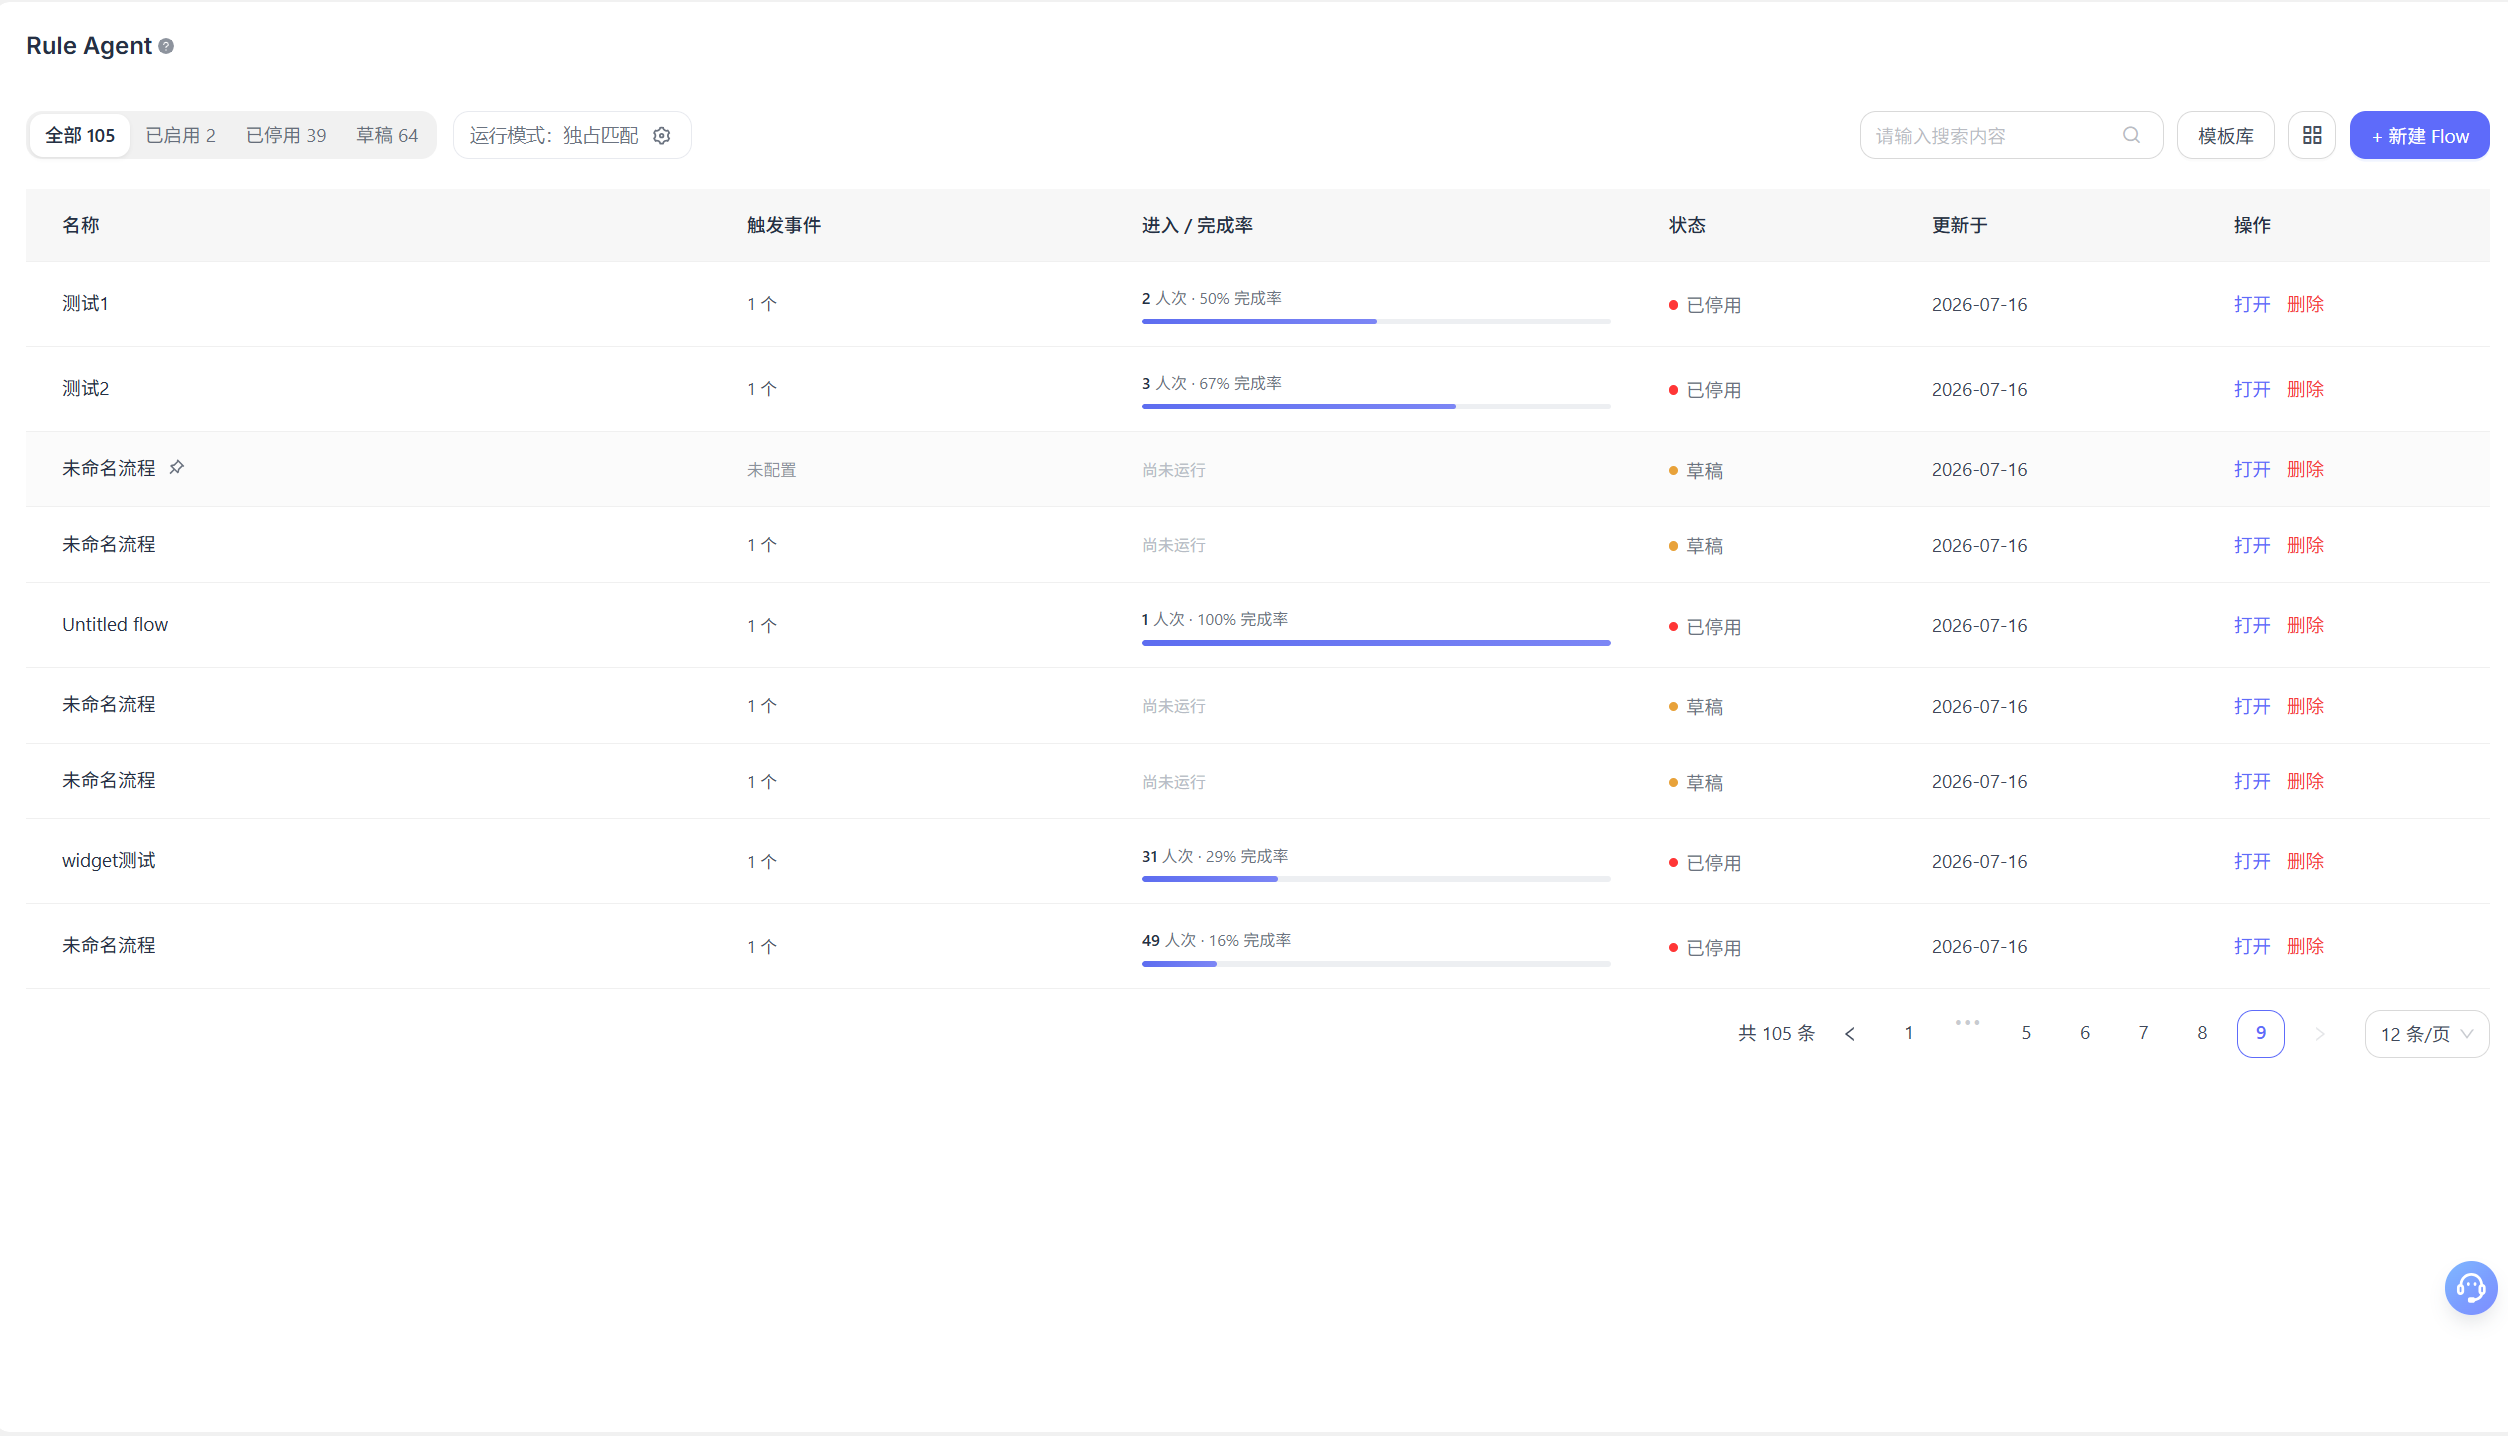
The list page is the Flow management entry point. It is useful for:
- Viewing all Flows
- Filtering by status
- Searching for a specified Flow
- Creating a new Flow from a template
- Setting the operation mode: distinguish between exclusive matching and parallel matching. In exclusive mode, the same entry event enters only the highest-ranked matching Flow. In parallel mode, the same event can enter multiple matching Flows.
How a Flow Runs
From the user's perspective, a Flow usually runs in the following order:
- A trigger condition occurs.
- The system determines whether the conversation can enter the Flow.
- The Flow starts executing from the initial node.
- During execution, it may send messages, evaluate conditions, update information, and call external systems.
- When it reaches a waiting node, the workflow pauses.
- When the expected action occurs or a timeout is reached, the workflow continues.
- The workflow ends when the goal is reached, an endpoint is reached, or an end path is triggered.
It is important to understand this:
A Flow does not calculate all logic at once. Instead, it progresses step by step within the context of a real conversation.
Best Practices and Limitations
Define the Goal Before Configuring the Workflow
Do not start by adding nodes.
A more reliable approach is to first clarify:
- What problem this Flow solves
- Where you want the user to end up
- Which events represent success
Determine the Audience and Entry Frequency First
If the audience is too broad or the entry frequency is too high, users may be contacted repeatedly.
We recommend confirming the following first:
- Which users can enter
- How often the same user can enter
- Whether the same conversation can enter repeatedly
Set a Fallback Path for Button Branches
If a message node uses branching buttons, consider the following in addition to the path after a click:
- What happens if the user does not click
- How long until the action is considered not clicked
- Whether the workflow should end, send a reminder, or switch to another path after no click
Waiting Nodes Must Account for Timeouts
Whether you are waiting for a reply, click, or event, it is generally recommended that you configure a timeout exit.
Otherwise, the workflow may stop in the middle and fail to continue.
Capabilities May Differ Across Channels
When the same Flow targets multiple channels, message capabilities may not be fully consistent across channels. For example:
- Attachment types may differ
- Rich media may be displayed differently
- Button interactions may differ
- Copy length or file restrictions may differ
Therefore, when configuring message nodes, confirm that all settings are applicable to the target channels.
Assignment Actions Must Comply with Channel Rules
When assigning a customer service representative, team, or AI, the assignment must comply with the system's existing assignment scope and business rules.
If the target is not within the assignable scope of the current conversation, the workflow may not complete the handoff as expected.
Distinguish Between Webhooks and API Calls
- Webhooks are more suitable for pushing current event or workflow information to an external system.
- API calls are more suitable for retrieving data from an external system and using the results for subsequent decisions.
Do not use these two types of nodes interchangeably.
Prioritize Testing Four Types of Paths Before Launch
- Default primary path
- Failure path
- Timeout path
- Path where the user takes no action
Troubleshooting and Frequently Asked Questions
Why Wasn't the Flow Triggered?
Check the following first:
- Whether the trigger event actually occurred
- Whether the current user belongs to the target audience
- Whether the channel is within the configured scope
- Whether the entry frequency prevented repeated entry
- Whether governance rules from another Flow blocked it
Why Did the Flow Follow Another Branch?
This is usually because:
- The properties of the current conversation differ from your expectations
- The condition order is different
- The fallback branch was triggered
- The external result or variable value differs from the test expectation
What Happens If a Button Is Not Clicked?
If a "not clicked" time window is configured for the message node, the workflow continues along the not-clicked path after the timeout.
Can a Flow Run Over a Long Period?
Yes, but the longer the workflow, the more attention you should pay to:
- Entry frequency
- Timeout settings
- Goal events
- Conflict governance with other Flows
When Should a Flow Be Split into Two Flows?
When the two business objectives, target audiences, governance rules, or workflow pacing differ significantly, it is generally more appropriate to split them.
When Is It Not Recommended to Put All Logic into One Flow?
If one Flow handles multiple objectives, such as welcoming, conversion, after-sales service, and satisfaction surveys, subsequent maintenance and testing will usually become more complex.
We recommend building the workflow around a single business objective.
