สร้าง Push
บทความนี้จัดทำขึ้นเพื่อแนะนำผู้ใช้เกี่ยวกับการสร้างงาน Push ประเภทต่าง ๆ ในคอนโซล EngageLab โดยครอบคลุมเวิร์กโฟลว์ทั้งหมดสำหรับข้อความแจ้งเตือน ข้อความแบบกำหนดเอง และข้อความในแอป ส่วนต่อไปนี้จะแนะนำขั้นตอนการสร้าง การกำหนดค่าพารามิเตอร์ และข้อควรระวังสำหรับข้อความแต่ละประเภท เพื่อช่วยให้คุณตั้งค่างาน Push ได้อย่างมีประสิทธิภาพ
สร้างข้อความแจ้งเตือน
ไปที่ [Push] - [Create Push] - [Notification Message] เพื่อสร้างงาน Push โดยมีคำอธิบายการกำหนดค่าพารามิเตอร์ดังนี้:
การตั้งค่าพื้นฐาน
- ชื่อการแจ้งเตือน: ชื่อของข้อความ Push ควรหลีกเลี่ยงเนื้อหาที่ไม่มีความหมาย เช่น "test", "测试" หรือเป็นตัวเลขล้วน มิฉะนั้นอาจถูกผู้ให้บริการบล็อกและทำให้ไม่สามารถรับข้อความแจ้งเตือนได้
- เนื้อหาการแจ้งเตือน: เนื้อหาของข้อความ Push ควรหลีกเลี่ยงเนื้อหาที่ไม่มีความหมาย เช่น "test", "测试" หรือเป็นตัวเลขล้วน มิฉะนั้นอาจถูกผู้ให้บริการบล็อกและทำให้ไม่สามารถรับข้อความแจ้งเตือนได้
- รองรับการเพิ่มชื่อ Push และเนื้อหา Push ได้หลายภาษา ระบบจะตรวจจับภาษาของอุปกรณ์ผู้ใช้ปลายทางโดยอัตโนมัติ หากไม่ได้กำหนดภาษาอื่นไว้ ระบบจะส่งเนื้อหาในภาษา [Default] ไปยังผู้ใช้เป้าหมายทั้งหมด
- รองรับการแปลด้วย AI ในคลิกเดียว
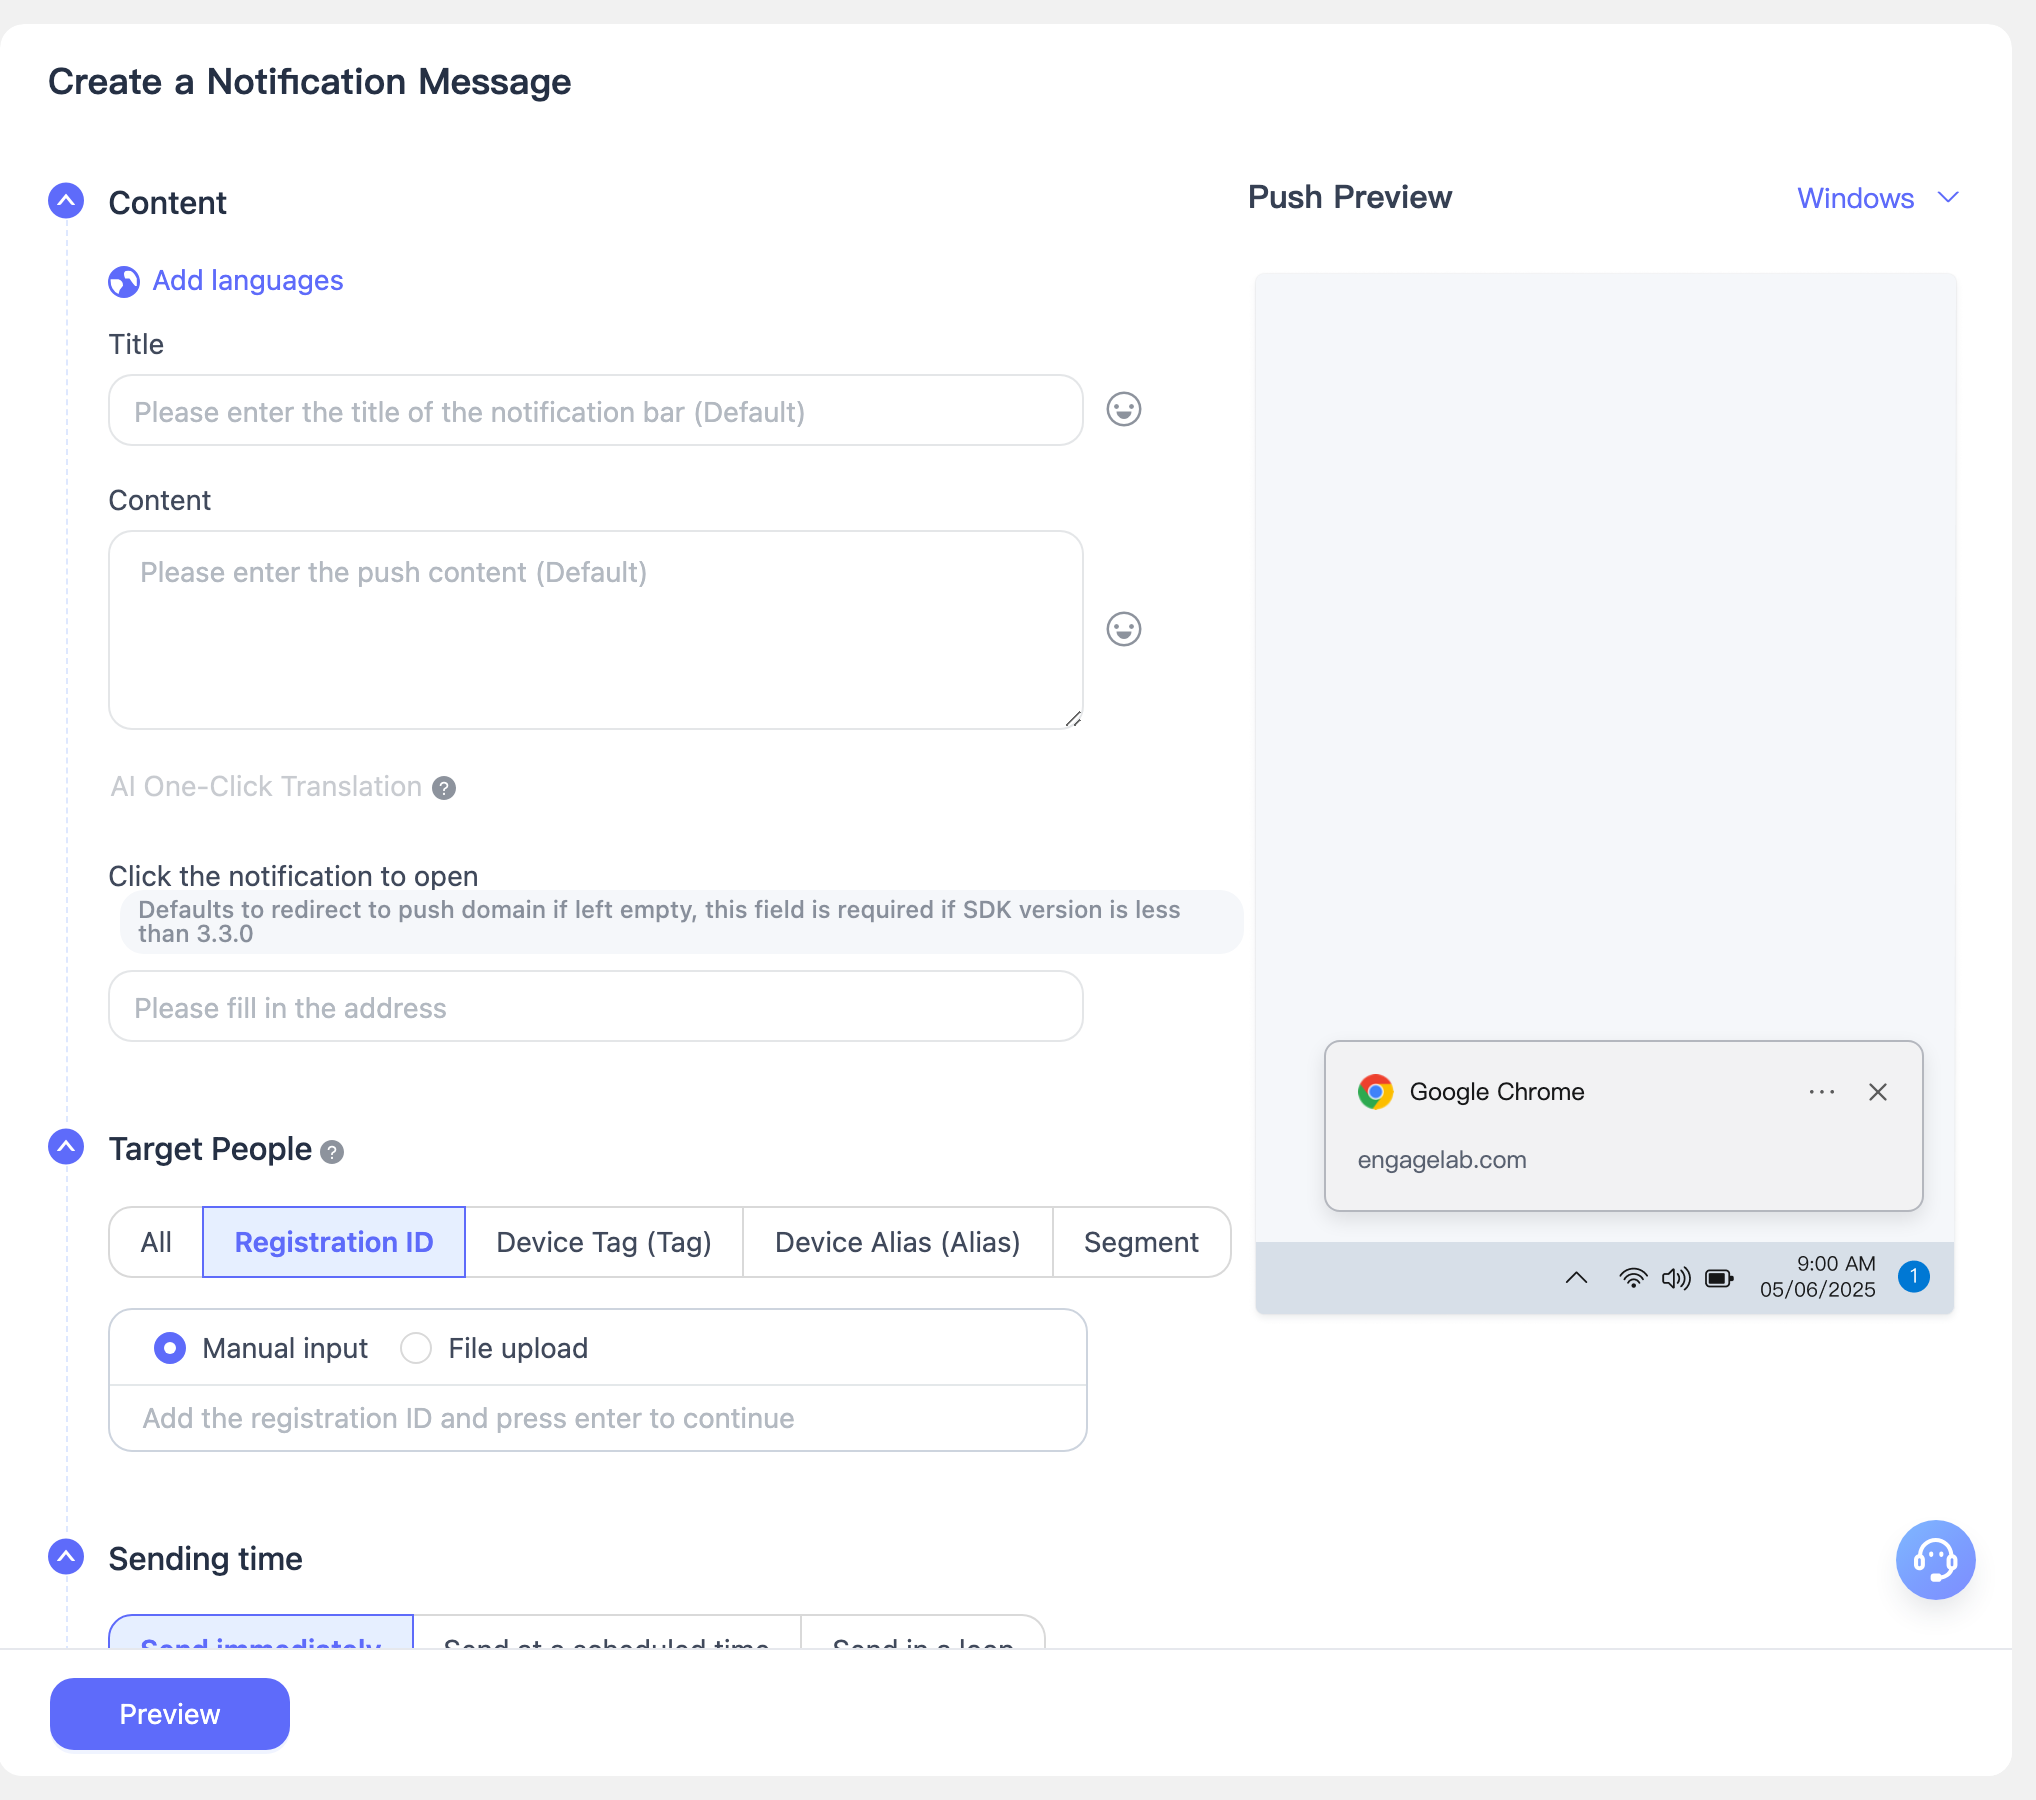
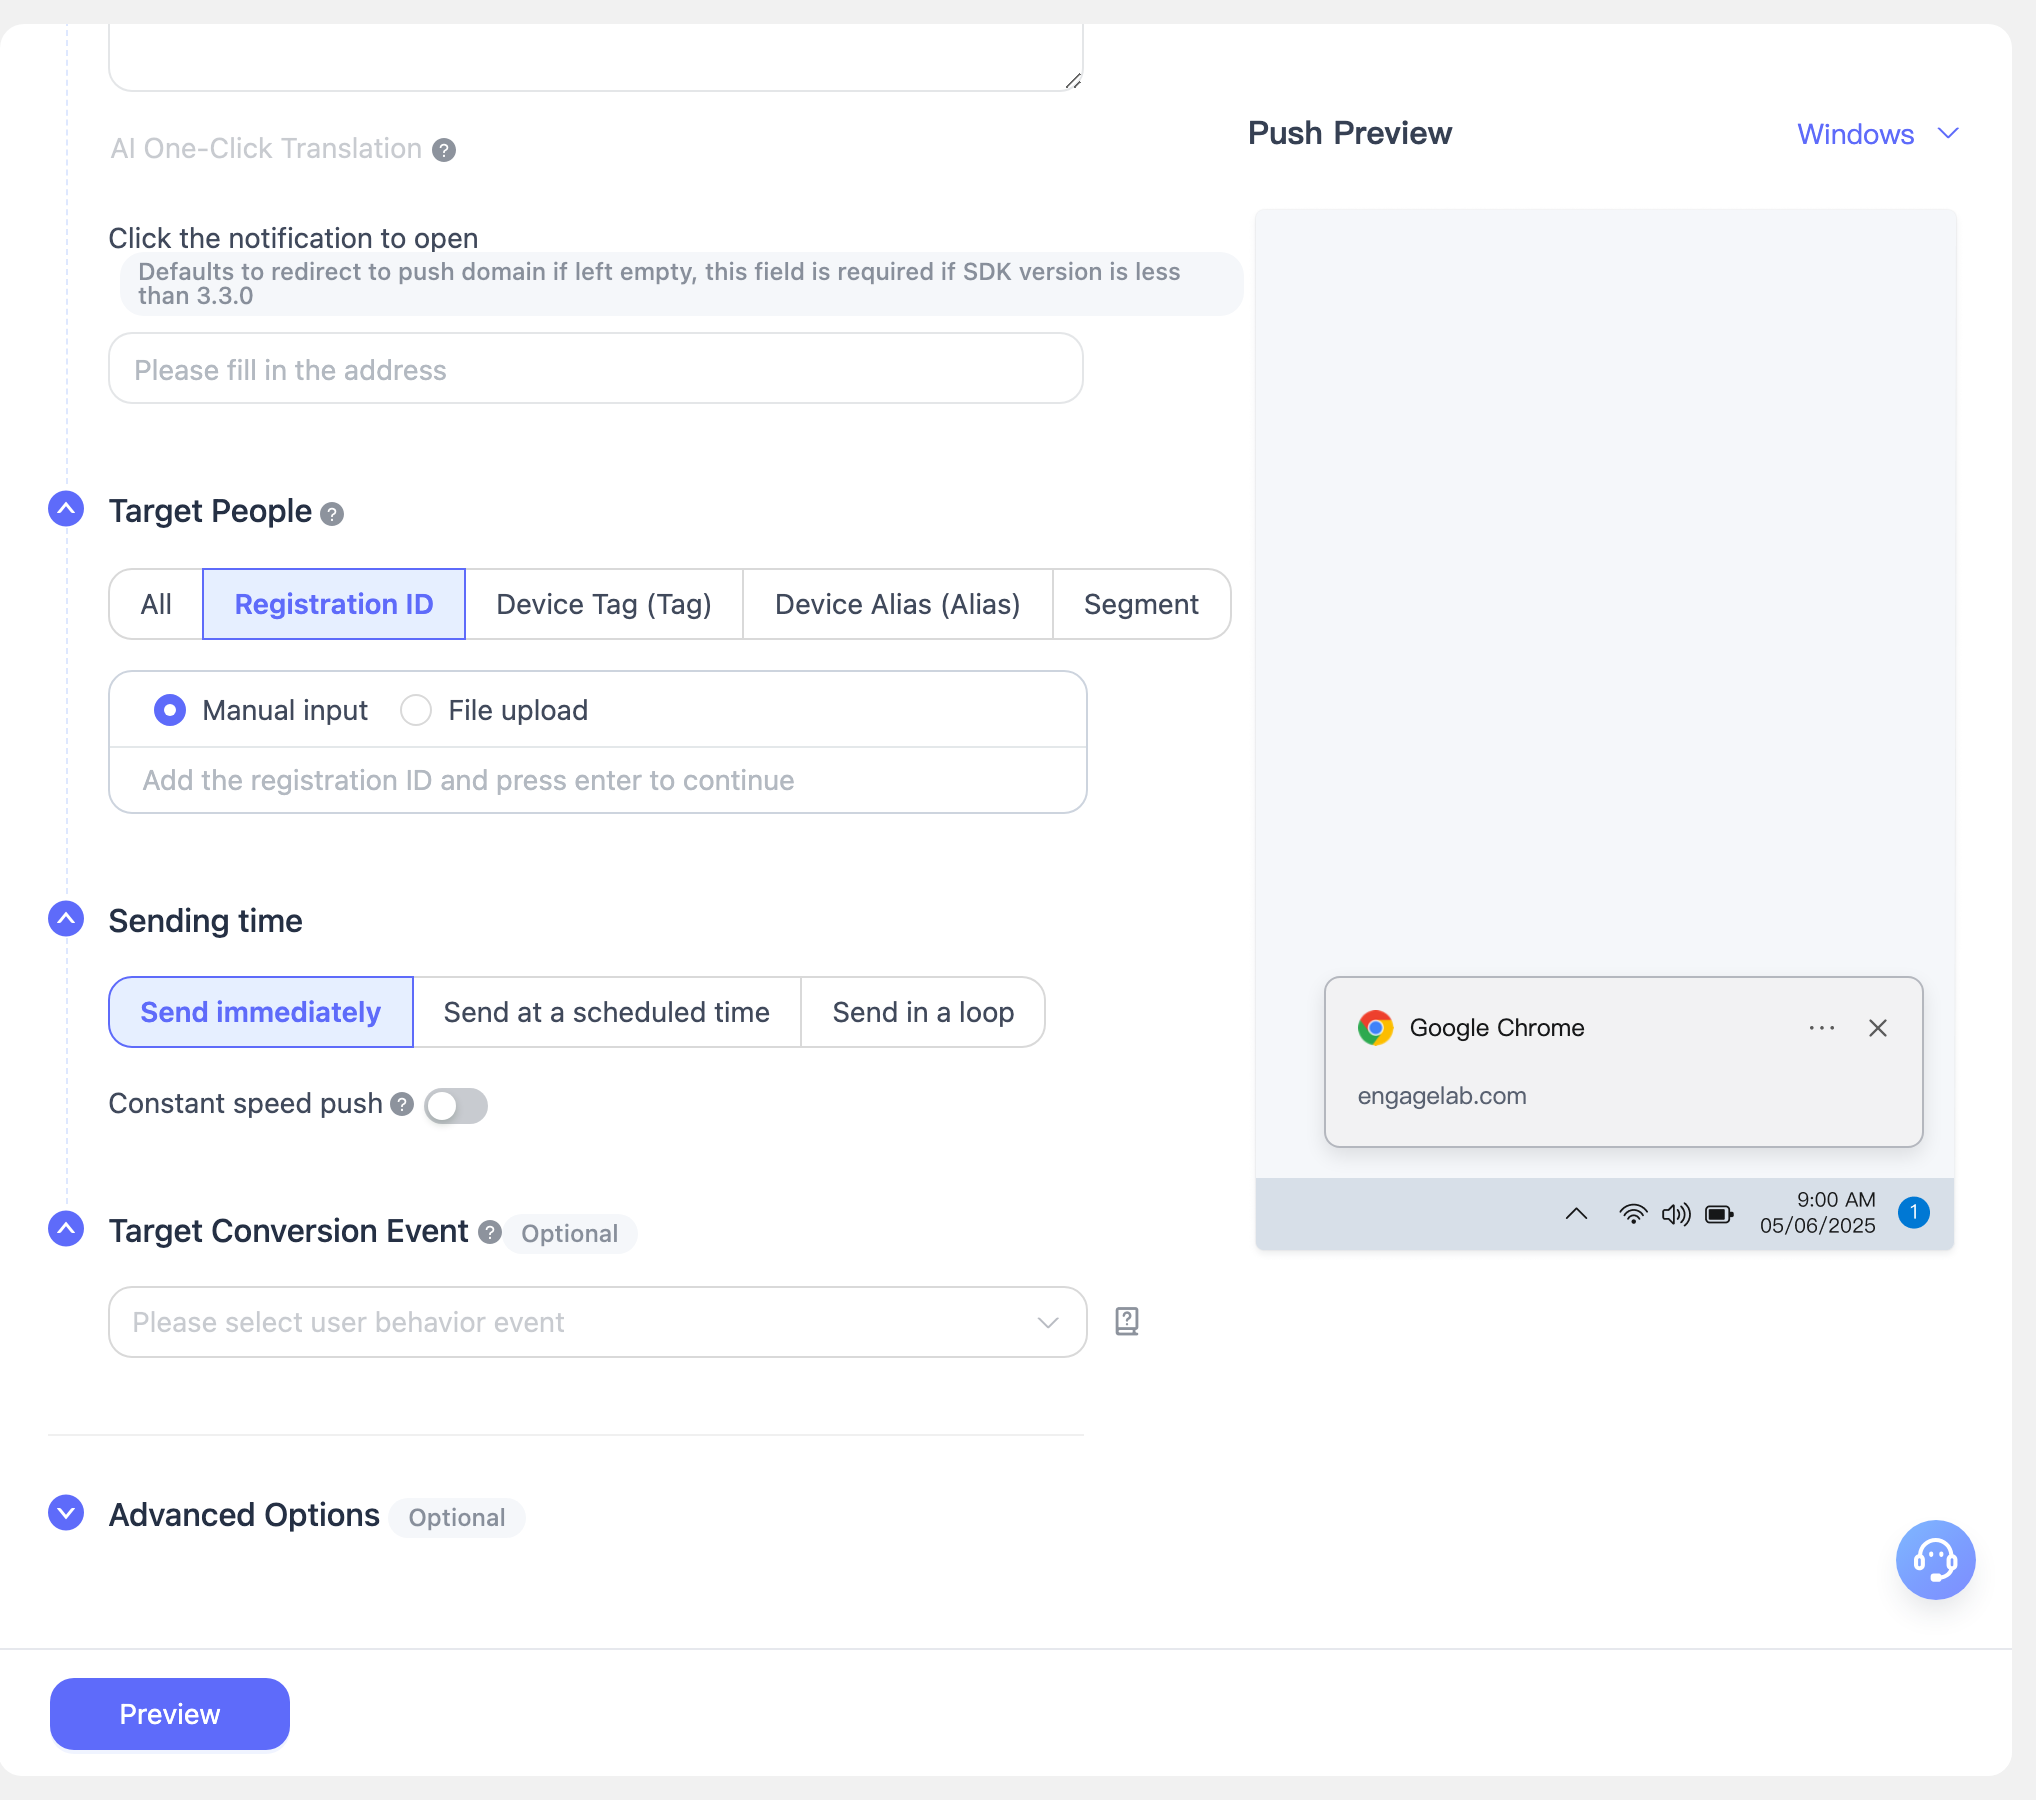
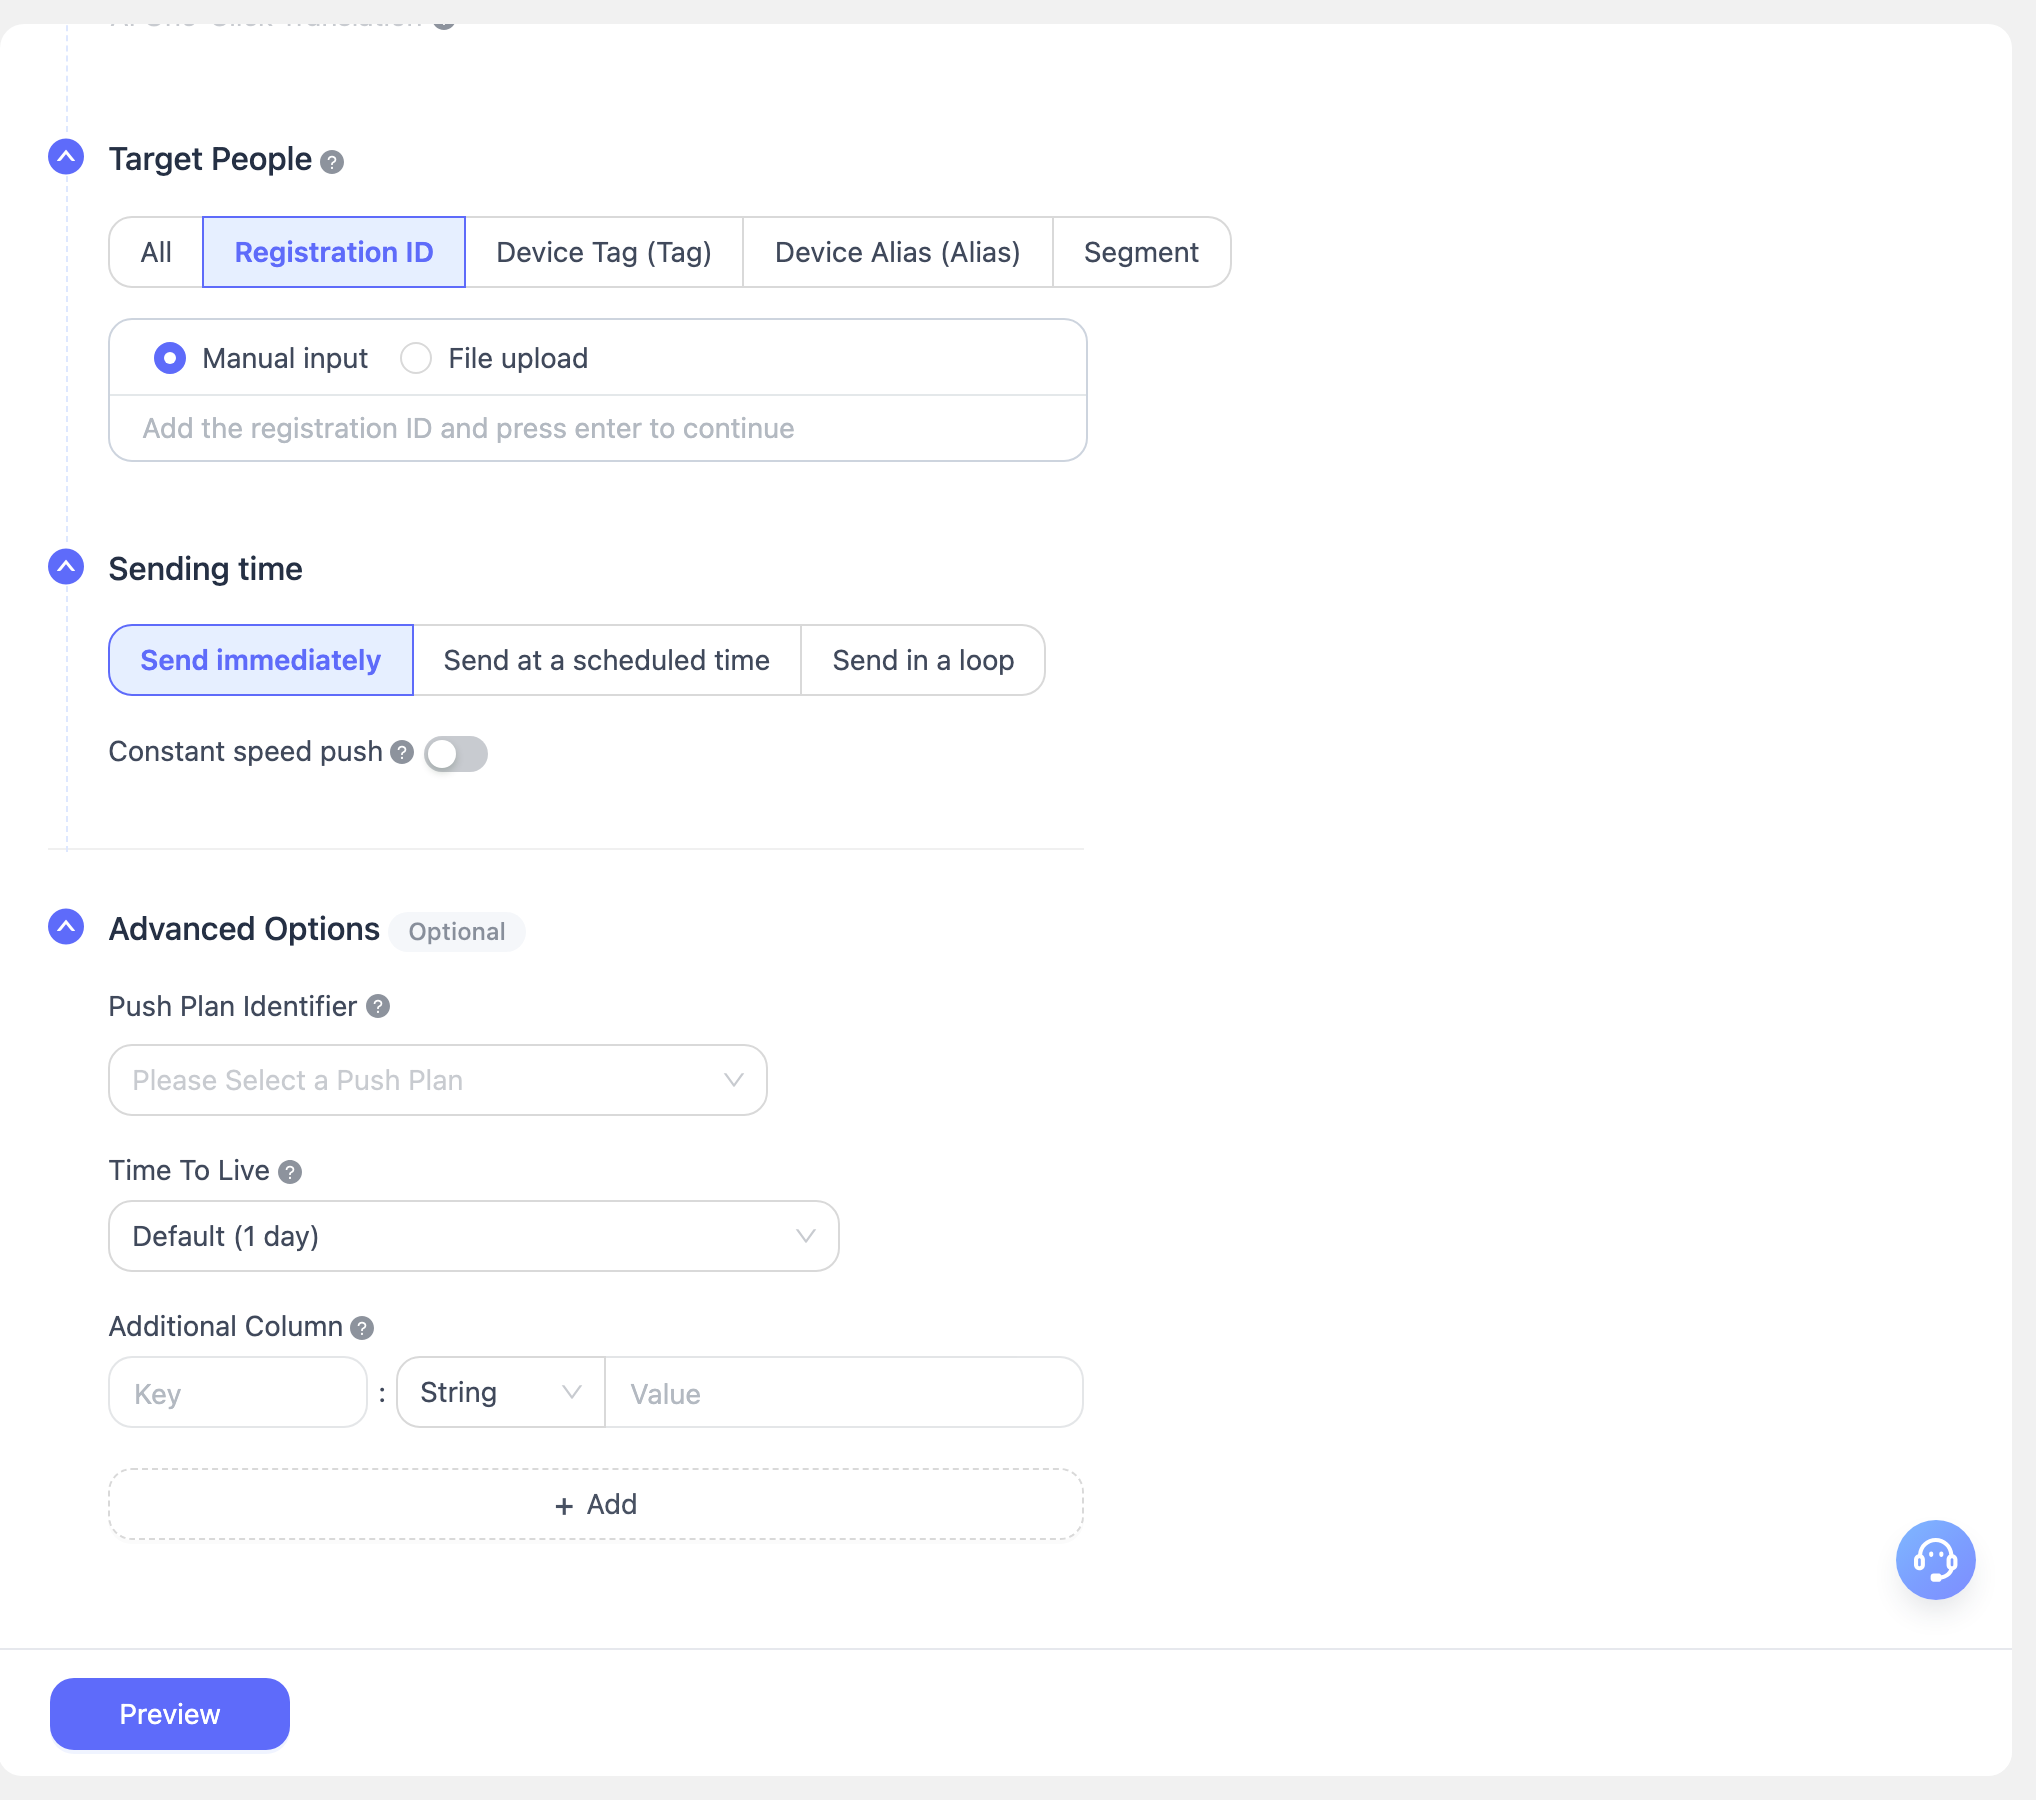
กลุ่มเป้าหมาย: แพลตฟอร์ม EngageLab Push รองรับหลายวิธีในการเลือกกลุ่มเป้าหมาย ช่วยให้นักพัฒนาและทีมปฏิบัติการเข้าถึงผู้ใช้ได้อย่างแม่นยำตามความต้องการทางธุรกิจที่แตกต่างกัน ในระหว่างการทดสอบ แนะนำให้ใช้ registration ID ที่ได้จากบันทึกการลงทะเบียนเพื่อทำการ Push
- ส่งถึงทั้งหมด: ส่งข้อความ Push ไปยังผู้ใช้ออนไลน์ทั้งหมดของแอปพลิเคชันที่ลงทะเบียนอยู่ในปัจจุบัน รวมถึงผู้ใช้ที่จะลงทะเบียนออนไลน์ในอนาคต
- Registration ID: ระบุ device ID ได้สูงสุด 1,000 รายการสำหรับการ Push โดยป้อนด้วยตนเองหรืออัปโหลดไฟล์ TXT
- ตั้งค่าแท็ก: กรองผู้ใช้เป้าหมายสำหรับการ Push ตามแท็กของอุปกรณ์ โดยใช้หลายรูปแบบร่วมกัน เช่น ยูเนียน อินเตอร์เซกชัน และคอมพลีเมนต์
- ตั้งค่า Alias: ส่งข้อความ Push ไปยังอุปกรณ์ของผู้ใช้เฉพาะรายโดยการป้อนหรืออัปโหลด alias
- เซกเมนต์ผู้ใช้: แบ่งผู้ใช้ที่มีคุณลักษณะเดียวกันออกเป็นกลุ่มผ่านกฎการแบ่งเซกเมนต์แบบกำหนดเอง และเลือกเซกเมนต์เป้าหมายสำหรับการ Push แบบเจาะจง
เวลาส่ง: เลือกเวลาที่จะส่งข้อความ
- ทันที: ส่งข้อความทันที
- ตามกำหนดเวลา: กำหนดงานส่งตามเวลาขององค์กรหรือเวลาของผู้ใช้ปลายทาง
- แบบเกิดซ้ำ: กำหนดค่าการแจ้งเตือนแบบเกิดซ้ำอัตโนมัติภายในช่วงเวลาที่ระบุ
- อัจฉริยะ: ทุกครั้งที่ผู้ใช้เข้าถึงบริการของคุณผ่านเว็บไซต์หรือแอปมือถือที่ติดตั้ง EngageLab SDK ระบบจะติดตามเวลาการใช้งานล่าสุดของผู้ใช้ บันทึกข้อมูลนี้ และอ้างอิงจากพฤติกรรมการใช้งานในอดีตของผู้ใช้เพื่อส่งการแจ้งเตือนให้แต่ละคนในเวลาที่เหมาะสมตามเขตเวลาของอุปกรณ์ผู้ใช้
Push แบบจำกัดอัตรา: ดำเนินการส่งให้เสร็จสิ้นภายในเวลาที่กำหนดเพื่อลดภาระของเซิร์ฟเวอร์
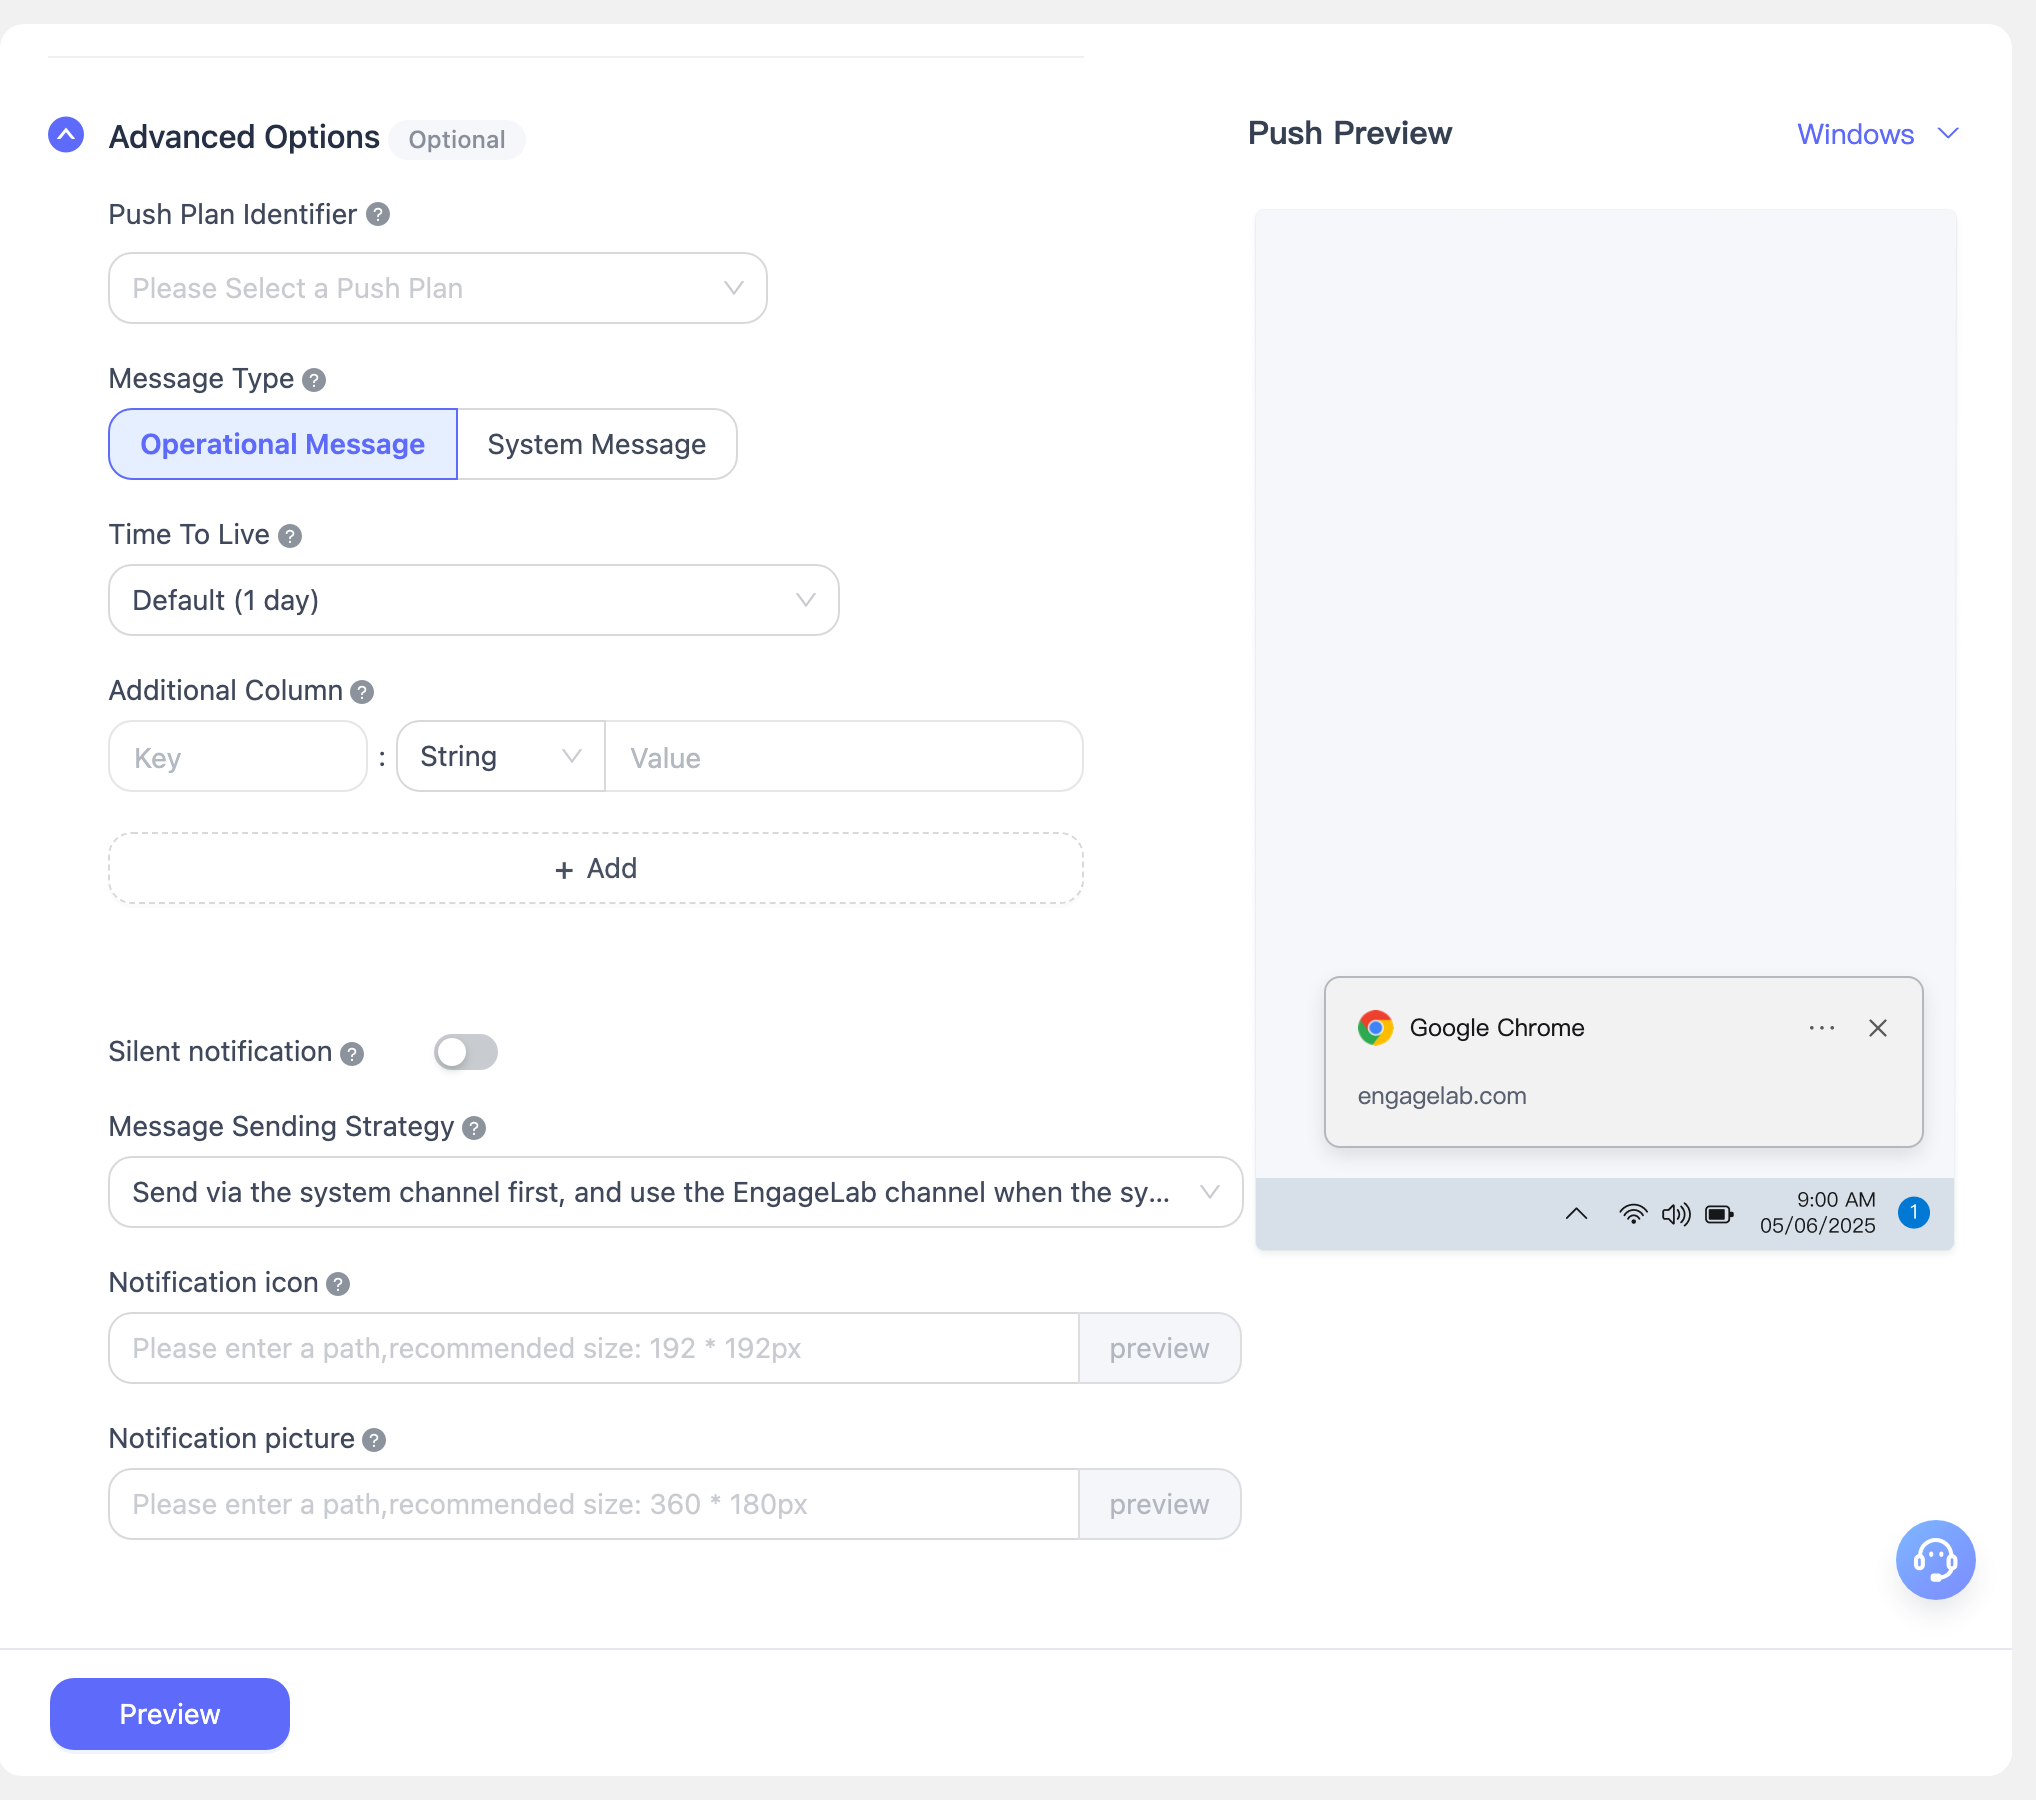
การตั้งค่าขั้นสูง (ไม่บังคับ)
ส่วนนี้จะแนะนำการตั้งค่าขั้นสูงสำหรับข้อความ Push คุณสามารถกำหนดค่าได้อย่างยืดหยุ่นตามความต้องการทางธุรกิจ เพื่อปรับปรุงประสิทธิภาพการ Push และประสบการณ์ผู้ใช้
ตัวระบุแผน Push
คุณสามารถตั้งค่าแผน Push เพื่อจัดชุดการ Push เดียวกันให้อยู่ภายใต้ตัวระบุแผนเดียวกัน ช่วยให้ง่ายต่อการจัดทำสถิติและการวิเคราะห์ประสิทธิภาพในภายหลังประเภทข้อความ
รองรับการเลือก ข้อความปฏิบัติการ หรือ ข้อความระบบ โดยแพลตฟอร์มจะปรับประเภทข้อความให้เหมาะสมกับแต่ละช่องทางของผู้ให้บริการโดยอัตโนมัติตามที่คุณเลือก- ข้อความระบบ: เหมาะสำหรับสถานการณ์ด้านบริการ และโดยทั่วไปจะไม่อยู่ภายใต้ข้อจำกัดโควต้าของผู้ให้บริการ เช่น การแจ้งเตือนสำคัญเกี่ยวกับการเปลี่ยนแปลงบัญชีหรือการบำรุงรักษาระบบ
- ข้อความปฏิบัติการ: เหมาะสำหรับสถานการณ์ด้านการตลาดและการดำเนินงาน และโดยทั่วไปจะอยู่ภายใต้ข้อจำกัดโควต้า Push ของผู้ให้บริการ มักใช้กับแคมเปญการตลาดและการกระตุ้นให้ผู้ใช้กลับมาใช้งานอีกครั้ง
ระยะเวลาเก็บข้อความออฟไลน์
คุณสามารถระบุระยะเวลาการเก็บข้อความออฟไลน์ได้ หากผู้ใช้ออฟไลน์อยู่ในขณะนั้น ข้อความจะถูกบันทึกเป็นข้อความออฟไลน์และถูก Push เมื่อผู้ใช้ออนไลน์ครั้งถัดไป หากผู้ใช้ออนไลน์ภายในช่วงเวลานี้ก็ยังสามารถรับ Push ได้ มิฉะนั้นข้อความจะหมดอายุ- ระยะเวลาเริ่มต้นคือ 1 วัน
- เมื่อตั้งค่าเป็น 0 จะไม่เก็บข้อความออฟไลน์ มีเพียงผู้ใช้ที่ออนไลน์อยู่ในขณะนั้นเท่านั้นที่สามารถรับข้อความได้ และผู้ใช้ออฟไลน์จะไม่ได้รับข้อความ
ฟิลด์เพิ่มเติม
รองรับการตั้งค่าพารามิเตอร์แบบกำหนดเอง โดยฝั่งไคลเอนต์สามารถรับค่าของฟิลด์เหล่านี้เพื่อใช้จัดการเหตุการณ์แบบกำหนดเองได้ คุณสามารถเพิ่มหรือลบพารามิเตอร์เพิ่มเติมเพื่อตอบโจทย์ความต้องการทางธุรกิจที่หลากหลายการแจ้งเตือนแบบเงียบ
เมื่อเปิดใช้งาน ผู้ใช้เว็บไซต์ที่ได้รับการแจ้งเตือนใหม่จะหลีกเลี่ยงพฤติกรรมเริ่มต้นของอุปกรณ์ เช่น การสั่น เสียง หรือการเปิดหน้าจอ ช่วยลดการรบกวนผู้ใช้กลยุทธ์การส่งการแจ้งเตือน
คุณสามารถเลือกวิธีการส่งการแจ้งเตือนที่แตกต่างกันได้:- ส่งผ่านช่องทางระบบ: ไม่ขึ้นอยู่กับการที่ผู้ใช้เปิดหน้าเว็บไซต์อยู่ ตราบใดที่เบราว์เซอร์ยังทำงานอยู่ในโปรเซสของระบบปฏิบัติการ ก็ยังสามารถส่งการแจ้งเตือนได้
- ส่งผ่านช่องทาง EngageLab: ส่งผ่าน WebSocket ที่ EngageLab พัฒนาขึ้นเอง และขึ้นอยู่กับการที่ผู้ใช้เปิดหน้าเว็บไซต์ของคุณอยู่
ไอคอนการแจ้งเตือน
รองรับการกำหนดไอคอนการแจ้งเตือนเองพร้อมพรีวิวแบบเรียลไทม์- ขนาดที่แนะนำ: 192 × 192 px
- ขนาดสูงสุด: 1 MB
- รูปแบบที่รองรับ: JPG, PNG, GIF
- เบราว์เซอร์ที่รองรับ: Chrome, Firefox, Opera, Edge
- ลิงก์รูปภาพต้องเป็นทรัพยากรบนเว็บที่ขึ้นต้นด้วย
httpหรือhttps
ภาพขนาดใหญ่ของการแจ้งเตือน
รองรับการกำหนดภาพขนาดใหญ่ของการแจ้งเตือนเองพร้อมพรีวิวแบบเรียลไทม์- ขนาดที่แนะนำ: 360 × 180 px
- ขนาดสูงสุด: 1 MB
- รูปแบบที่รองรับ: JPG, PNG, GIF
- แพลตฟอร์มที่รองรับ: Chrome, Opera และ Edge บน Windows
- ลิงก์รูปภาพต้องเป็นทรัพยากรบนเว็บที่ขึ้นต้นด้วย
httpหรือhttps
ตัวอย่างก่อนส่ง
ภาพตัวอย่างจะแสดงอยู่ทางด้านขวาของหน้า หลังจากกำหนดค่าพารามิเตอร์ Push แล้ว ให้คลิก Send Preview เพื่อดูพารามิเตอร์ Push ที่ตั้งค่าไว้
ยืนยันพารามิเตอร์การส่ง จากนั้นคลิก Confirm เพื่อสร้างงาน Push ได้สำเร็จ
สร้างข้อความแบบกำหนดเอง
ไปที่ [Create Push] - [Custom Message] เพื่อสร้างงาน Push โดยมีคำอธิบายการกำหนดค่าพารามิเตอร์ดังนี้:
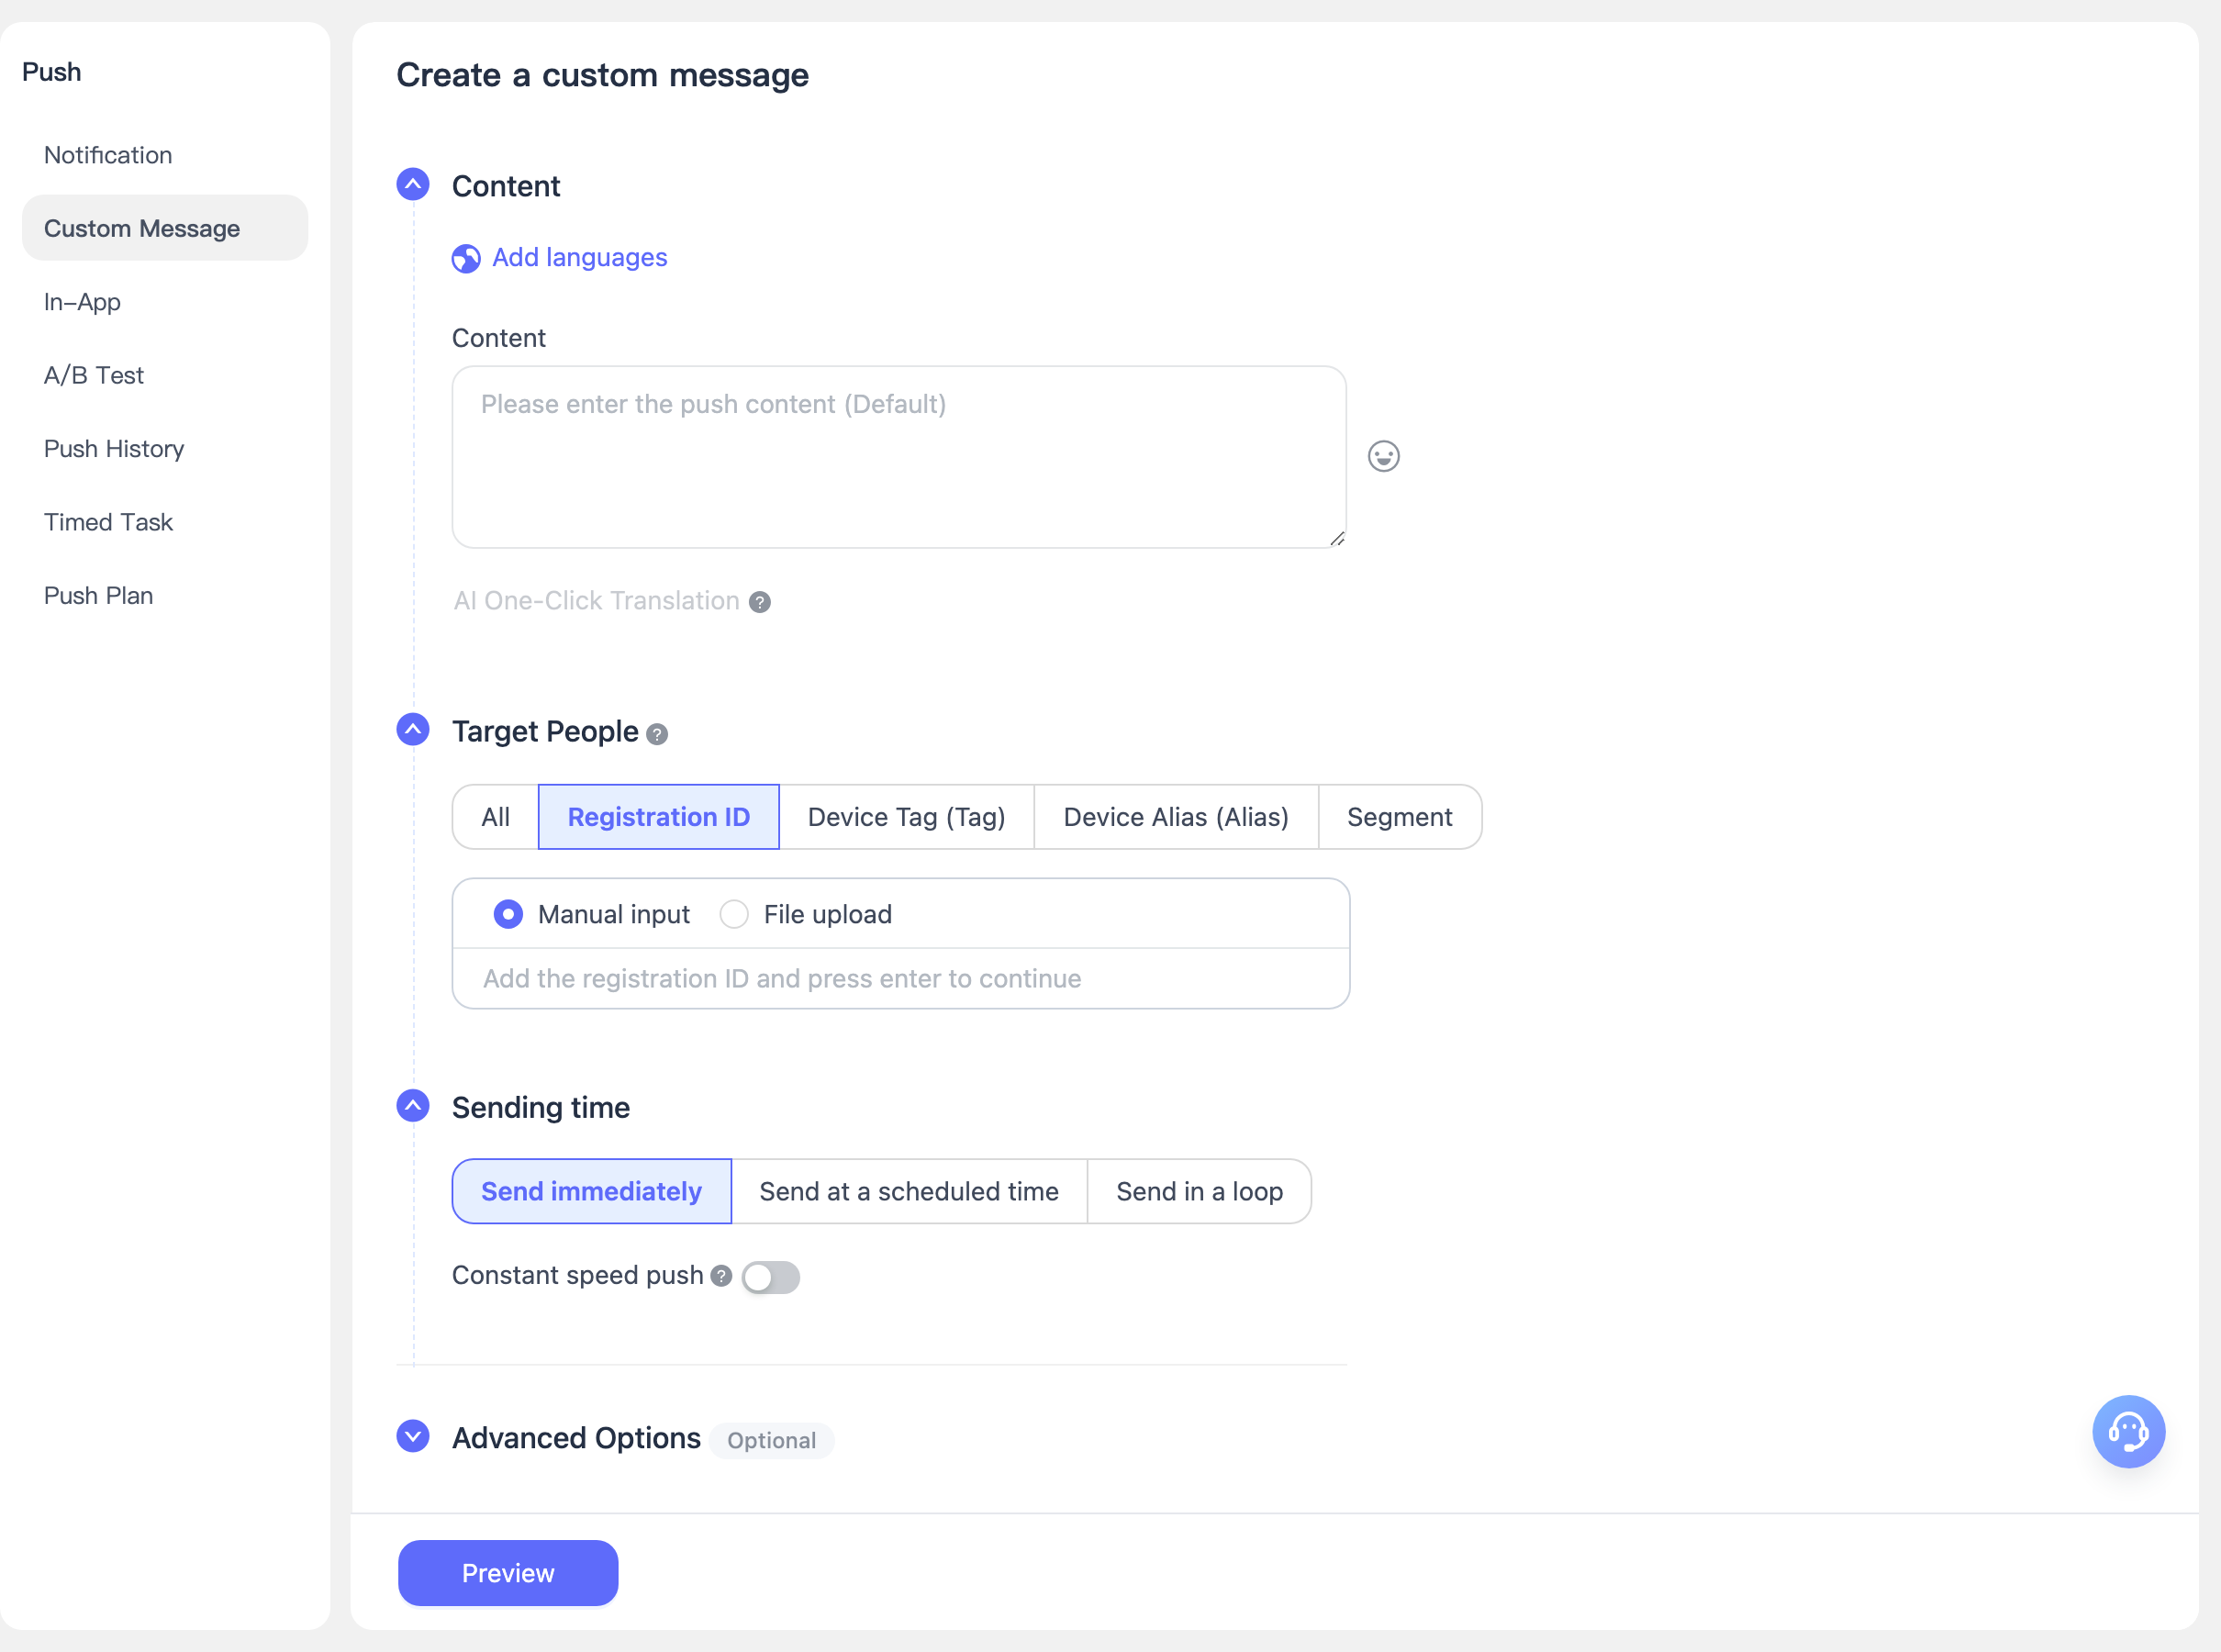
การตั้งค่าพื้นฐาน
- เนื้อหาการแจ้งเตือน: เนื้อหาของข้อความ Push ควรหลีกเลี่ยงเนื้อหาที่ไม่มีความหมาย เช่น "test", "测试" หรือเป็นตัวเลขล้วน มิฉะนั้นอาจถูกผู้ให้บริการบล็อกและทำให้ไม่สามารถรับข้อความแจ้งเตือนได้
- รองรับการเพิ่มชื่อ Push และเนื้อหา Push ได้หลายภาษา ระบบจะตรวจจับภาษาของอุปกรณ์ผู้ใช้ปลายทางโดยอัตโนมัติ หากไม่ได้กำหนดภาษาอื่นไว้ ระบบจะส่งเนื้อหาในภาษา [Default] ไปยังผู้ใช้เป้าหมายทั้งหมด
- รองรับการแปลด้วย AI ในคลิกเดียว
- กลุ่มเป้าหมาย: โปรดดู สร้างข้อความแจ้งเตือน
- เวลาส่ง: โปรดดู สร้างข้อความแจ้งเตือน
การตั้งค่าขั้นสูง (ไม่บังคับ)
ส่วนนี้จะแนะนำการตั้งค่าขั้นสูงสำหรับข้อความ Push คุณสามารถกำหนดค่าได้อย่างยืดหยุ่นตามความต้องการทางธุรกิจ เพื่อปรับปรุงประสิทธิภาพการ Push และประสบการณ์ผู้ใช้
ตัวระบุแผน Push
คุณสามารถตั้งค่าแผน Push เพื่อจัดชุดการ Push เดียวกันให้อยู่ภายใต้ตัวระบุแผนเดียวกัน ช่วยให้ง่ายต่อการจัดทำสถิติและการวิเคราะห์ประสิทธิภาพในภายหลังประเภทข้อความ
รองรับการเลือก ข้อความปฏิบัติการ หรือ ข้อความระบบ โดยแพลตฟอร์มจะปรับประเภทข้อความให้เหมาะสมกับแต่ละช่องทางของผู้ให้บริการโดยอัตโนมัติตามที่คุณเลือก- ข้อความระบบ: เหมาะสำหรับสถานการณ์ด้านบริการ และโดยทั่วไปจะไม่อยู่ภายใต้ข้อจำกัดโควต้าของผู้ให้บริการ
- ข้อความปฏิบัติการ: เหมาะสำหรับสถานการณ์ด้านการตลาดและการดำเนินงาน และโดยทั่วไปจะอยู่ภายใต้ข้อจำกัดโควต้า Push ของผู้ให้บริการ
ระยะเวลาเก็บข้อความออฟไลน์
คุณสามารถระบุระยะเวลาการเก็บข้อความออฟไลน์ได้ หากผู้ใช้ออฟไลน์อยู่ในขณะนั้น ข้อความจะถูกบันทึกเป็นข้อความออฟไลน์และถูก Push เมื่อผู้ใช้ออนไลน์ครั้งถัดไป หากผู้ใช้ออนไลน์ภายในช่วงเวลานี้ก็ยังสามารถรับ Push ได้ มิฉะนั้นข้อความจะหมดอายุ- ระยะเวลาเริ่มต้นคือ 1 วัน
- เมื่อตั้งค่าเป็น 0 จะไม่เก็บข้อความออฟไลน์ มีเพียงผู้ใช้ที่ออนไลน์อยู่ในขณะนั้นเท่านั้นที่สามารถรับข้อความได้ และผู้ใช้ออฟไลน์จะไม่ได้รับข้อความ
ฟิลด์เพิ่มเติม
รองรับการตั้งค่าพารามิเตอร์แบบกำหนดเอง โดยฝั่งไคลเอนต์สามารถรับค่าของฟิลด์เหล่านี้เพื่อใช้จัดการเหตุการณ์แบบกำหนดเองได้ คุณสามารถเพิ่มหรือลบพารามิเตอร์เพิ่มเติมเพื่อตอบโจทย์ความต้องการทางธุรกิจที่หลากหลาย
ข้อความในแอป
ไปที่ [Push] - [Create Push] - [In-App Message] เพื่อสร้างงาน Push โดยมีคำอธิบายการกำหนดค่าพารามิเตอร์ดังนี้:
การตั้งค่าพื้นฐาน
- ชื่อข้อความ: จำเป็นต้องกรอก และจำกัดไม่เกิน 20 ตัวอักษร
- แพลตฟอร์มการส่ง: รองรับเฉพาะ Web เท่านั้น
- ผู้ใช้เป้าหมาย: แพลตฟอร์ม EngageLab Push รองรับหลายวิธีในการเลือกกลุ่มเป้าหมาย ช่วยให้นักพัฒนาและทีมปฏิบัติการเข้าถึงผู้ใช้ได้อย่างแม่นยำตามความต้องการทางธุรกิจที่แตกต่างกัน ในระหว่างการทดสอบ แนะนำให้ใช้ registration ID ที่ได้จากบันทึกการลงทะเบียนเพื่อทำการ Push
- ส่งถึงทั้งหมด: ส่งข้อความ Push ไปยังผู้ใช้ออนไลน์ทั้งหมดของแอปพลิเคชันที่ลงทะเบียนอยู่ในปัจจุบัน รวมถึงผู้ใช้ที่จะลงทะเบียนออนไลน์ในอนาคต
- Registration ID: ระบุ device ID ได้สูงสุด 1,000 รายการสำหรับการ Push โดยป้อนด้วยตนเองหรืออัปโหลดไฟล์ TXT
- ตั้งค่าแท็ก: กรองผู้ใช้เป้าหมายสำหรับการ Push ตามแท็กของอุปกรณ์ โดยใช้หลายรูปแบบร่วมกัน เช่น ยูเนียน อินเตอร์เซกชัน และคอมพลีเมนต์
- ตั้งค่า Alias: ส่งข้อความ Push ไปยังอุปกรณ์ของผู้ใช้เฉพาะรายโดยการป้อนหรืออัปโหลด alias
- เซกเมนต์ผู้ใช้: แบ่งผู้ใช้ที่มีคุณลักษณะเดียวกันออกเป็นกลุ่มผ่านกฎการแบ่งเซกเมนต์แบบกำหนดเอง และเลือกเซกเมนต์เป้าหมายสำหรับการ Push แบบเจาะจง
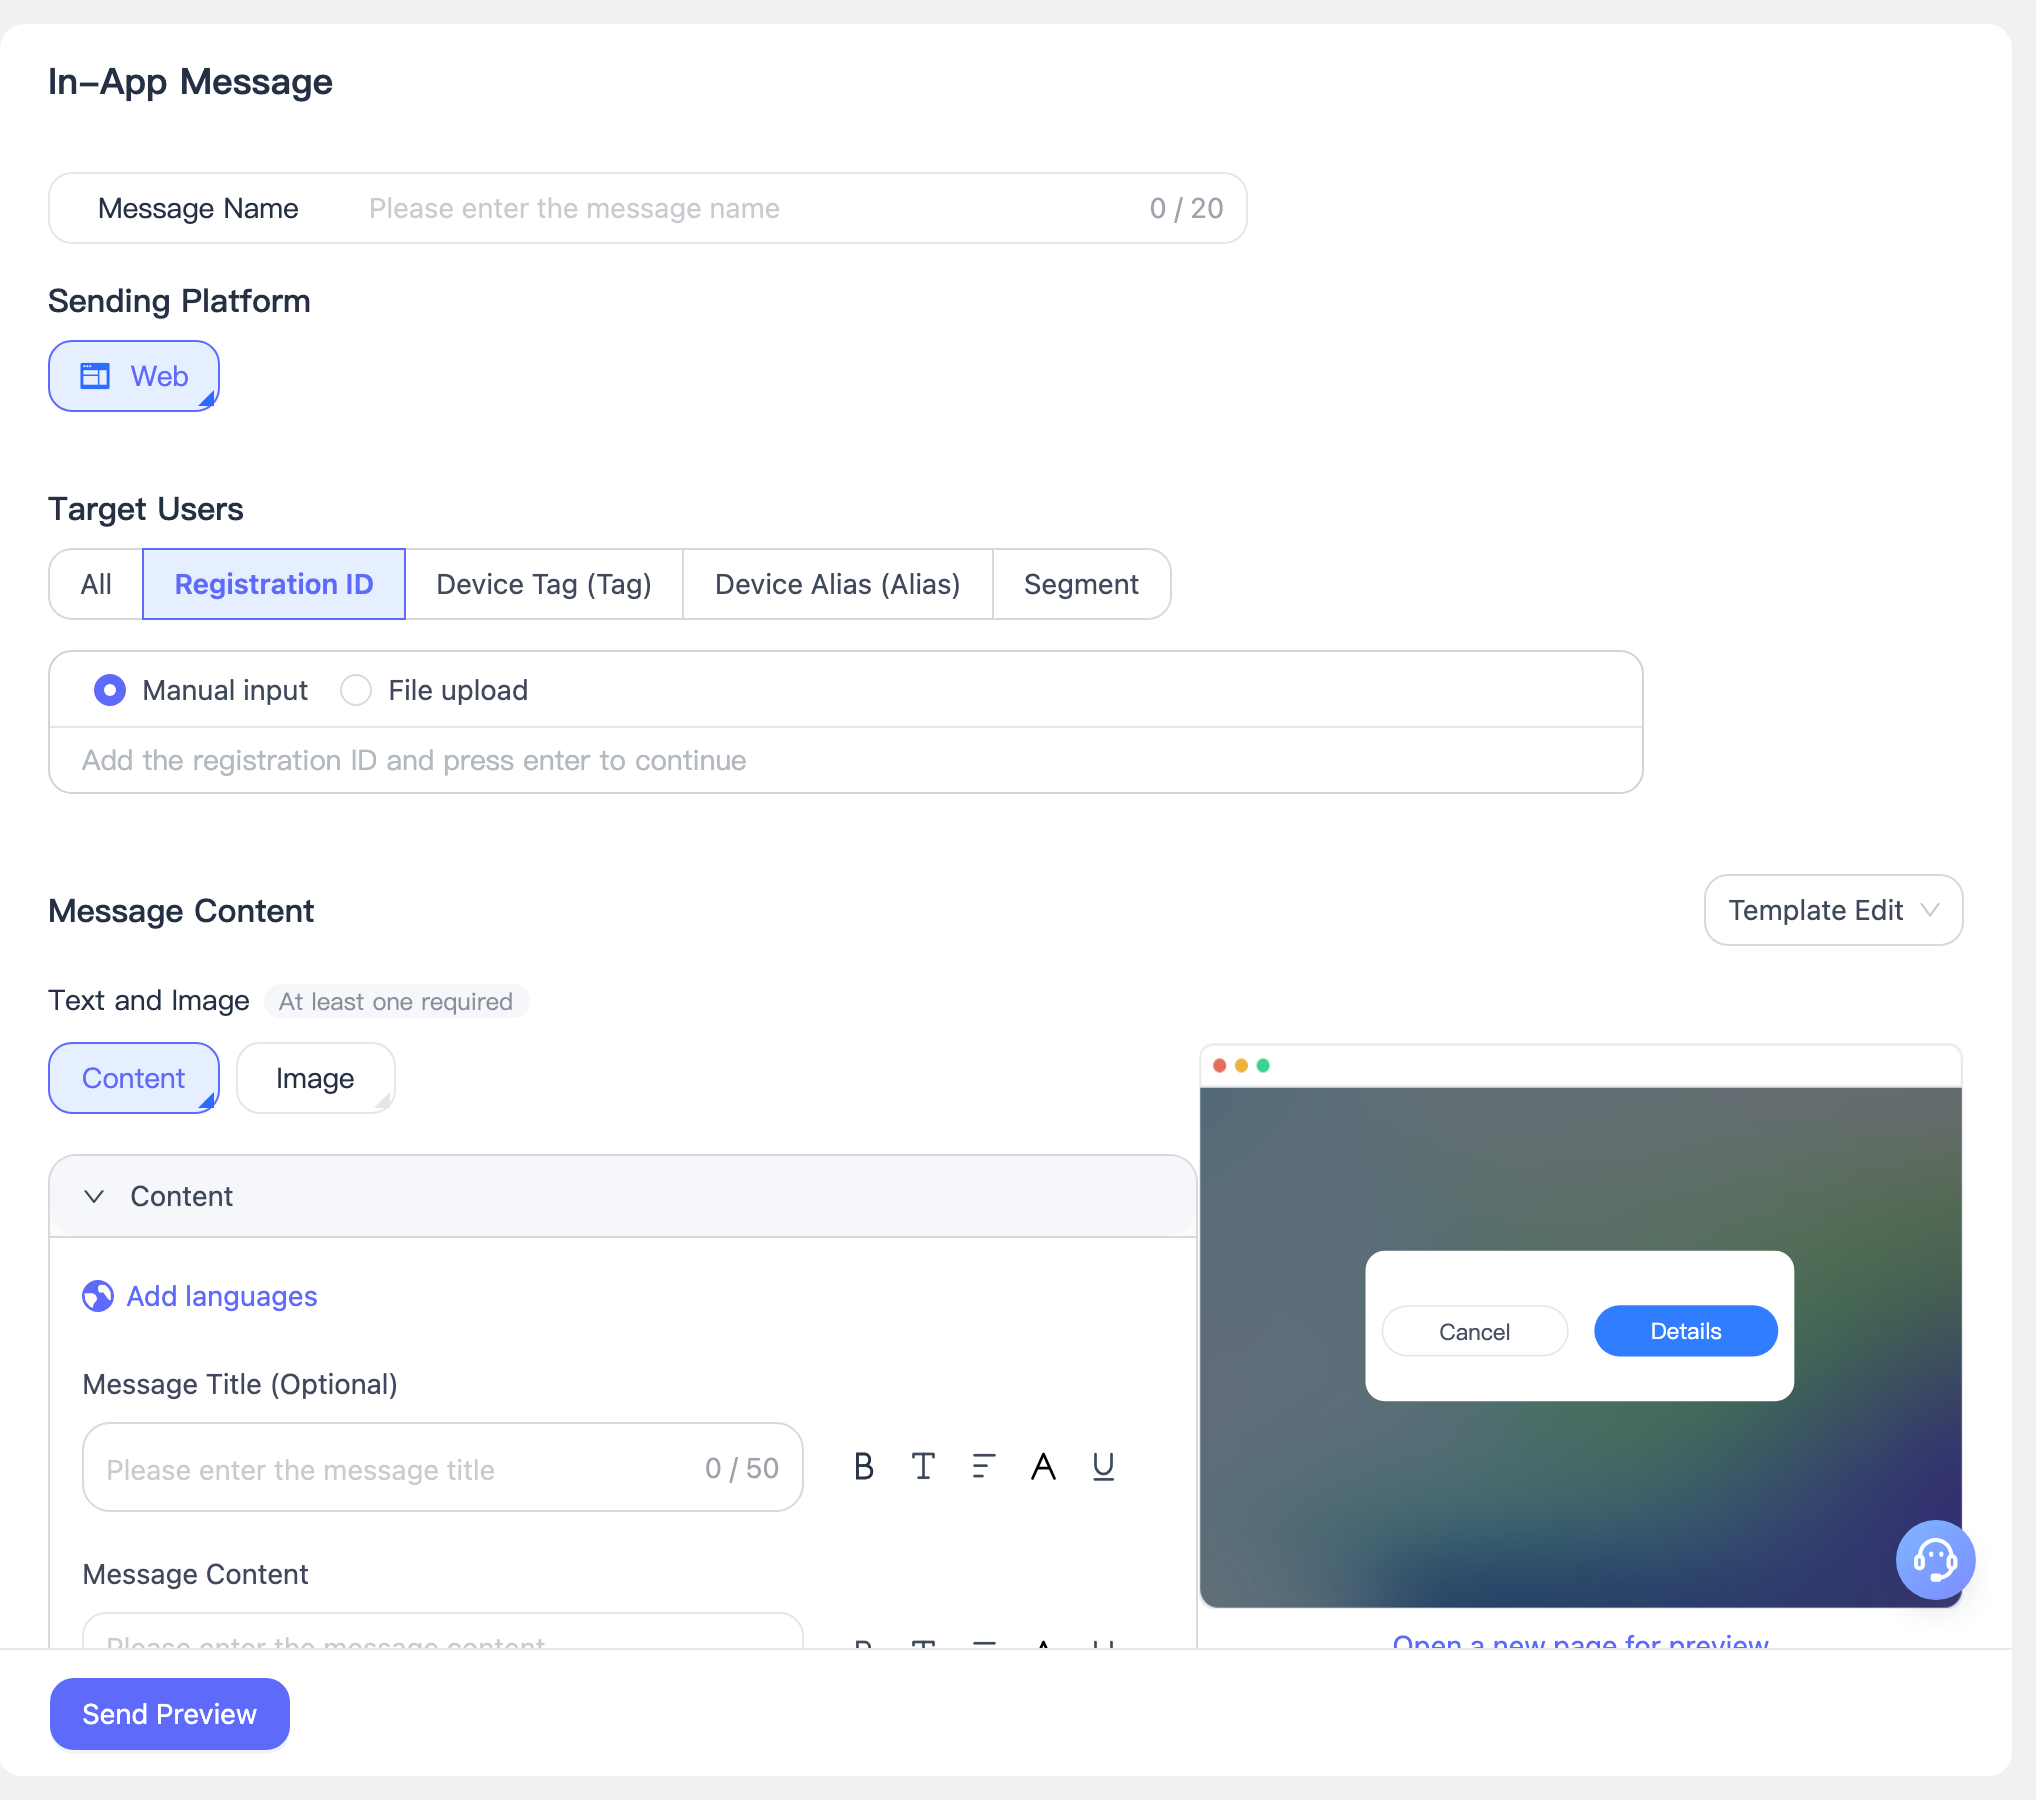
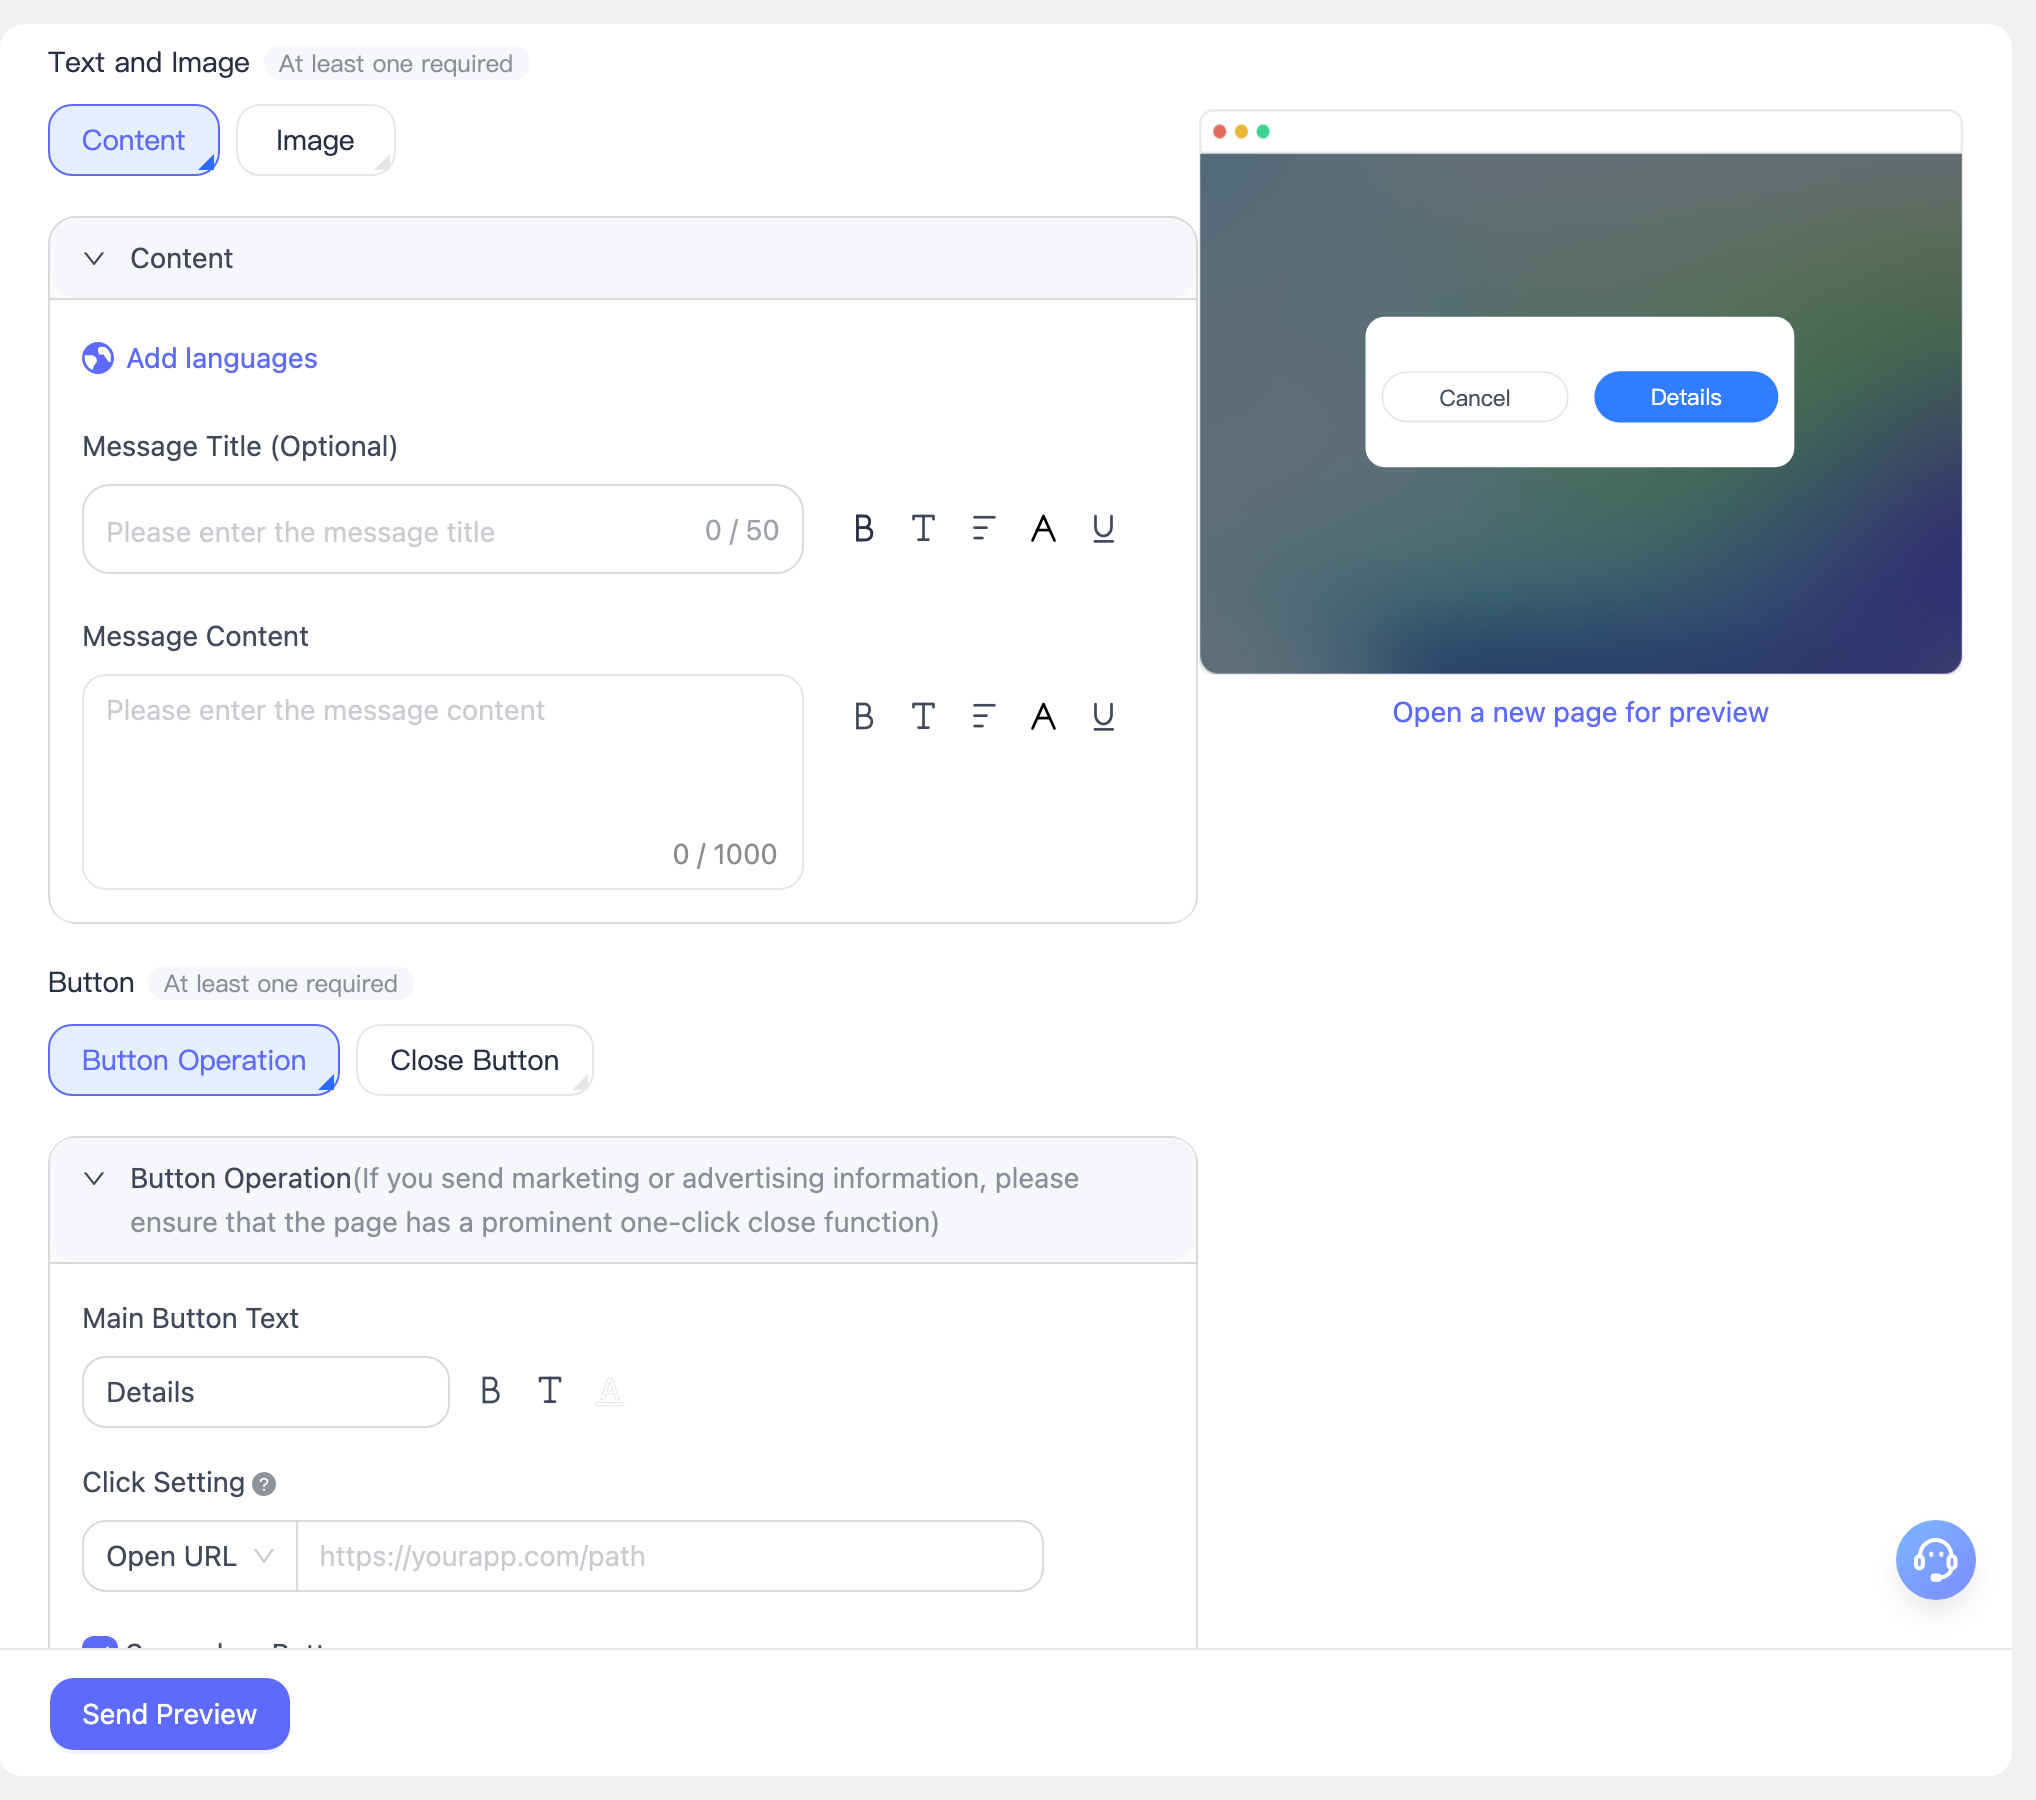
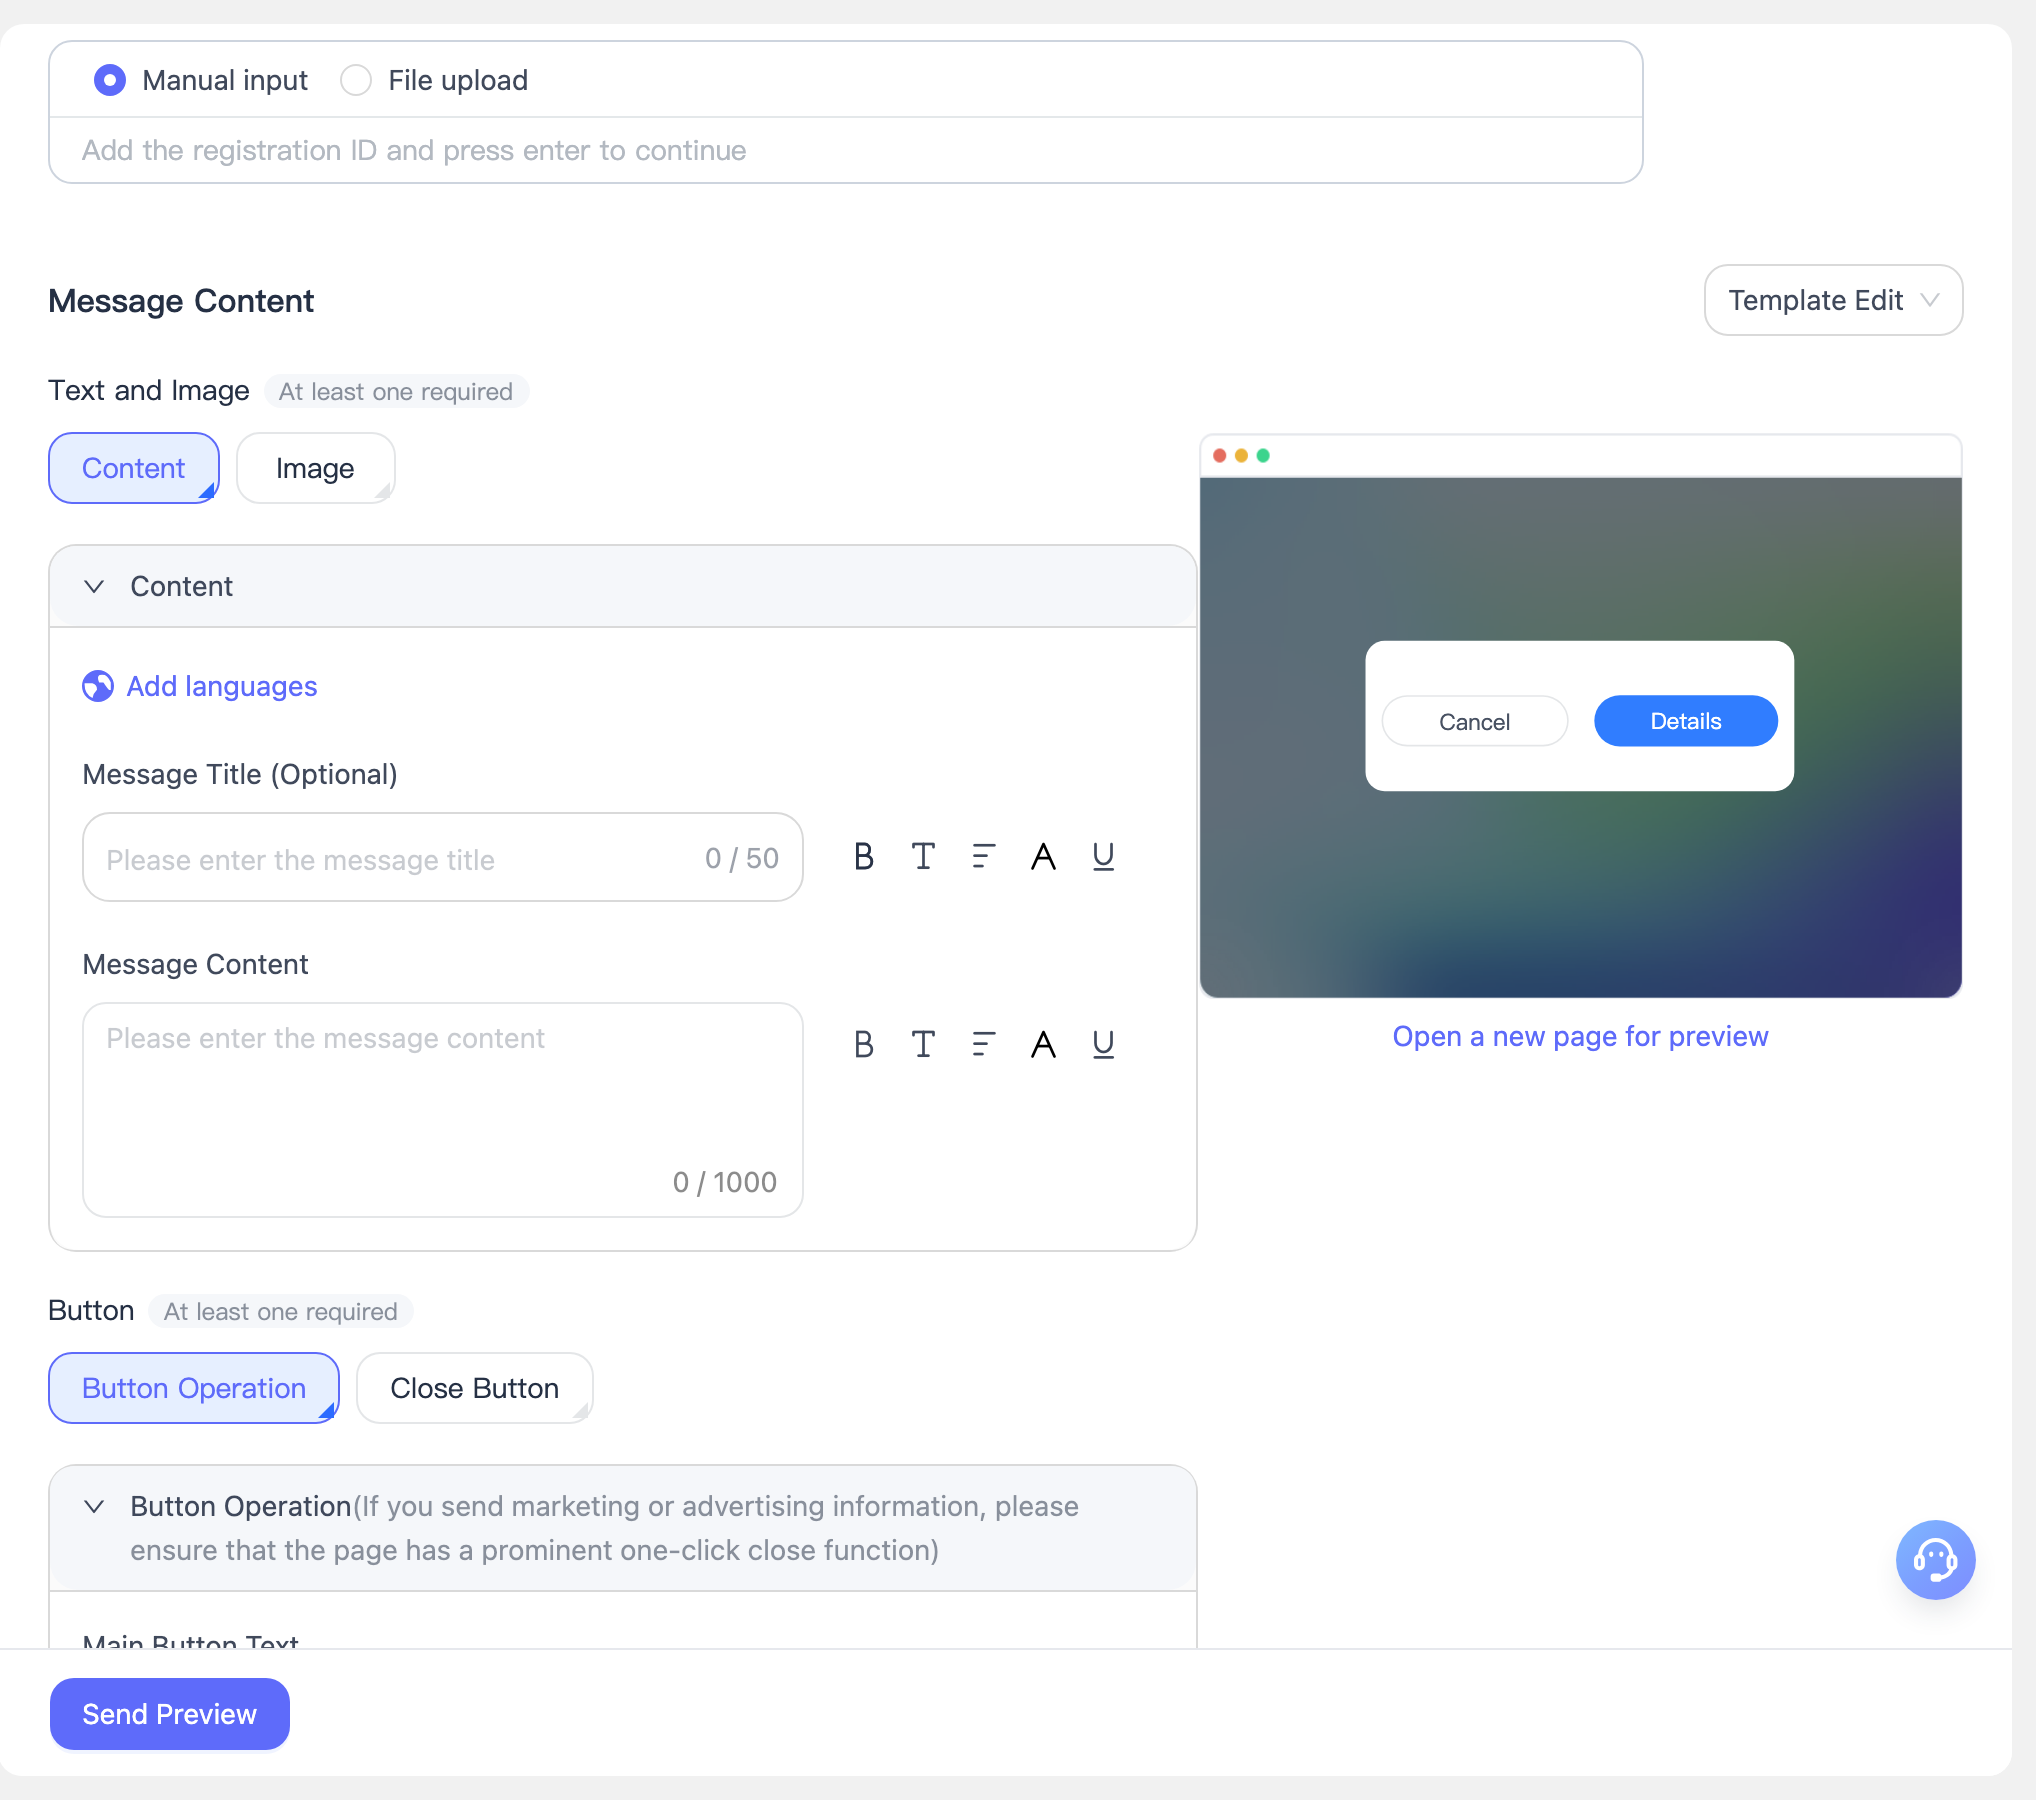
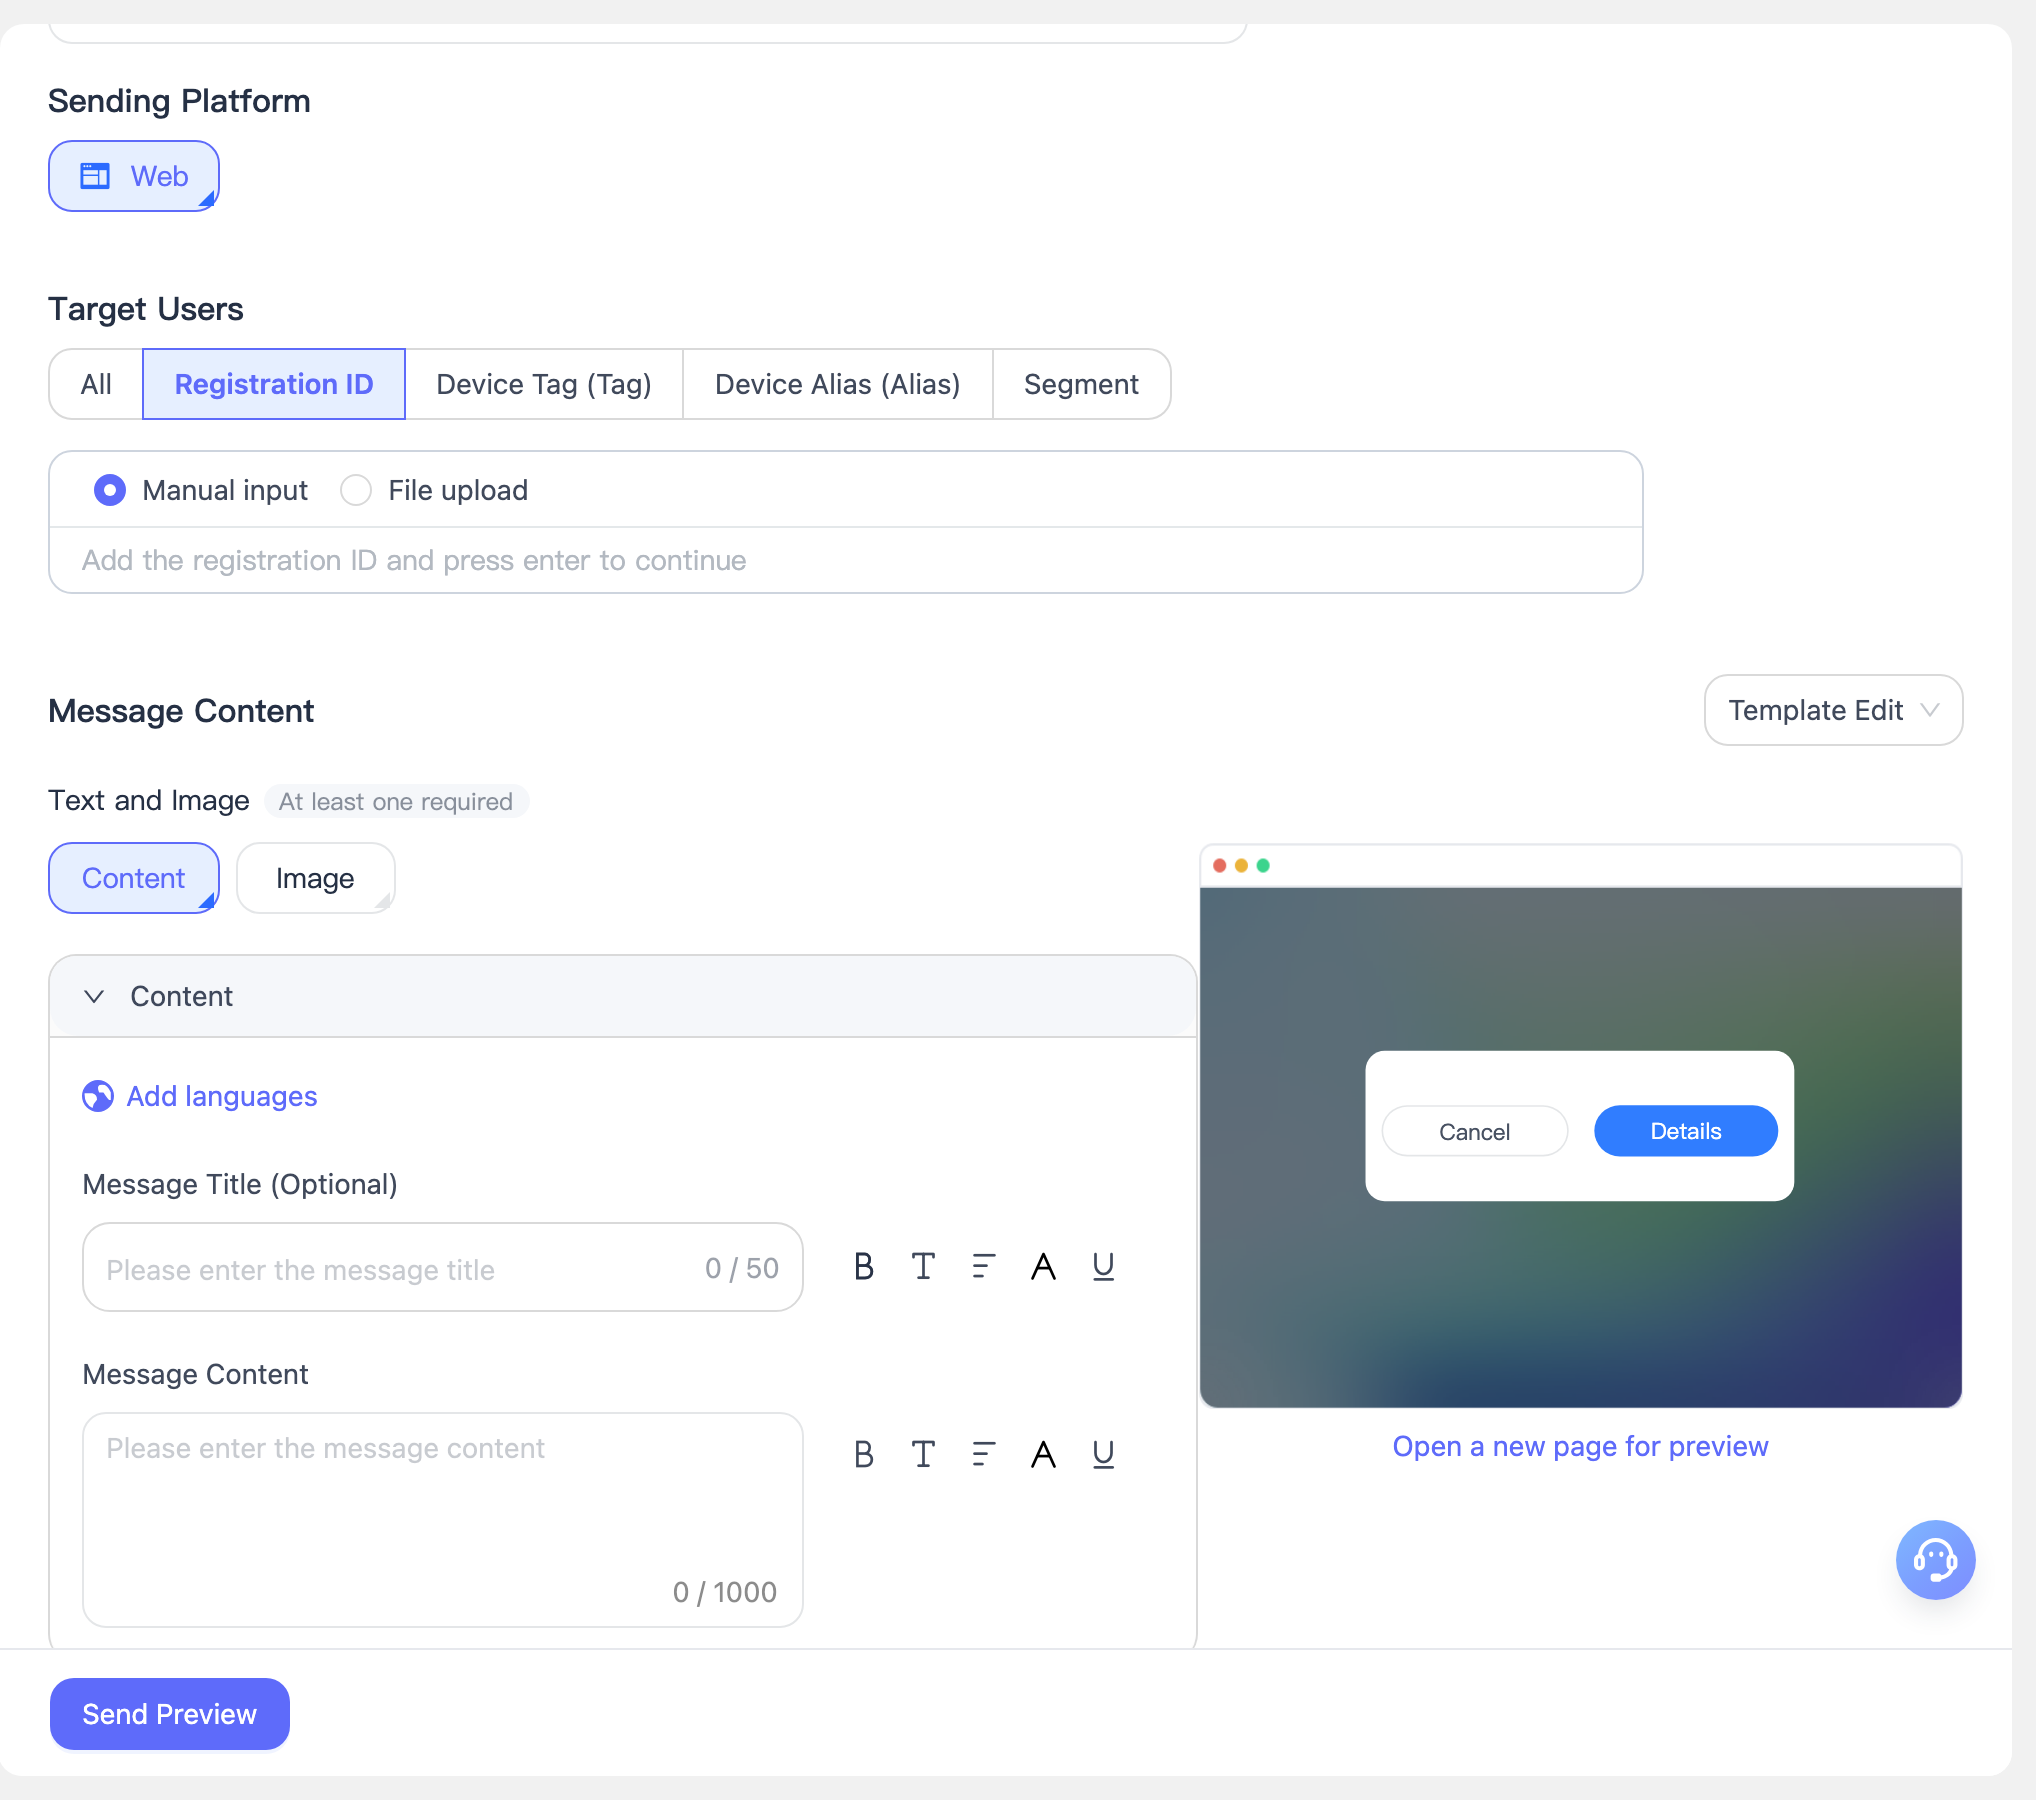
เนื้อหาข้อความ
การตั้งค่ารูปภาพและข้อความ
เนื้อหา: ป้อนเนื้อหาข้อความ และกำหนดค่าชื่อเรื่อง (ไม่บังคับ) และเนื้อความ
- เพิ่มภาษา: รองรับการเพิ่มชื่อ Push และเนื้อหา Push ได้หลายภาษา ระบบจะตรวจจับภาษาของอุปกรณ์ผู้ใช้ปลายทางโดยอัตโนมัติ หากไม่ได้กำหนดภาษาอื่นไว้ ระบบจะส่งเนื้อหาในภาษา [Default] ไปยังผู้ใช้เป้าหมายทั้งหมด

- การตั้งค่าแบบอักษร:
พื้นที่แก้ไขชื่อและเนื้อหาข้อความรองรับการจัดรูปแบบ rich text ขั้นพื้นฐาน รวมถึงตัวหนา (B), ตัวเอียง (T), การจัดแนว (≡), ขนาดตัวอักษร (A) และขีดเส้นใต้ (U)
รูปภาพ: ป้อน URL ของรูปภาพบนเว็บ และเลือกการทำงานเมื่อคลิกรูปภาพ
- การตั้งค่าการคลิก: คุณสามารถเลือกให้เปิด URL เมื่อคลิก หรือกำหนดให้ไม่มีการดำเนินการ การใช้งานลิงก์ URL ที่พบบ่อย ได้แก่:
- ใช้ลิงก์เว็บหรือ deep link: นำผู้ใช้ไปยังหน้าภายนอกหรือหน้าที่ระบุภายในแอปพลิเคชันของคุณ
- ใช้การนำทางแบบ Push: หากผู้ใช้เคยปฏิเสธสิทธิ์ใน native prompt มาก่อน การคลิกจะเปิดการตั้งค่าอุปกรณ์สำหรับแอปพลิเคชันของคุณ (ข้อความในแอปนี้จะไม่แสดงแก่ผู้ใช้ที่อนุญาตการแจ้งเตือนไปแล้ว)
ต้องเลือกอย่างใดอย่างหนึ่งระหว่าง เนื้อหา หรือ รูปภาพ จากสองรูปแบบเนื้อหานี้ โดยสามารถสร้างประเภทเนื้อหาข้อความได้ทั้งหมด 3 แบบ ดังต่อไปนี้เป็นตัวอย่างวิธีการกำหนดค่าของแต่ละแบบ:
ประเภท 1: เนื้อหาข้อความ
ประเภท 2: เนื้อหารูปภาพ
- คลิก Load เพื่อตรวจสอบว่ารูปภาพใช้งานได้หรือไม่ หากใช้งานไม่ได้ ระบบจะแจ้งให้คุณเปลี่ยน URL ของรูปภาพ
- ใน Click Settings ให้เลือกว่าเมื่อคลิกรูปภาพจะเปลี่ยนเส้นทางไปยัง URL หรือไม่ หากต้องการเปลี่ยนเส้นทาง ให้ป้อนลิงก์หน้าเว็บที่จะเปิด หากไม่ต้องการ ให้เลือก No Action
- หลังจากตั้งค่า URL สำหรับเปลี่ยนเส้นทางแล้ว คุณสามารถคลิกรูปภาพในภาพตัวอย่างเพื่อทดสอบพฤติกรรมการเปลี่ยนเส้นทางได้
ประเภท 3: เนื้อหารูปภาพและข้อความ

- ตามที่แสดง จะมีทั้งเนื้อหารูปภาพและเนื้อหาข้อความ
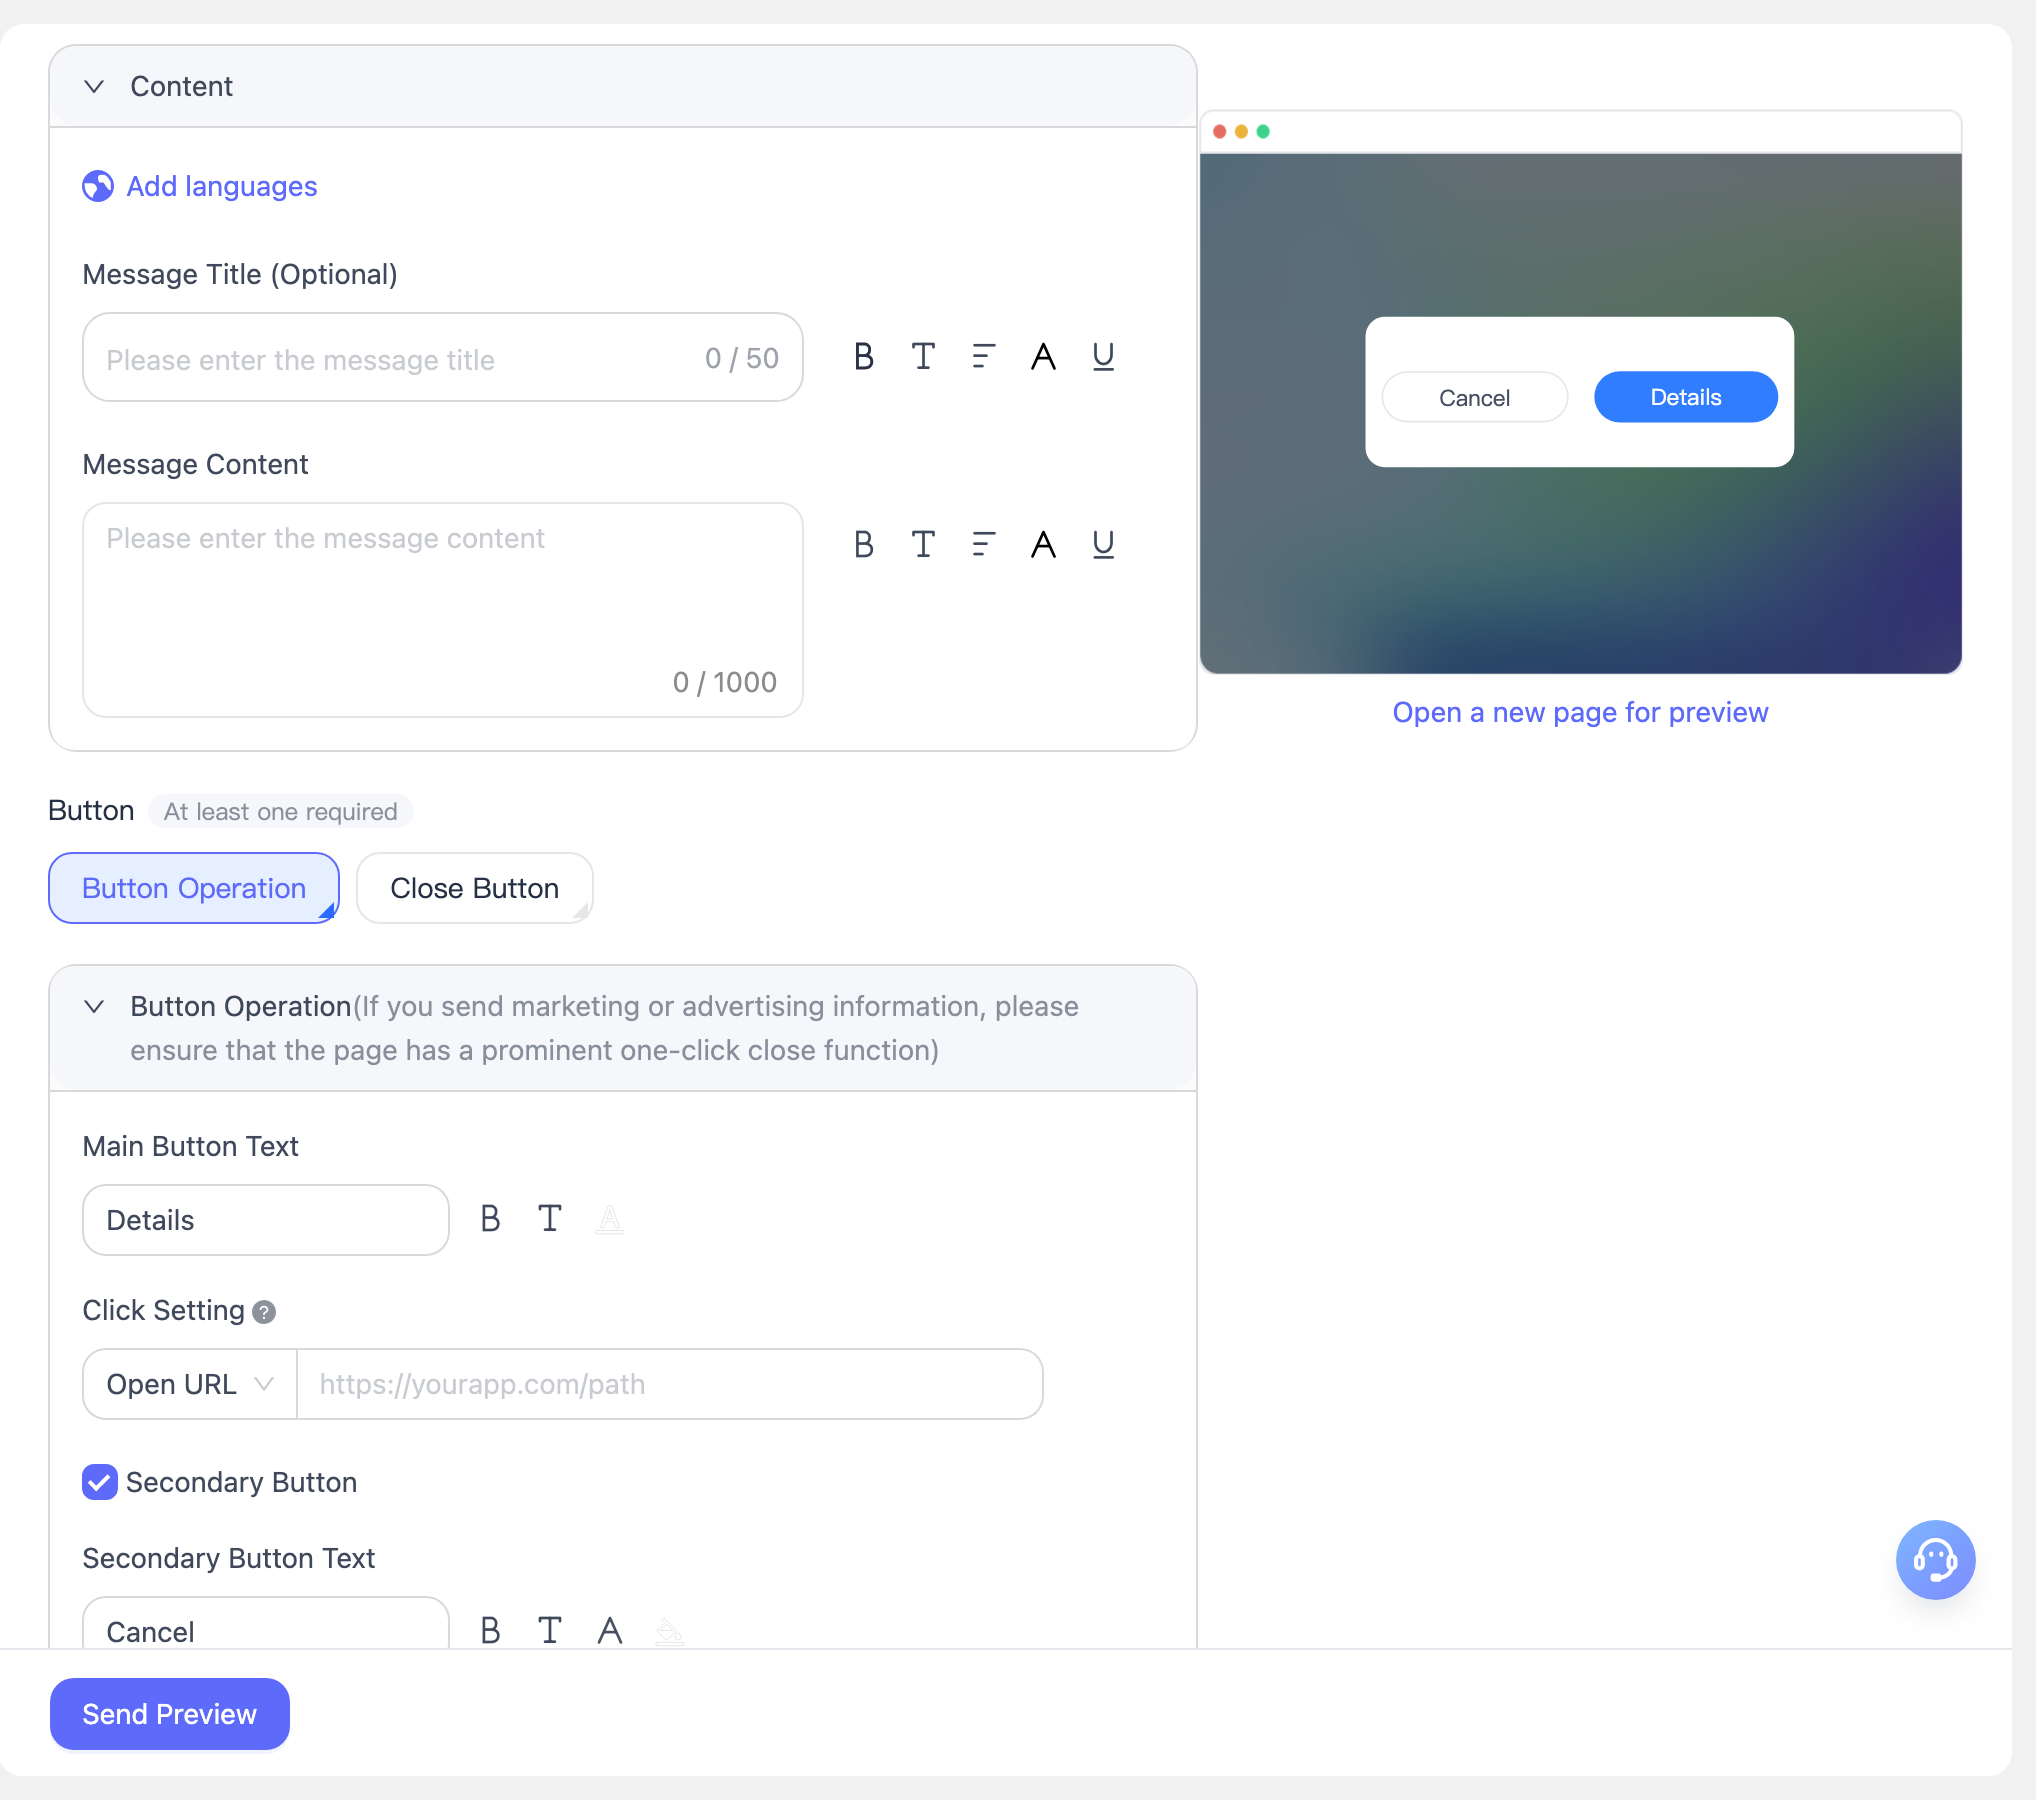
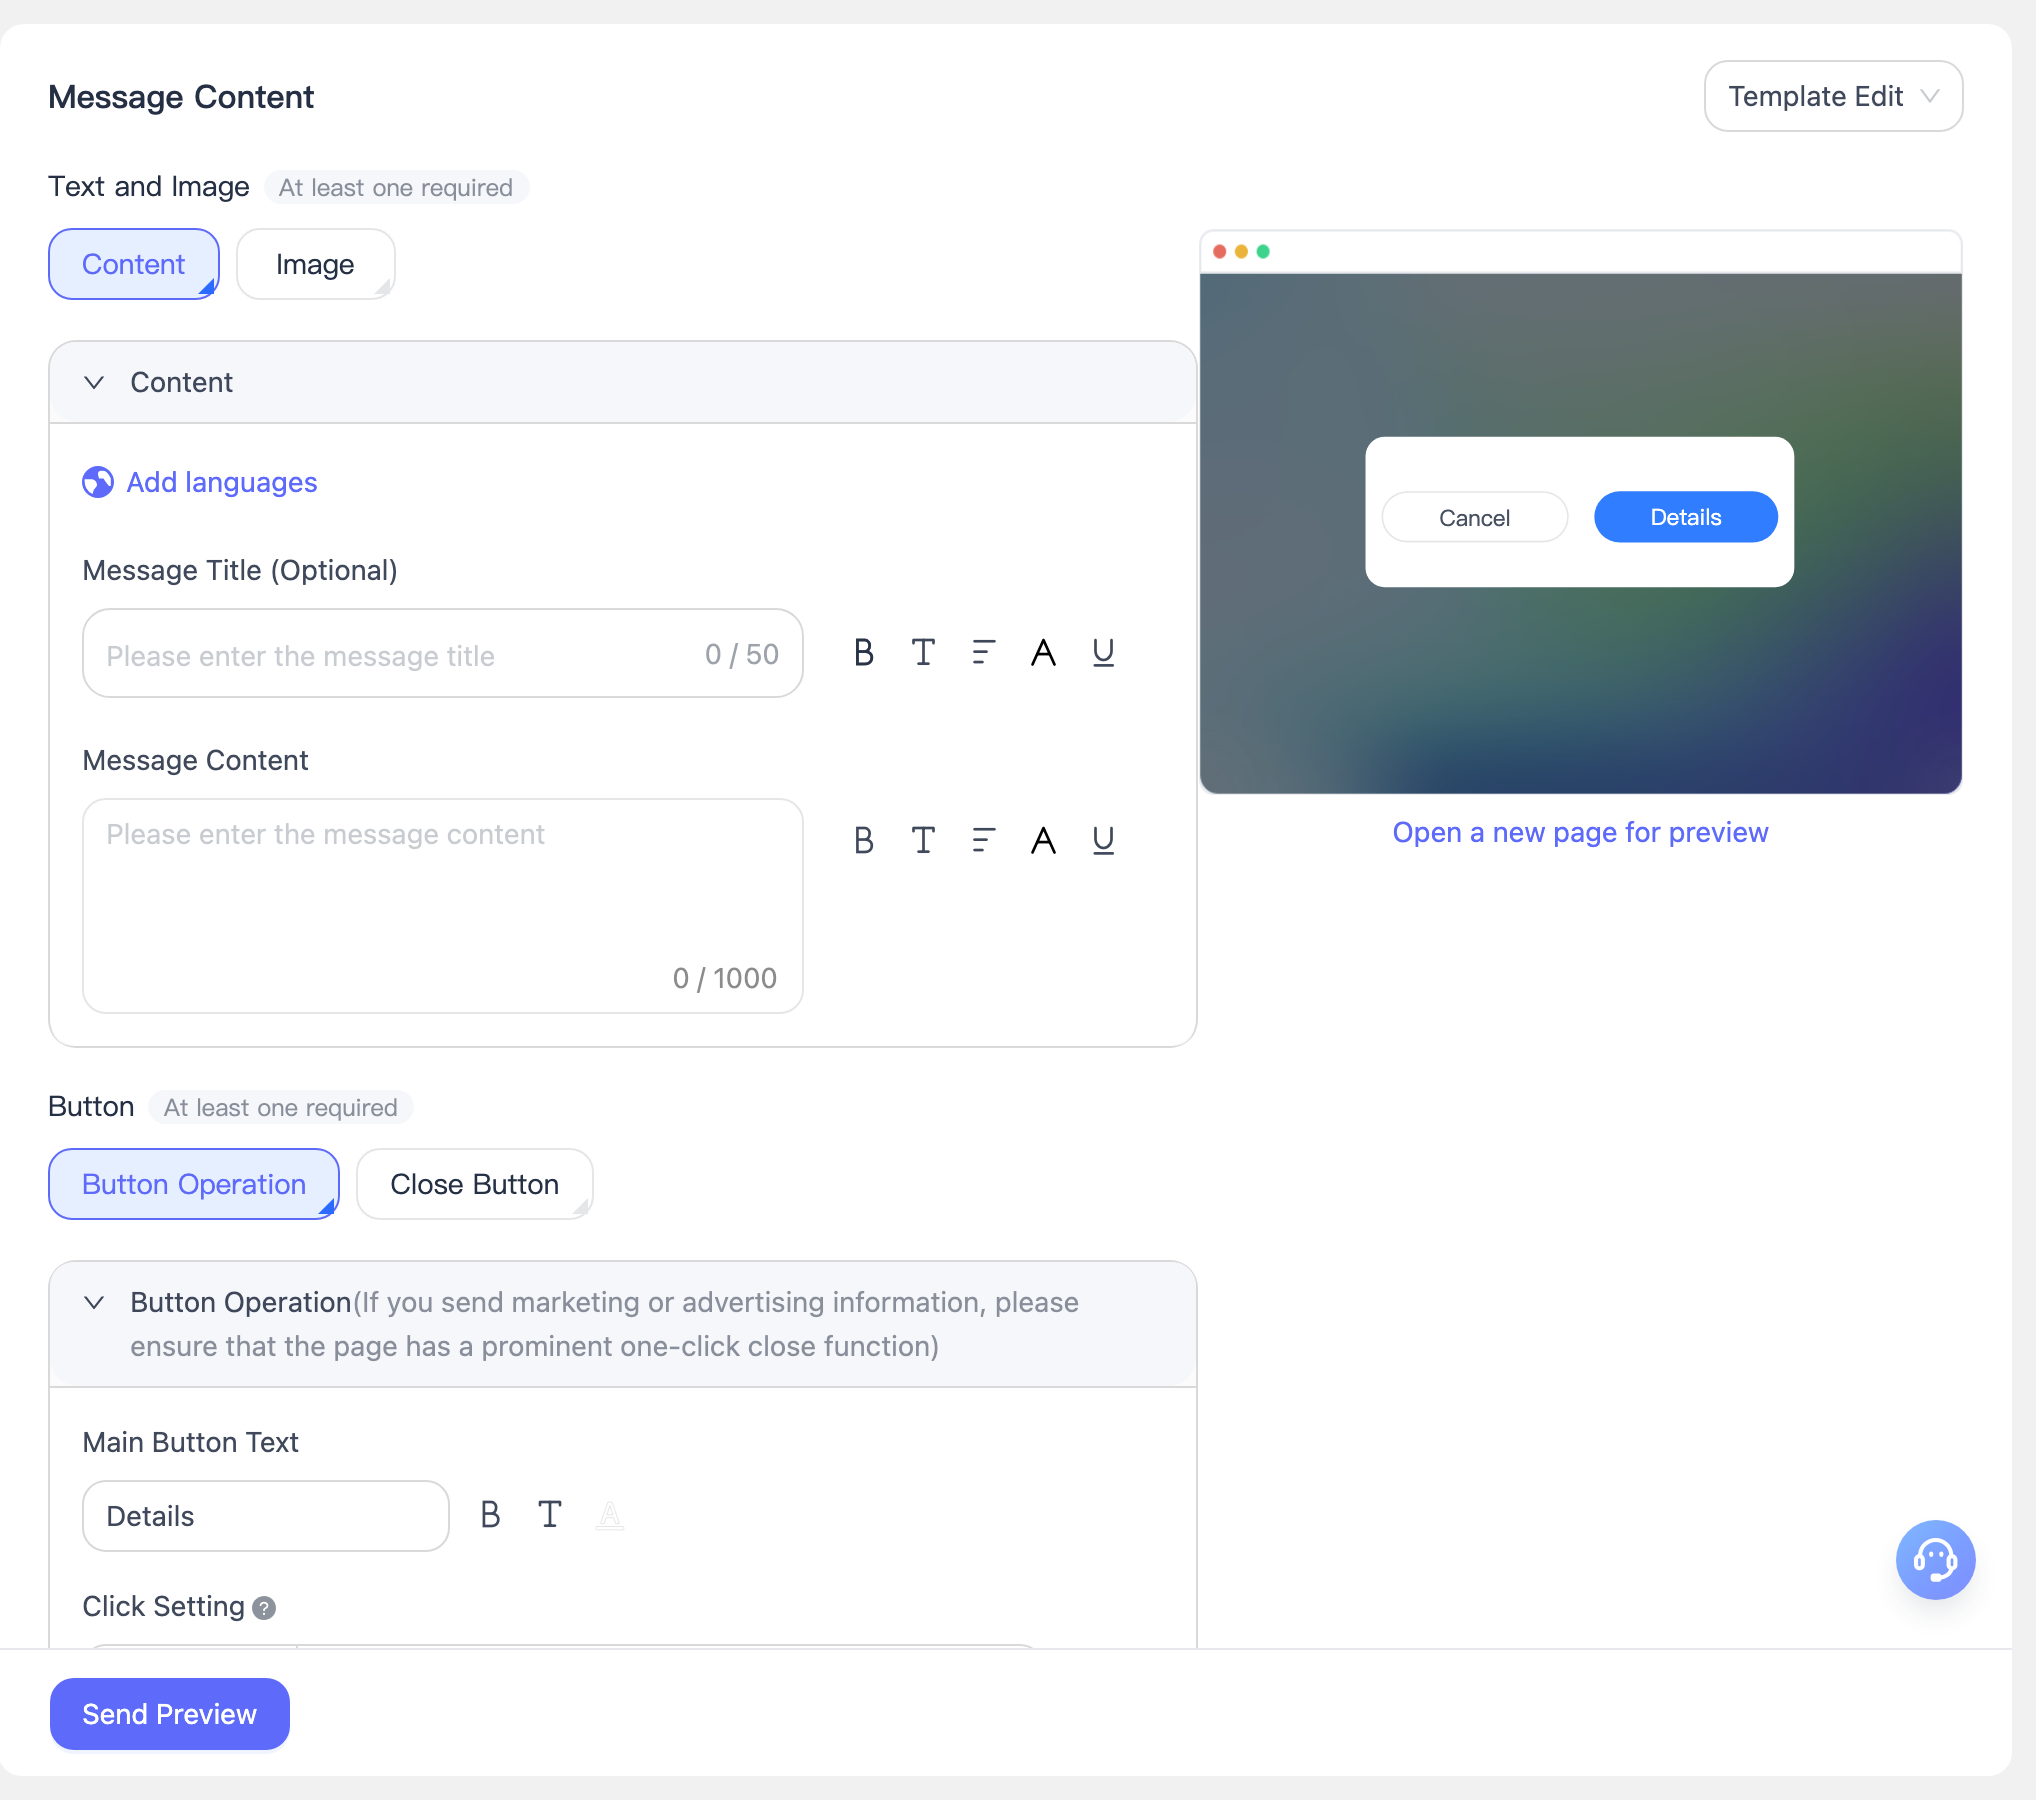
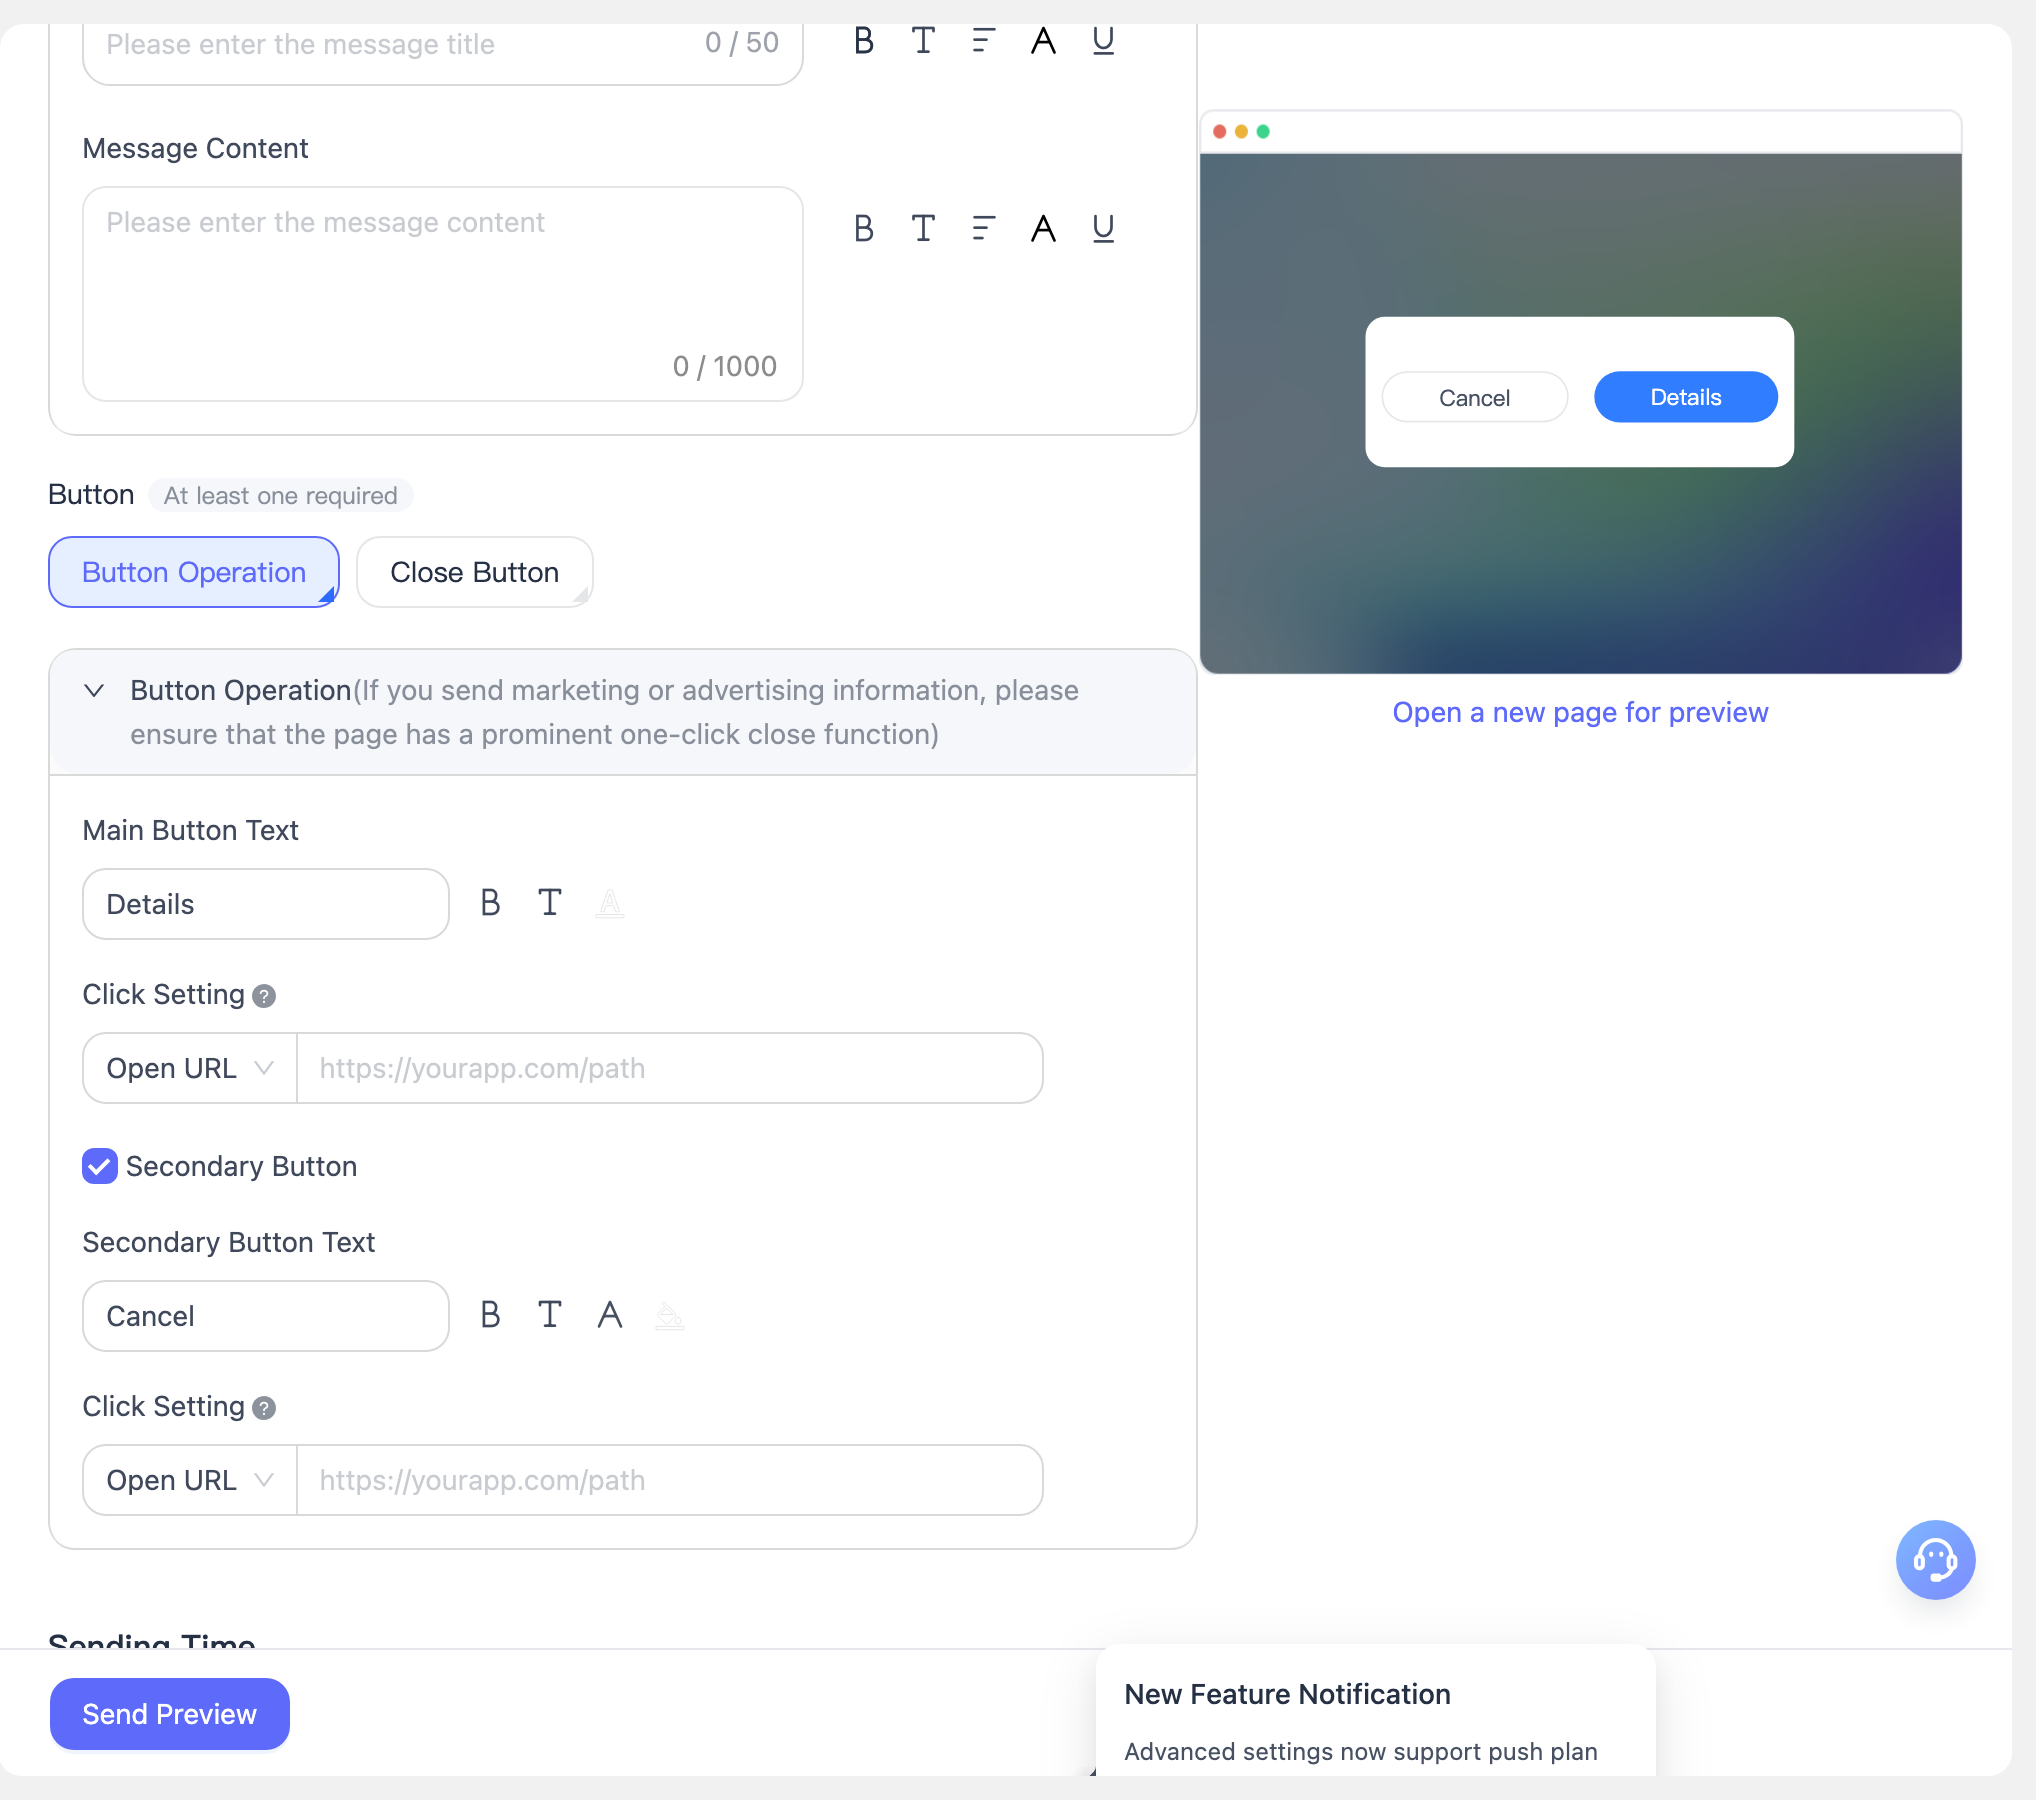
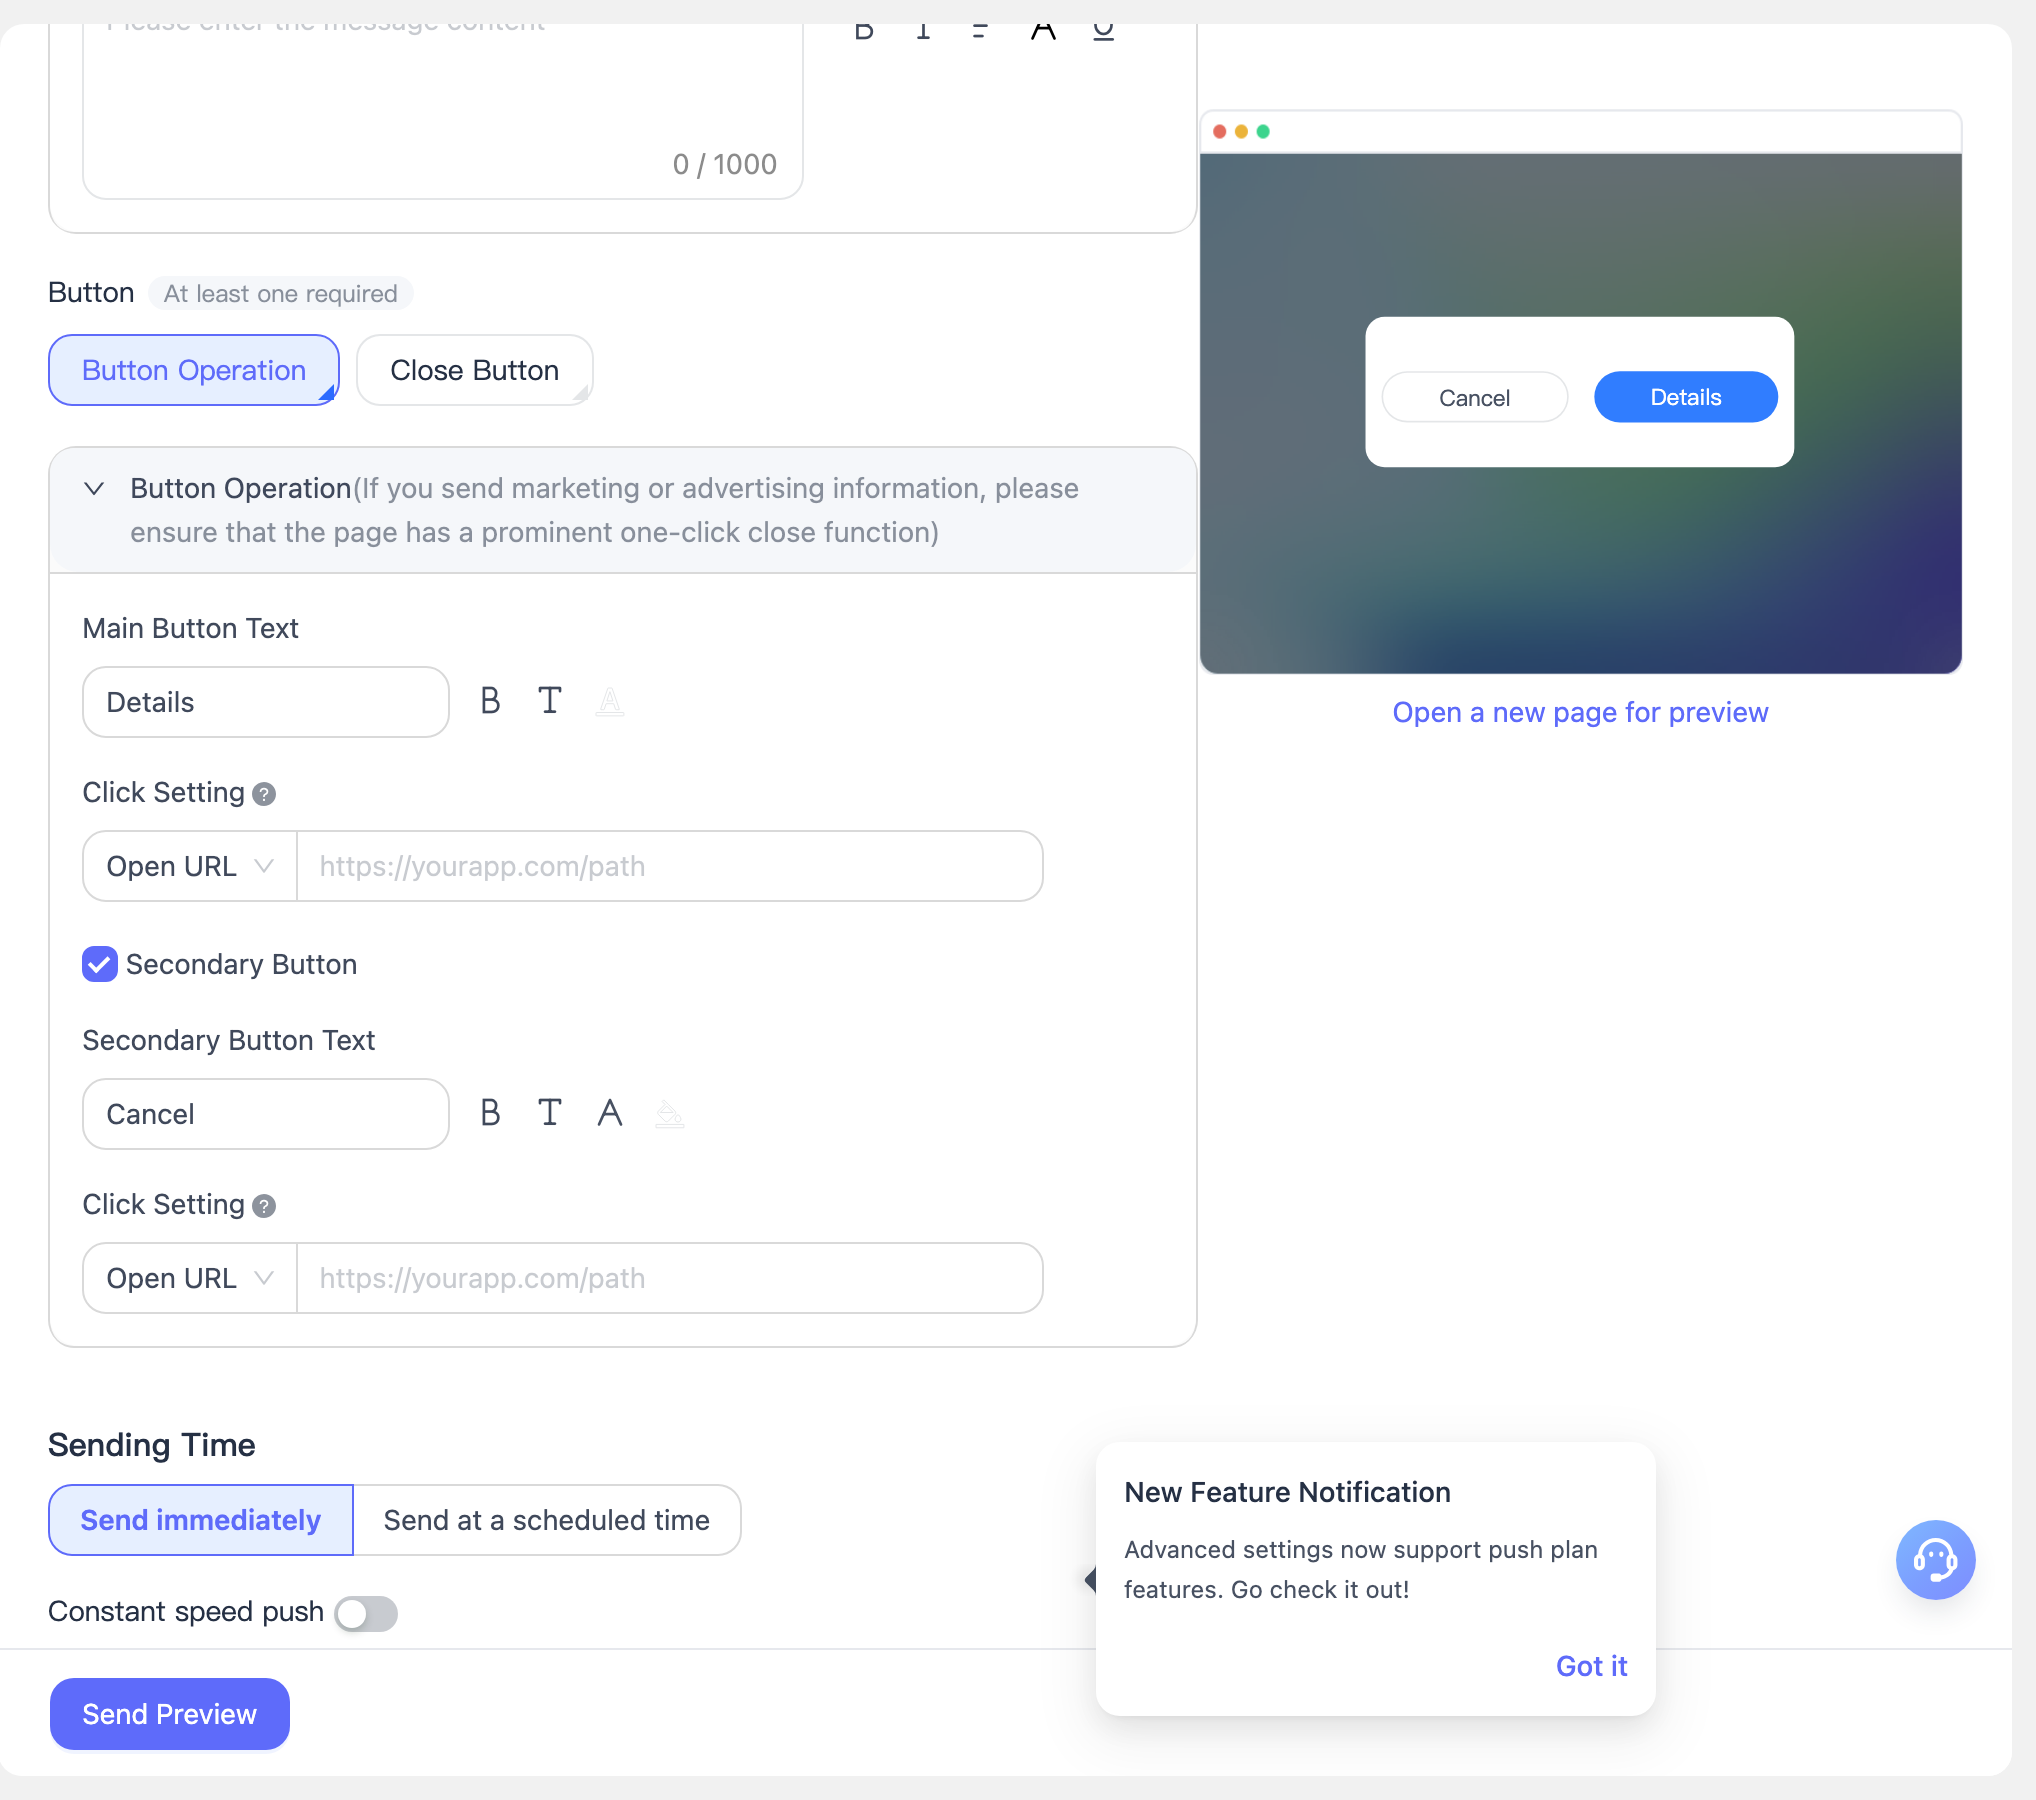
การตั้งค่าปุ่ม
เพื่อวัตถุประสงค์ในการสาธิต รูปภาพตัวอย่างในส่วนการตั้งค่าปุ่มจะคงตัวอย่าง เนื้อหารูปภาพและข้อความ จากส่วน เนื้อหาข้อความ โปรดให้ความสำคัญกับการเปลี่ยนแปลงในการตั้งค่าปุ่มตามตัวอย่างนั้น
ปุ่มหลัก:
- ข้อความปุ่มหลัก: คุณสามารถกำหนดข้อความปุ่มหลักว่าจะเป็นตัวหนาหรือไม่ ขนาดตัวอักษร สีตัวอักษร (รองรับค่าสีแบบกำหนดเอง) และสีปุ่ม (รองรับค่าสีแบบกำหนดเอง)

- การตั้งค่าการคลิก: กำหนดว่าการคลิกปุ่มหลักจะเปลี่ยนเส้นทางไปยัง URL ที่ระบุหรือไม่ หากต้องการเปลี่ยนเส้นทาง ให้ป้อนลิงก์หน้าเว็บที่จะเปิด หากไม่ต้องการ ให้เลือก No Action
ปุ่มรอง:
- ไม่บังคับ ในการเปิดใช้งานปุ่มรอง
- ข้อความปุ่มรอง: เหมือนกับปุ่มหลัก
- การตั้งค่าการคลิก: เหมือนกับปุ่มหลัก
ปุ่มปิด:
- คุณสามารถเลือกตำแหน่งของปุ่มปิดในป๊อปอัปได้ (มุมขวาบนหรือกึ่งกลางด้านล่าง)
ต้องเลือกการตั้งค่าปุ่มอย่างน้อยหนึ่งรายการ โดยสามารถสร้างประเภทการทำงานของปุ่มได้ทั้งหมด 3 แบบ ดังต่อไปนี้เป็นตัวอย่างวิธีการกำหนดค่าของแต่ละแบบ:
ประเภท 1: กำหนดค่าเฉพาะการทำงานของปุ่ม โดยไม่มีปุ่มปิด
(หากคุณกำลังส่งโปรโมชันทางการตลาดหรือโฆษณา โปรดตรวจสอบให้แน่ใจว่าหน้ามีฟังก์ชันปิดแบบคลิกเดียวที่มองเห็นได้ชัดเจน)
ประเภท 2: กำหนดค่าเฉพาะปุ่มปิด โดยไม่มีการทำงานของปุ่ม
ประเภท 3: กำหนดค่าทั้งปุ่มปิดและการทำงานของปุ่ม
การแก้ไข HTML
ทางด้านขวาของพื้นที่เนื้อหาข้อความ คุณสามารถสลับระหว่างโหมด Template Editing และ HTML Editing ได้อย่างอิสระผ่านเมนูแบบเลื่อนลง โดย Template Editing เหมาะสำหรับการกำหนดค่าเนื้อหาแบบภาพ ส่วน HTML Editing ช่วยให้คุณเขียนและปรับแต่งซอร์สโค้ด HTML ของข้อความได้โดยตรง เพื่อตอบโจทย์เนื้อหาและรูปแบบที่ซับซ้อนมากขึ้น
- พรีวิวแบบเรียลไทม์: ในโหมด HTML Editing ให้คลิกปุ่ม Go to Preview เพื่อดูผลลัพธ์การเรนเดอร์ของเนื้อหา HTML ปัจจุบันแบบเรียลไทม์ทางด้านขวา ช่วยให้คุณตรวจสอบและปรับแต่งรูปแบบข้อความได้อย่างรวดเร็ว รูปต่อไปนี้แสดงตัวอย่างเริ่มต้นของระบบ:

- สถานการณ์ที่เหมาะสม: การแก้ไข HTML เหมาะสำหรับผู้ใช้ที่มีประสบการณ์ด้านการพัฒนาฟรอนต์เอนด์และต้องการสร้างการแสดงข้อความที่ปรับแต่งได้สูง หากคุณต้องการเพียงการ Push เนื้อหาทั่วไป แนะนำให้เลือกใช้โหมด Template Editing ก่อน
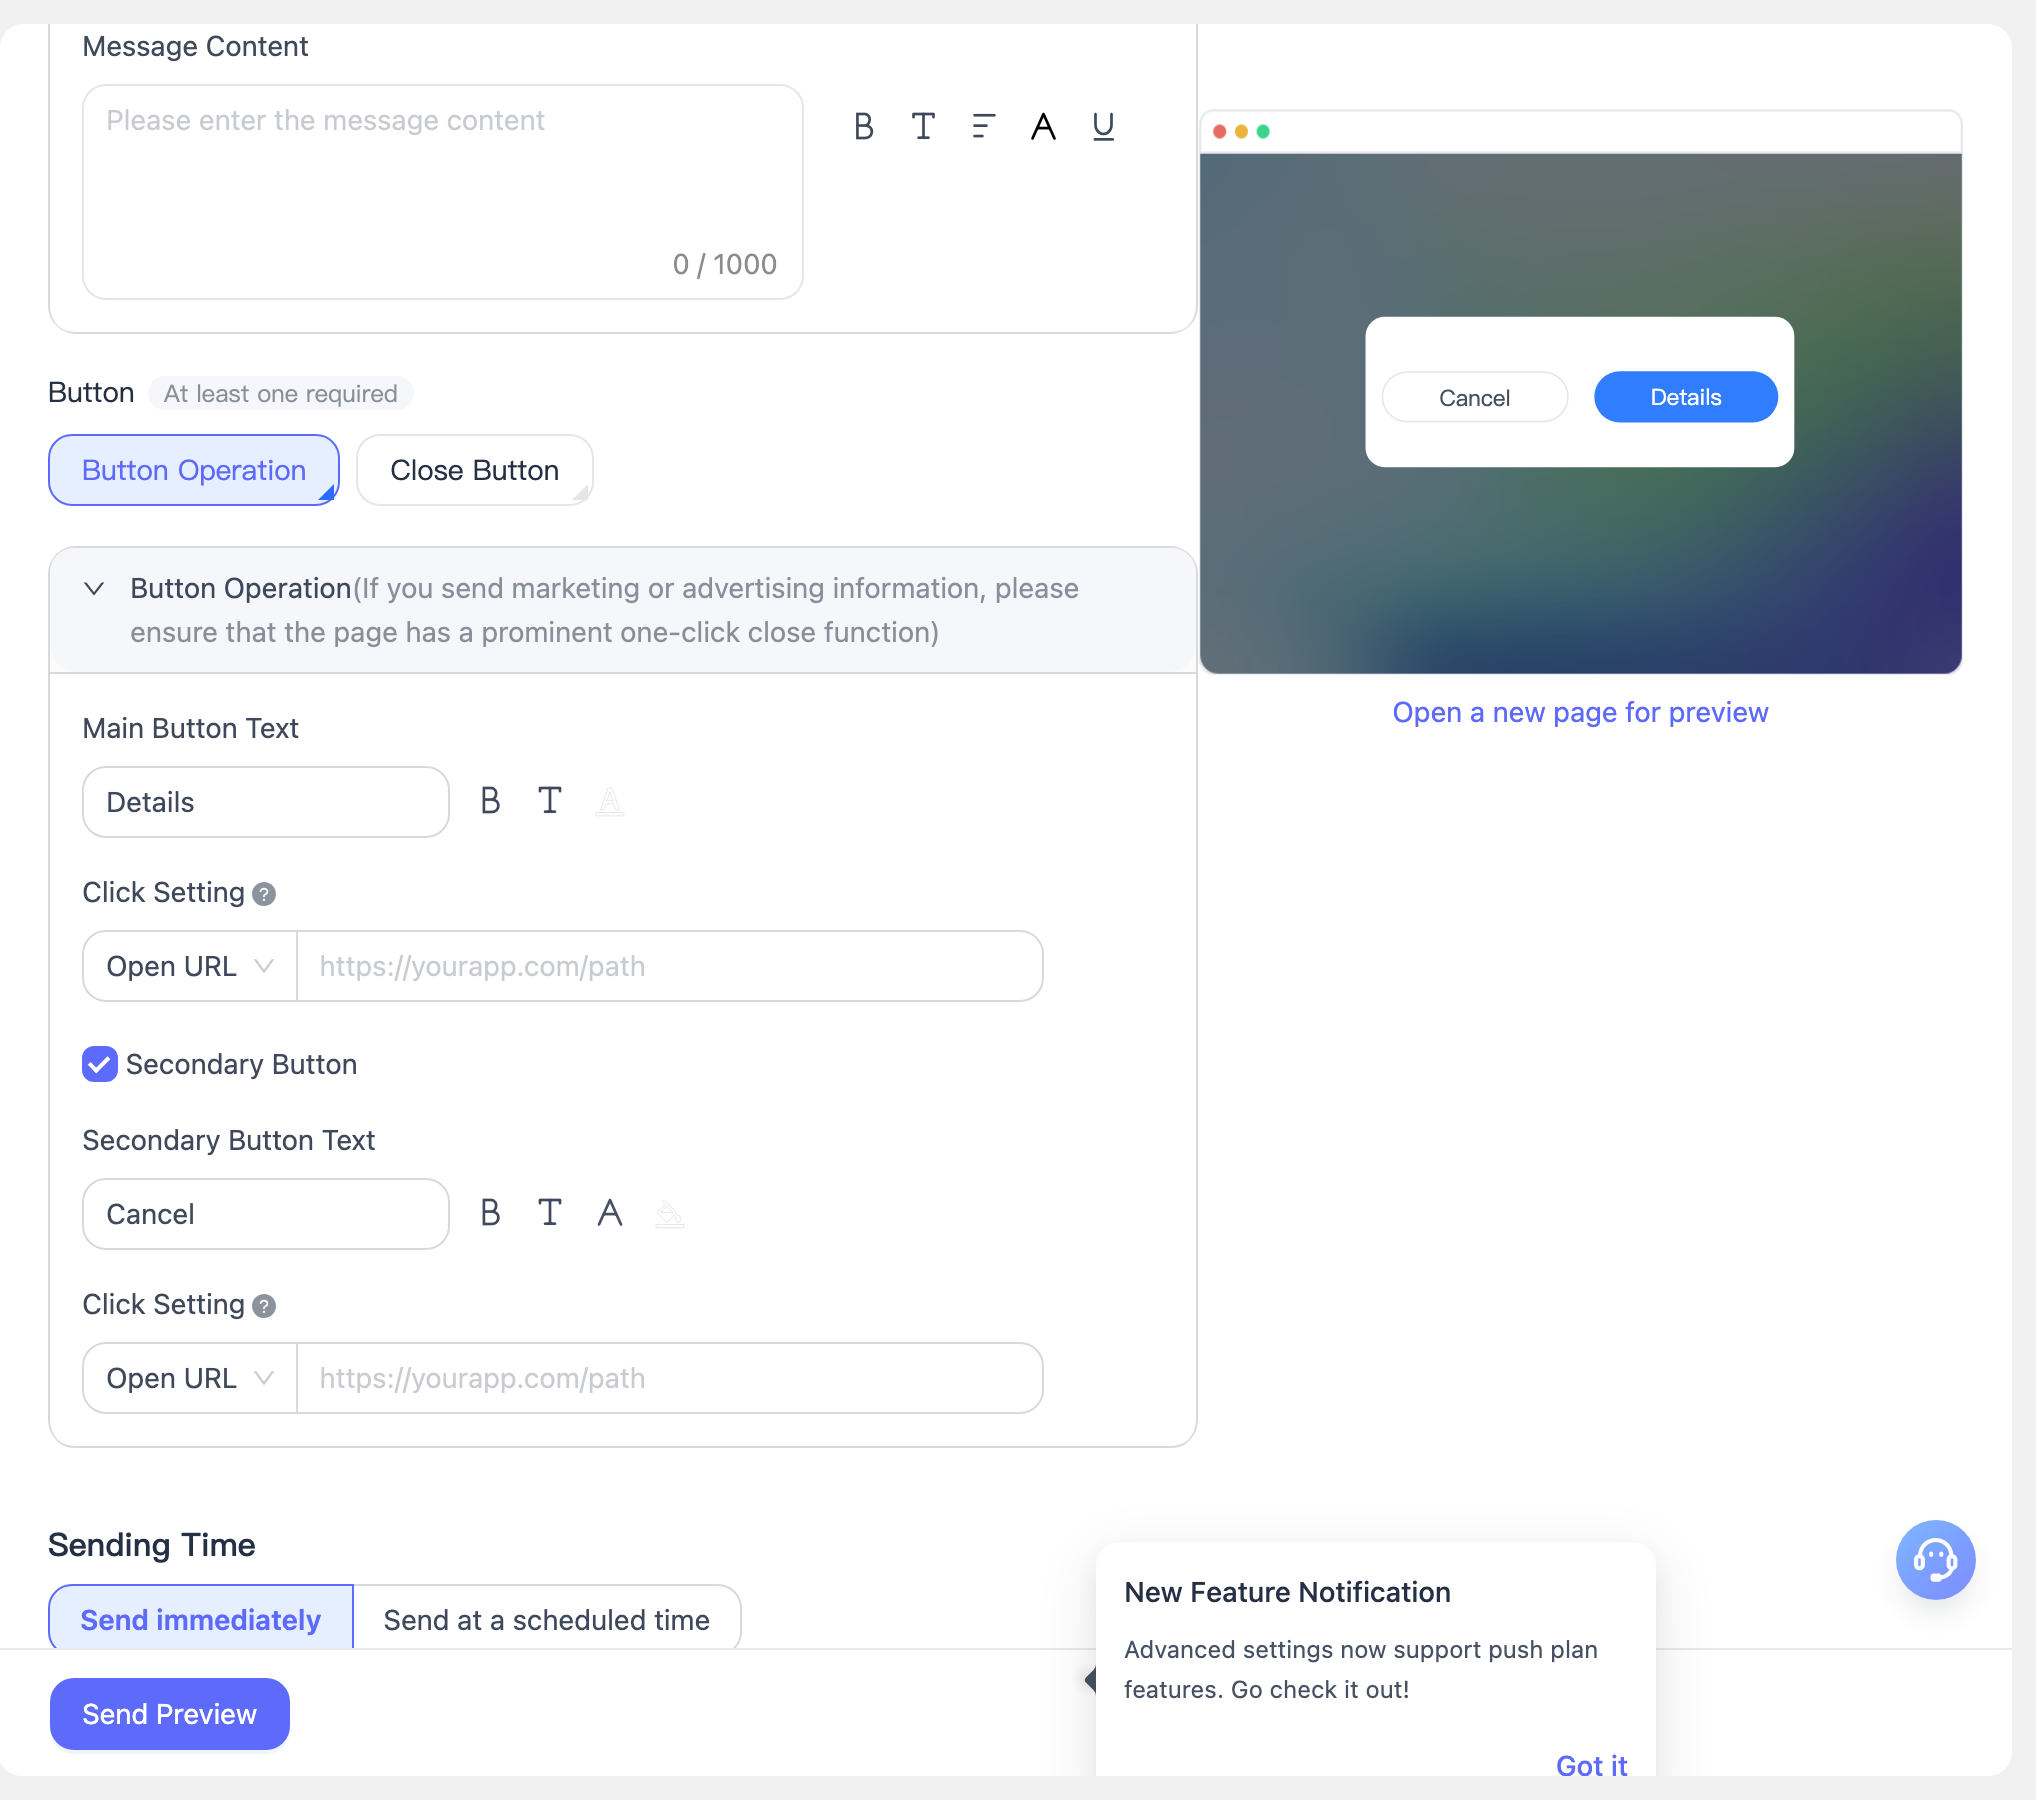
เวลาการส่ง
- ส่งทันที: ส่งข้อความทันที
- ส่งตามกำหนดเวลา: กำหนดงานส่งตามเวลาขององค์กรหรือเวลาของผู้ใช้ปลายทาง
- Push แบบจำกัดอัตรา: ดำเนินการส่งให้เสร็จสิ้นภายในเวลาที่กำหนดเพื่อลดภาระของเซิร์ฟเวอร์
พรีวิวหน้าใหม่
ระหว่างแก้ไขเนื้อหาข้อความ แผงพรีวิวทางด้านขวาจะแสดงเอฟเฟกต์ป๊อปอัปของข้อความแบบเรียลไทม์
หากคุณคลิก Open New Page Preview ระบบจะเปิดหน้าใหม่เพื่อแสดงเอฟเฟกต์ป๊อปอัปของหน้าเว็บที่กำหนดค่าไว้ในปัจจุบัน บนหน้าใหม่นี้ คุณสามารถคลิกปุ่มที่กำหนดให้เปลี่ยนเส้นทางด้วย URL เพื่อทดสอบการทำงานของการเปลี่ยนเส้นทางได้

การตั้งค่าขั้นสูง
ส่วนนี้จะแนะนำการตั้งค่าขั้นสูงสำหรับการ Push ข้อความในแอป คุณสามารถกำหนดค่าได้อย่างยืดหยุ่นตามความต้องการในการดำเนินงานจริง เพื่อปรับปรุงการเข้าถึงข้อความและประสบการณ์ผู้ใช้
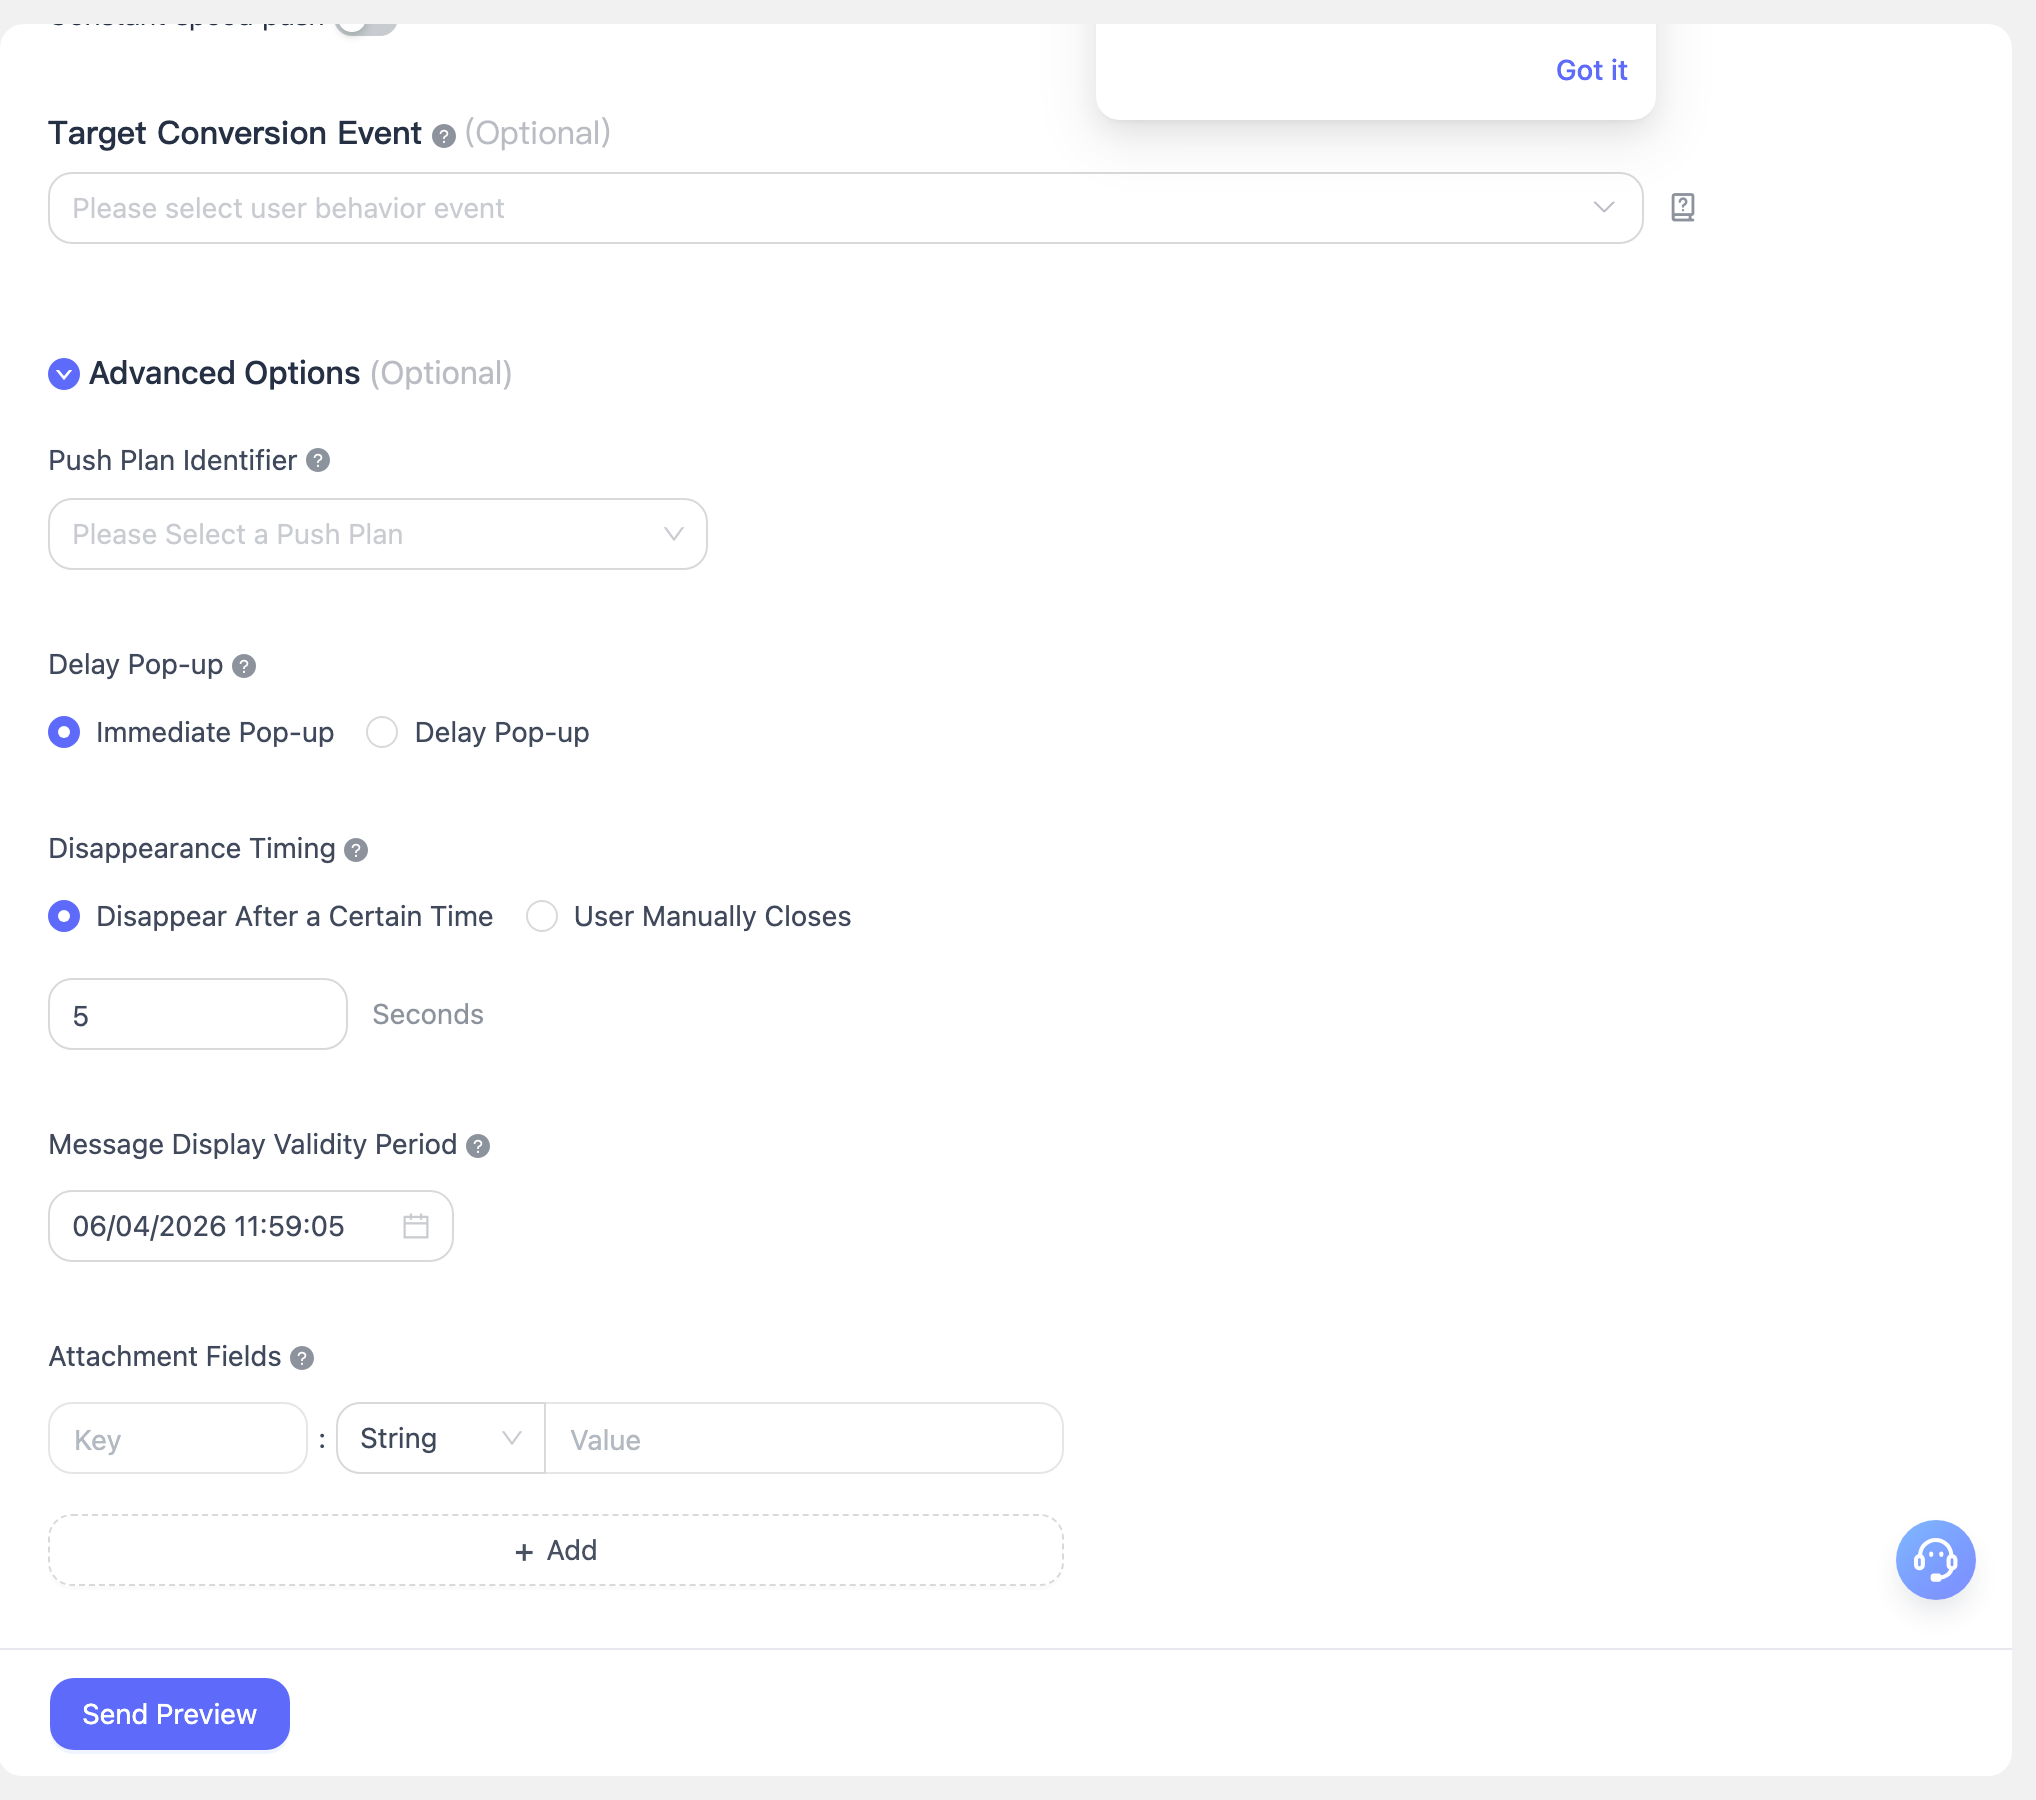
ตัวระบุแผน Push
คุณสามารถตั้งค่าแผน Push เพื่อจัดชุดการ Push เดียวกันให้อยู่ภายใต้ตัวระบุแผนเดียวกัน ช่วยให้ง่ายต่อการจัดทำสถิติและการวิเคราะห์ประสิทธิภาพในภายหลังป๊อปอัปแบบหน่วงเวลา
รองรับการเลือกช่วงเวลาที่ข้อความจะเด้งขึ้น ซึ่งสามารถกำหนดให้แสดงทันทีหรือแสดงแบบหน่วงเวลาได้- ในหน้าเดียวกัน ลำดับความสำคัญของข้อความในแอปประเภทต่าง ๆ คือ: Fullscreen > Interstitial > Banner > In-App Reminder Message
- ข้อความ interstitial และ fullscreen ในหน้าเดียวกันไม่สามารถถูกทริกเกอร์ซ้ำหลายครั้งได้ โดยจะแสดงเฉพาะข้อความล่าสุดเท่านั้น
- สามารถแสดงข้อความ banner ได้หลายรายการบนหน้าเดียวกัน
เวลาที่หายไป
ควบคุมเวลาที่ป๊อปอัปข้อความจะหายไปโดยอัตโนมัติ- ข้อความ banner จะแสดงเป็นเวลา 5 วินาทีโดยค่าเริ่มต้น ส่วนข้อความ interstitial และ HTML จะแสดงเป็นเวลา 30 วินาทีโดยค่าเริ่มต้น และรองรับการตั้งค่าแบบกำหนดเองได้ตั้งแต่ 5 ถึง 180 วินาที
- หากข้อความ fullscreen มีการกำหนดปุ่มข้ามและเวลาข้ามไว้ ข้อความดังกล่าวจะไม่ถูกควบคุมโดยการตั้งค่านี้
ระยะเวลาที่ข้อความแสดงผลได้อย่างมีผล
กำหนดระยะเวลาที่ข้อความมีผลในสถานะออฟไลน์- หากผู้ใช้ออฟไลน์อยู่ในขณะนั้น ข้อความจะถูกบันทึกเป็นข้อความออฟไลน์และถูก Push เมื่อผู้ใช้ออนไลน์ครั้งถัดไป
- สำหรับข้อความที่ส่งถึงแอปแล้ว หากผู้ใช้ปลายทางไม่เคยเข้าสู่หน้าที่ระบุ ระบบจะไม่แสดงข้อความเมื่อผู้ใช้เข้าหน้านั้นหลังจากระยะเวลาการแสดงผลหมดอายุแล้ว
- ข้อความจะแสดงได้ตามปกติก็ต่อเมื่อผู้ใช้ออนไลน์และเข้าสู่หน้าที่จะแสดงภายในช่วงเวลาที่มีผลเท่านั้น
ฟิลด์เพิ่มเติม
รองรับการตั้งค่าพารามิเตอร์แบบกำหนดเอง โดยฝั่งไคลเอนต์สามารถรับค่าของฟิลด์เหล่านี้เพื่อใช้จัดการเหตุการณ์แบบกำหนดเองได้ คุณสามารถเพิ่มหรือลบพารามิเตอร์เพิ่มเติมเพื่อตอบโจทย์ความต้องการทางธุรกิจที่หลากหลาย
ตัวอย่างก่อนส่ง
ภาพตัวอย่างจะแสดงอยู่ทางด้านขวาของหน้า หลังจากกำหนดค่าพารามิเตอร์ Push แล้ว ให้คลิก Send Preview เพื่อดูพารามิเตอร์ Push ที่ตั้งค่าไว้
ยืนยันพารามิเตอร์การส่ง จากนั้นคลิก Confirm เพื่อสร้างงาน Push ได้สำเร็จ หากไม่มีกลุ่มเป้าหมาย Push ที่ตรงตามเงื่อนไข ระบบจะส่งคืนข้อผิดพลาดดังต่อไปนี้:

หากคุณมีความต้องการเพิ่มเติมหรือพบปัญหาใด ๆ โปรดติดต่อฝ่ายสนับสนุนด้านเทคนิคของ EngageLab
การทดสอบ A/B
ไปที่ [Create Push] - [A/B Testing] เพื่อสร้างงาน Push โดยมีคำอธิบายการกำหนดค่าพารามิเตอร์ดังนี้:
- ชื่อข้อความ: กำหนดชื่อข้อความสำหรับการทดสอบ A/B นี้เอง เพื่อให้ง่ายต่อการจัดการและค้นหาในภายหลัง
- เลือกแพลตฟอร์ม: ขณะนี้รองรับ Web Push
การกำหนดค่าเนื้อหาข้อความของกลุ่ม A/B
การกำหนดค่าเนื้อหาข้อความสำหรับกลุ่ม A/B เหมือนกับ Notification Message โดยรองรับการตั้งค่าต่าง ๆ เช่น หลายภาษา ชื่อการแจ้งเตือน คำบรรยาย เนื้อหา ฟิลด์เพิ่มเติม พฤติกรรมการคลิก และรูปแบบขั้นสูง
กลุ่ม B รองรับการคัดลอกการตั้งค่าทั้งหมดจากกลุ่ม A ได้ในคลิกเดียว ช่วยให้สร้างเนื้อหาของกลุ่มควบคุมได้อย่างรวดเร็ว
กลุ่ม B รองรับการคัดลอกการตั้งค่าของกลุ่ม A ได้ในคลิกเดียว คุณสามารถใช้การคัดลอกในคลิกเดียวแล้วค่อยแก้ไขต่อจากกลุ่ม A ได้
กลุ่มเป้าหมาย
แพลตฟอร์ม EngageLab Push รองรับหลายวิธีในการเลือกกลุ่มเป้าหมาย ช่วยให้นักพัฒนาและทีมปฏิบัติการเข้าถึงผู้ใช้ได้อย่างแม่นยำตามความต้องการทางธุรกิจที่แตกต่างกัน ในระหว่างการทดสอบ แนะนำให้ใช้ registration ID ที่ได้จากบันทึกการลงทะเบียนเพื่อทำการ Push สำหรับรายละเอียดการกำหนดค่า โปรดดู Notification Message
การตั้งค่าการทดสอบ A/B
ในกลุ่มผู้ใช้ที่ตรงตามทั้งเงื่อนไขของกลุ่มเป้าหมายและเงื่อนไขของแพลตฟอร์ม (Windows/macOS/Android) ให้กำหนดเปอร์เซ็นต์ของผู้ใช้ที่เข้าร่วมการทดสอบ A/B
สัดส่วนผู้ใช้ของกลุ่ม A และ B ที่เข้าร่วมการทดสอบจะเท่ากัน ตัวอย่างเช่น หากสัดส่วนผู้ใช้คือ 40% สัดส่วนผู้ใช้ของกลุ่ม A และ B จะเป็น 20% ต่อกลุ่ม
จำนวนผู้ใช้สุดท้ายที่คำนวณได้จะถูกปัดเศษลงเป็นจำนวนเต็ม หากจำนวนผู้ใช้เป้าหมายที่เข้าร่วมการทดสอบ A/B น้อยกว่า 2 การ Push จะล้มเหลว
เวลาส่งและการตั้งค่าขั้นสูง
เวลาส่งและการตั้งค่าขั้นสูงสำหรับการ Push ของกลุ่ม A/B จะเหมือนกับ Notification Message สำหรับคำอธิบายการกำหนดค่าโดยละเอียด โปรดดู Notification Message
ตัวอย่างก่อนส่ง
หลังจากกำหนดค่าทั้งหมดเสร็จแล้ว ให้คลิกปุ่ม Send Preview ที่ด้านล่างของหน้าเพื่อดูผลการแสดงจริงของเทมเพลตการแจ้งเตือนปัจจุบันก่อน หลังจากยืนยันว่าทุกอย่างถูกต้องแล้ว ให้คลิก Confirm Send เพื่อส่งข้อความ Push ไปยังกลุ่มเป้าหมายทดสอบ
หลังจากส่งข้อความแล้ว คุณสามารถดูการวิเคราะห์ประสิทธิภาพโดยละเอียดของการทดสอบ A/B นี้ได้ในหน้า Push Records