Jacob Morrow
Updated: 2026-07-30
To learn how to create a business email , start with a domain you control, choose a mailbox host, verify the domain, create each mailbox, add the host's DNS records, and test both sending and receiving. The result should be an address such as maya@yourcompany.com that works in webmail and on your team's devices. Most small teams can finish the account setup in one session; DNS verification may take longer.
If your priority is how to create a business email for free, the same setup rules still apply. A limited free mailbox, a mailbox bundled with another service, or email forwarding may reduce the monthly cost, but the domain can still have an annual renewal fee and forwarding alone is not a full inbox.
Business email setup at a glance
- Step 1. Choose a domain and mailbox host.
- Step 2. Verify that you own the domain.
- Step 3. Create named mailboxes, aliases, and shared addresses.
- Step 4. Publish the exact MX, SPF, DKIM, and DMARC records your host supplies.
- Step 5. Protect accounts with MFA and configure approved devices.
- Step 6. Test inbound mail, outbound mail, replies, and authentication.
What You Need Before You Create a Business Email
A business email has two parts: a domain, such as yourcompany.com , and a mailbox service that stores messages and lets users send and receive them. Buying a domain does not always include a full mailbox, and buying website hosting does not guarantee email hosting. Confirm these five items before you start:

A recipient sees both the display name and the domain-based From address, so both should identify the same business.
- A domain you own: use a stable brand domain, not a temporary project name.
- A mailbox host: examples include Google Workspace, Microsoft 365, Zoho Mail, Proton Mail, or email included with a reputable web host.
- DNS administrator access: you must be able to add TXT, MX, and sometimes CNAME records at your registrar or DNS provider.
- An address plan: decide which people need individual mailboxes and which functions need aliases or shared inboxes.
- A cutover plan: if the domain already receives email, inventory every existing address before changing MX records.
Do not change MX records first
Create and license the new mailboxes before routing live mail to them. Otherwise, new messages can reach a service where the intended recipients do not exist yet. Keep the old service available until external send-and-receive tests pass.
How to Create a Business Email in 6 Steps
The labels vary by provider, but the underlying sequence is the same. Follow the steps in order, and use the expected result and failure check before moving on.
1. Choose Your Domain and Mailbox Host
Register a domain through an accredited registrar, or reuse the domain already attached to your website. Then choose the mailbox host based on team size, admin controls, security, storage, calendar and document needs, migration support, data-region requirements, and total renewal cost. Do not choose on an introductory price alone.

Example only: this GoDaddy domain search was captured on July 30, 2026. A registrar search can check availability, but compare renewal cost, account security, DNS controls, and transfer policy before buying.
Expected result: you can sign in to the provider's admin console and begin adding your domain.
Failure check: if the provider asks you to transfer the domain, pause and confirm whether a transfer is actually required. Most mailbox services only need DNS access; the domain can remain with its current registrar.
2. Add and Verify the Domain
Enter the domain in the mailbox host's setup wizard. The host will usually generate a TXT verification record. Copy the host name and value exactly into your DNS manager, save the record, then return to the setup wizard and select Verify . According to Google Workspace (2026) , its setup wizard supplies a unique verification code that customers add at their domain host.
Expected result: the admin console marks the domain as verified without changing where current email is delivered.
Failure check: if verification remains pending, check that the record was added to the authoritative DNS zone, remove accidental quotation marks, and confirm that the host name was not duplicated by the DNS interface.
3. Create Mailboxes, Aliases, and Shared Addresses
Create one named account for each person who needs to sign in. Add role addresses such as sales@ , support@ , or billing@ as aliases or shared mailboxes when several people must handle the same conversation. Avoid sharing one password among a team; shared access should be granted through the provider's delegation or group controls.
Expected result: every real recipient has a mailbox or a documented forwarding destination before mail routing changes.
Failure check: compare the new account list with the old provider, website forms, invoices, support tools, and automated alerts. A forgotten role address is a common source of silent message loss.
4. Route and Authenticate Email With DNS
Publish the records shown in your mailbox host's admin console. Use the exact values, priorities, and host names supplied for your domain; the examples below explain each record's job, not a value to copy.
| Record | What it does | What to check |
|---|---|---|
| MX | Routes incoming mail for your domain to the mailbox host. | Correct destination and priority; old MX records removed only when the cutover is ready. |
| SPF | Lists systems authorized to send mail for the domain. | Keep one SPF TXT policy. If several services send mail, merge approved mechanisms instead of publishing competing SPF records. |
| DKIM | Adds a signature that receiving systems can validate. | Selector and public key match the provider; DKIM is enabled after the DNS record resolves. |
| DMARC | Tells receivers how to handle authentication failures and where to send reports. | Start with a policy appropriate to your readiness, review reports, and tighten enforcement after all legitimate senders align. |
According to Microsoft 365 (2026) , administrators should add users and set up mailboxes before adding the Microsoft 365 MX record. That order keeps email working while delivery moves from the old provider.
Expected result: the host reports the required records as detected, and new inbound mail reaches the new mailboxes.
Failure check: do not keep clicking verify without checking public DNS. Confirm that each record resolves from outside your network and that no old or duplicate policy conflicts with the new one.
5. Secure Accounts and Connect Devices
Require multi-factor authentication for administrators and users, store recovery codes securely, and use separate admin accounts where the provider supports them. Connect approved desktop and mobile apps through the provider's guided setup or modern OAuth login. Avoid enabling legacy password-only access unless a documented business system still requires it.
Expected result: each user can sign in through webmail and approved devices, and the admin can revoke sessions or reset access.
Failure check: if a mail app repeatedly asks for a password, confirm that it supports the provider's current authentication method before creating an app password.
6. Test Sending, Receiving, and Authentication
Send a message from the new business address to an external Gmail or Outlook account, reply from that external account, and confirm the reply arrives. Check the message's original headers for SPF, DKIM, and DMARC results. Then test every website form, billing tool, CRM, or support system that uses the domain.
Expected result: outbound and inbound messages arrive, replies preserve the correct address, authentication passes, and no critical workflow still uses the old mailbox.
Failure check: a successful outbound test alone is not enough. If replies fail, recheck MX routing and the Reply-To address. If messages land in spam, review authentication and the practical steps in our email deliverability guide .
How to Create a Business Email for Free
You may be able to create the mailbox at no additional monthly cost, but a custom-domain business address is rarely completely free. The domain usually renews annually, and each no-cost route gives you a different level of sending, storage, administration, and support. Creating a new consumer email account for free is easy, but an address ending in @gmail.com or @outlook.com is not a company-domain mailbox.
| Free or low-cost route | What you receive | What to verify |
|---|---|---|
| Limited free mailbox plan | A real inbox on your domain, subject to the provider's current limits. | Custom-domain eligibility, region availability, users, storage, admin controls, and whether sending through desktop or mobile apps is included. |
| Mailbox bundled with hosting | Email included while another domain or web-hosting service remains active. | Renewal price, mailbox count, storage, spam protection, export options, and what happens if you move the website. |
| Email forwarding | Messages sent to your domain are redirected to another inbox. | Whether you can send and reply from the business address with SPF and DKIM alignment. Forwarding alone does not provide a complete mailbox. |
| Free trial | A temporary way to configure and test a paid mailbox service. | Trial end date, automatic billing, data export, and the price after the trial. |
For the lowest-cost workable setup, use a domain the business already controls, check whether your current registrar or web host includes a real mailbox, and compare that option with a current free mailbox plan. Create one named mailbox first and use aliases for role addresses when the provider allows it. Then complete domain verification, MX and authentication records, MFA, and the send-receive tests from the six-step workflow above.
The practical cost boundary
Treat “free” as a way to reduce mailbox hosting cost, not permission to skip domain ownership, security, backups, or authentication. If the address will receive invoices, password resets, or customer requests, choose a route with a recoverable inbox and documented admin access instead of forwarding alone.
Which Business Email Provider Fits Your Team?
There is no universal winner. Choose the provider whose administration, security, collaboration tools, support, and compliance model fit your team. Prices and included features change, so verify the current plan page before buying.
| Option | Best fit | Verify before buying | Watch-out |
|---|---|---|---|
| Google Workspace | Teams that want Gmail, Calendar, Drive, and familiar collaboration. | Storage, admin controls, migration tools, and support level. | Consumer Gmail is not the same as custom-domain Workspace email. |
| Microsoft 365 | Organizations centered on Outlook, Teams, and Microsoft desktop apps. | Exchange features, desktop app licensing, retention, and migration support. | Plan names can look similar while including different desktop and security features. |
| Zoho Mail | Cost-conscious teams that want email plus a broader business suite. | Custom-domain limits, storage, admin tools, migration, and region availability. | The lowest-cost plan may omit features your team expects. |
| Proton Mail | Teams that prioritize privacy and encrypted collaboration. | Custom-domain count, user management, client support, and migration workflow. | Compatibility expectations may differ from a Microsoft or Google environment. |
| Registrar or web-host email | Very small teams that value one bill and a simple setup. | Renewal price, mailbox storage, spam protection, backups, and migration export. | Bundled email can be limited and harder to move later. |
Already have team mailboxes?
Your next decision is whether to send customer messages through a transactional or marketing delivery service with domain controls and reporting.
How to Choose Professional Email Addresses
Use a predictable naming rule that still works when the team grows. A named mailbox such as maya.chen@company.com belongs to one person. An alias such as press@company.com delivers to an existing mailbox but normally has no separate login. A shared mailbox such as support@company.com lets authorized people read and reply without sharing credentials.
- Choose one pattern for people, such as first name or first name plus last initial.
- Use short role addresses that customers can remember.
- Avoid job titles in personal addresses because roles change.
- Reserve common addresses such as admin@ and security@ even if they only route to a monitored group.
- Document ownership, backup coverage, and offboarding for each shared address.
Set a Consistent Display Name and Signature
Keep the visible sender name, mailbox address, and signature consistent. A useful signature identifies the sender, role, company, and one reliable contact route without turning every message into a large banner. This does not replace domain authentication, but it helps recipients understand who is contacting them and how to reply.

Use this as a pattern: include a clear subject, greeting, concise body, closing, and signature. Do not copy it literally: replace every placeholder and avoid adding a phone number or street address unless recipients need it.
How to Use a Business Email Address in a Customer Email Workflow
A mailbox host is for people reading and replying to day-to-day mail. A delivery platform is for applications and marketing teams sending password resets, receipts, onboarding messages, or campaigns to opted-in recipients. EngageLab belongs to the second category: it does not create or replace each employee's Google Workspace, Microsoft 365, Zoho, or Proton mailbox. Once your business address and sending domain are ready, use the current Email workflow below to build, test, send, and measure customer email.
Use this workflow only when
- Your team mailbox already works.
- You control a sending domain or subdomain and its DNS.
- You have permission to message the intended recipients.
- You need API/SMTP delivery, campaign tools, or delivery reporting beyond a normal inbox.
1. Select a Branded Email Template
Open the Email Templates gallery and filter by purpose, such as Notice, Promotion, Invitation, or Order. Select a layout that matches the message, then replace the placeholder logo, copy, links, and sender details with your own brand information.
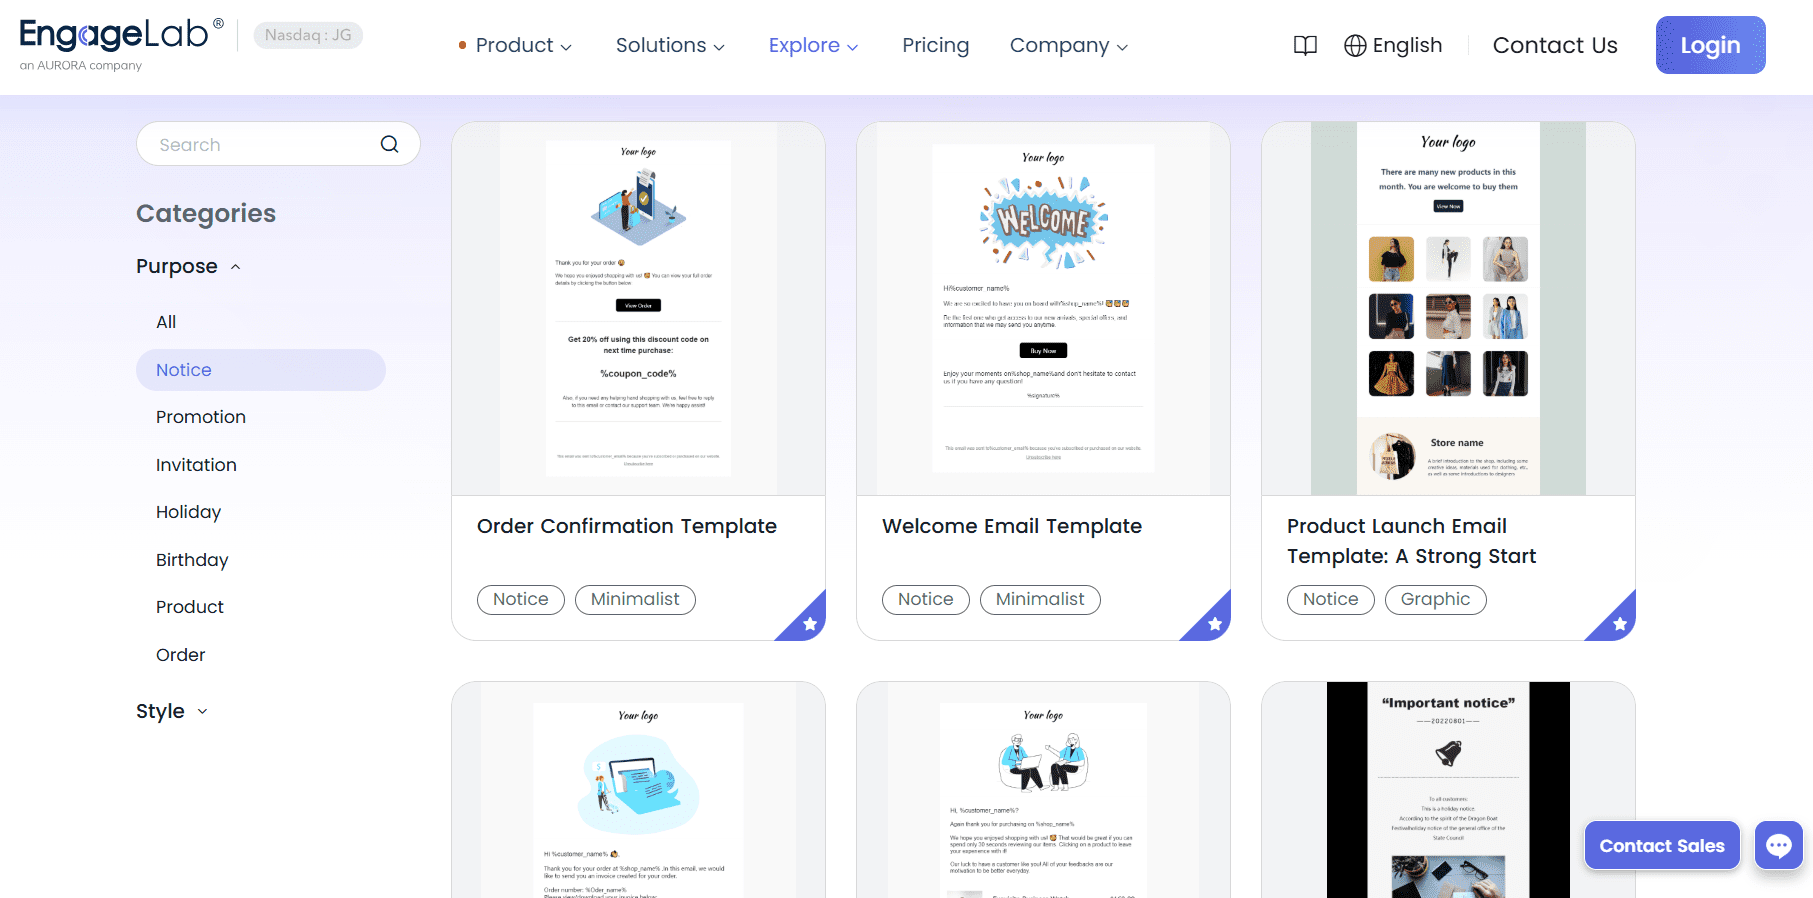
Expected result: you have an editable starting design with one clear message and CTA. Failure check: do not keep sample logos, placeholder URLs, or generic sender information in the saved version.
2. Configure the Campaign and Sender
In the EngageLab Email console, open Marketing > Campaigns and select Create . Under Campaign detail , name the campaign, choose the consented audience in Send to , add any suppression audience in Do not send to , and select the authenticated address in From . Enter a monitored business address in Reply To so customer replies reach a real team.
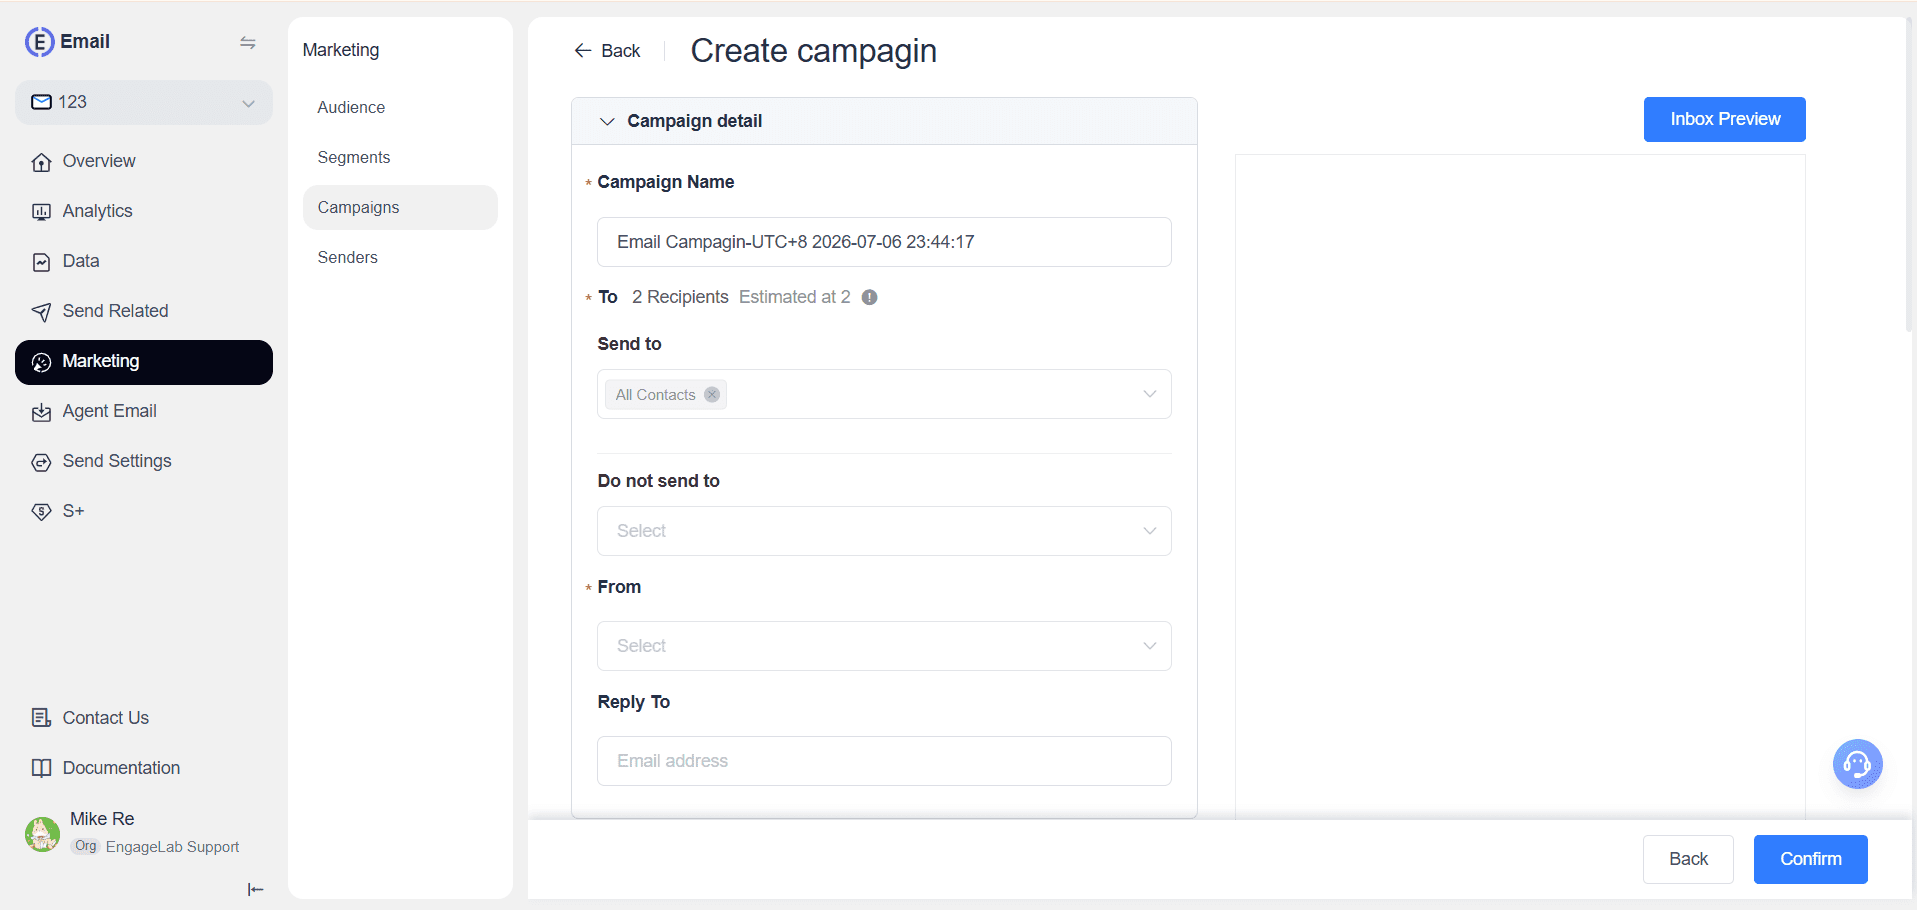
Expected result: the estimated recipient count matches the intended segment, the From address uses the approved sending domain, and replies route to a monitored mailbox. Failure check: stop if the audience is unexpectedly broad, the From field is unavailable, or the Reply To address has not been tested.
3. Choose the Send Time
In Schedule your campaign , choose Send now , Send at a scheduled time , Based on timezones , or Smart Sending . Use a fixed schedule when timing must be predictable. Use timezone-based delivery when a local clock time matters across regions, and consider Smart Sending only when there is enough engagement history to guide it.
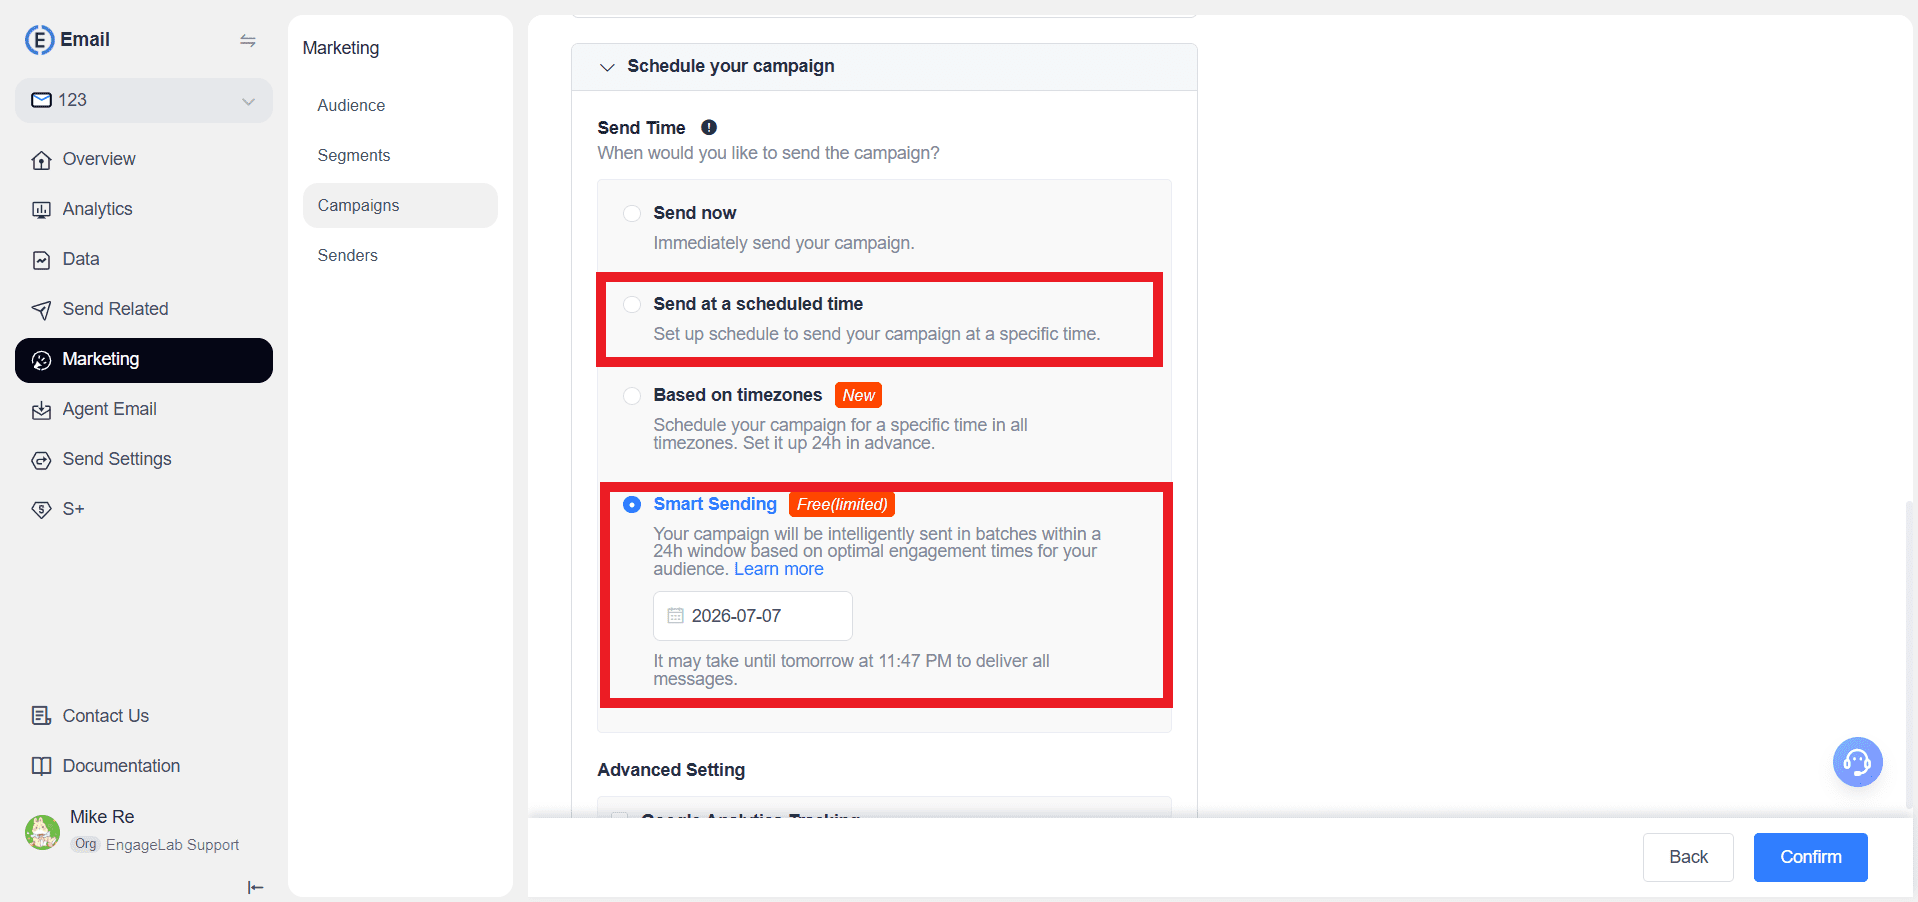
Expected result: the confirmation screen shows the intended date, timezone, or delivery window. Failure check: recheck the account timezone and selected option before confirming; a correct date with the wrong timezone is still a scheduling error.
4. Protect Deliverability Before Scaling
A verified sender is necessary but not sufficient for a new high-volume stream. In the campaign's Advanced Setting , open Warm Up Sending when gradual volume control is appropriate. The current dialog lets you set rates and delivery-ratio upgrade or downgrade conditions for receiving domains such as Gmail, Yahoo, and Hotmail.
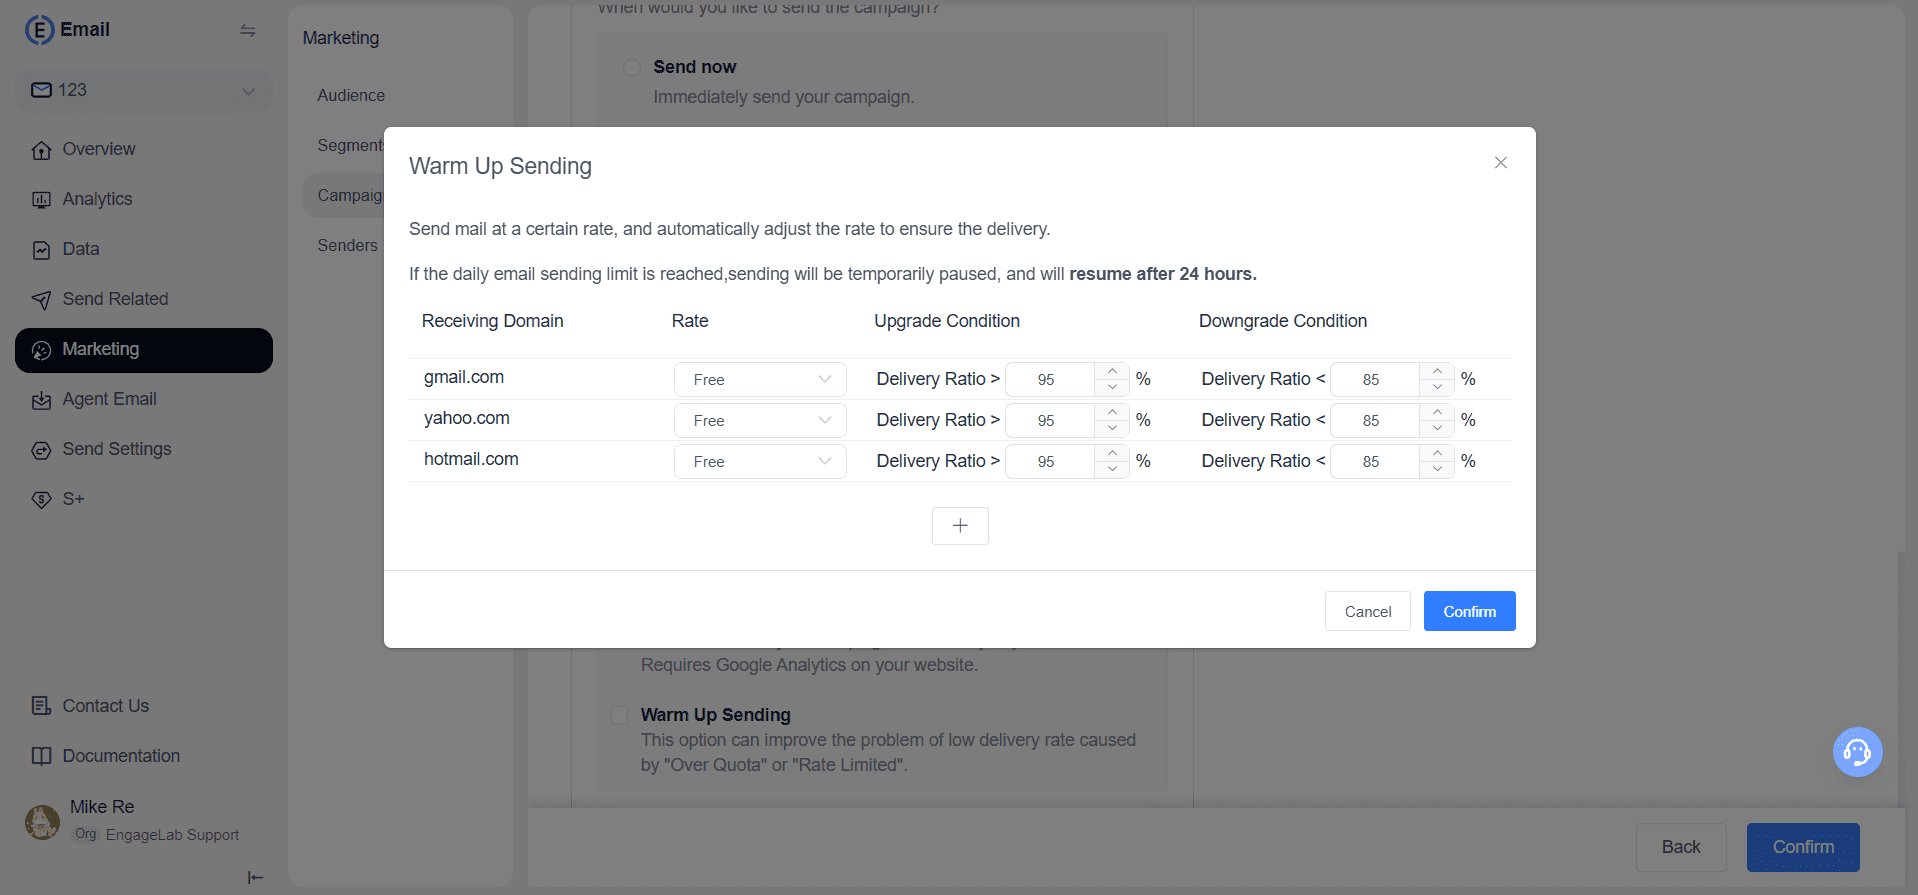
Expected result: the warm-up rules reflect the receiving domains and thresholds your delivery team intends to monitor. Failure check: do not treat warm-up as a substitute for consent, list hygiene, or SPF, DKIM, and DMARC authentication.
5. Preview the Message in Real Email Clients
Select Inbox Preview , choose the desktop, mobile, and dark-mode clients that matter to your audience, and run the preview. Check the first visible screen, logo, body text, CTA, link color, image fallbacks, footer, and unsubscribe treatment before confirming the campaign.
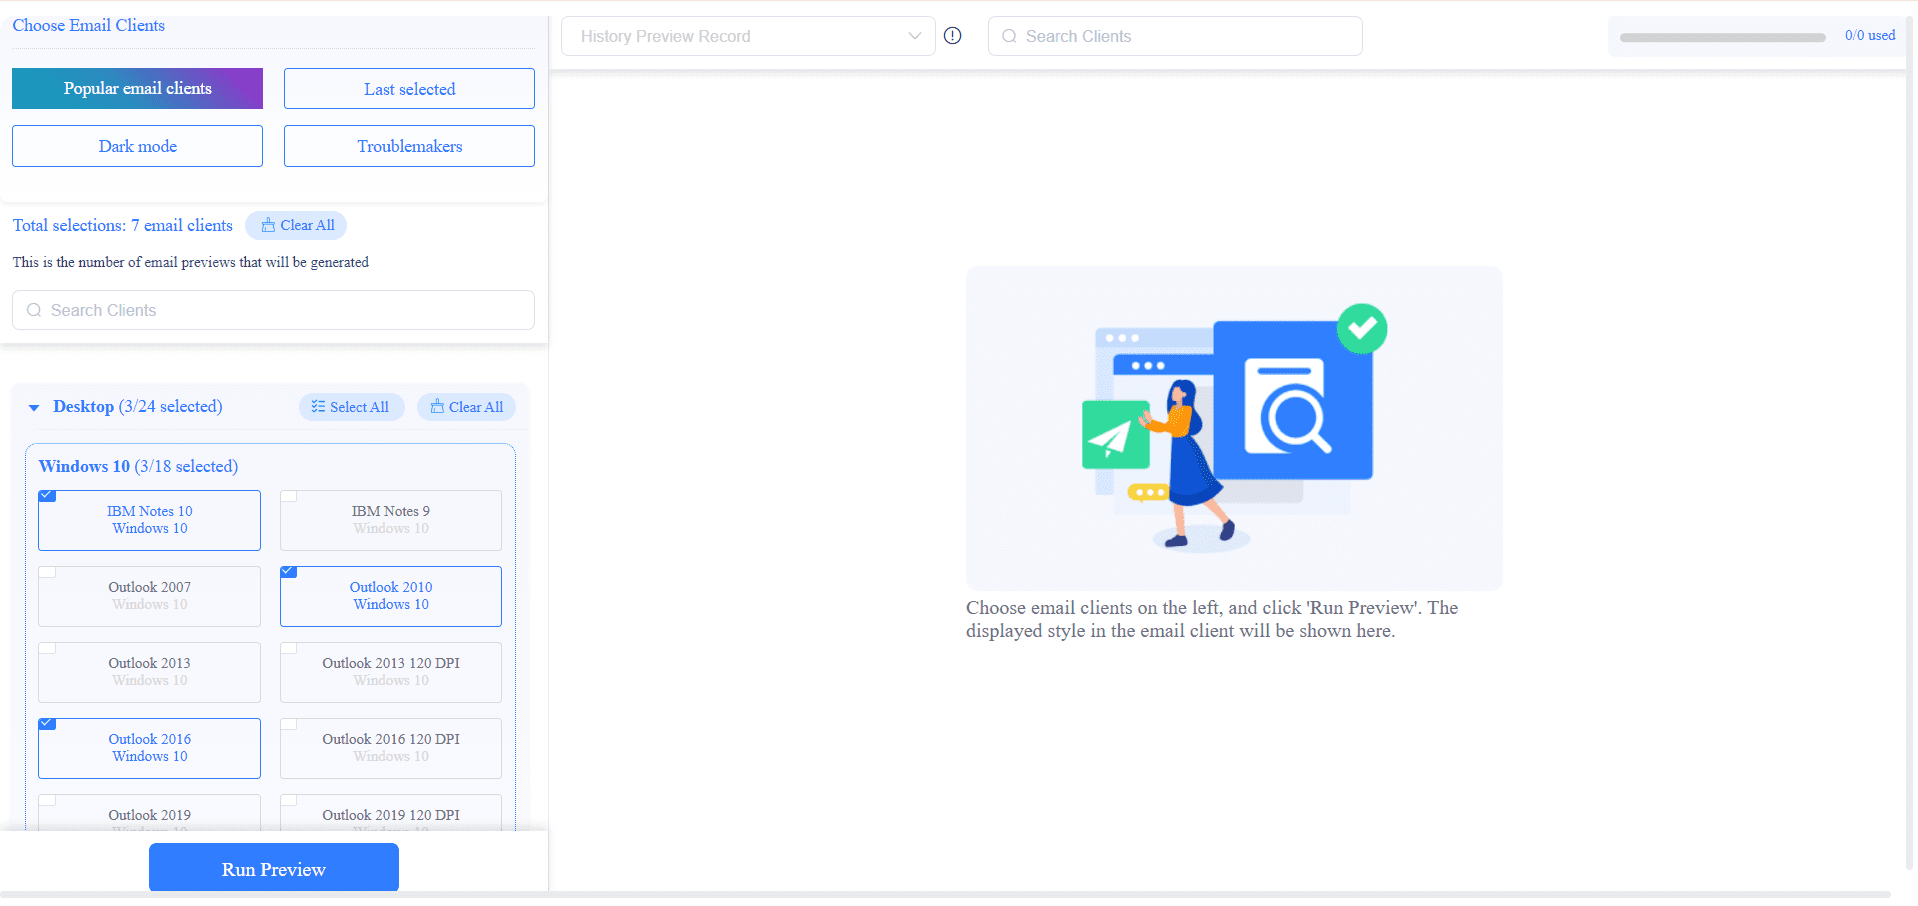
Expected result: the message remains readable and actionable in the selected clients. Failure check: return to the editor when a client clips the CTA, hides critical text, breaks the layout, or makes the message unreadable in dark mode.
6. Measure Delivery and Engagement
After sending, open Analytics > Statistics . Review Delivery Statistics for sent, delivered, invalid address, and soft-bounce results, then use Tracking Statistics and campaign-level reporting for engagement. Compare receiving domains and investigate failure logs before changing subject lines or creative alone.
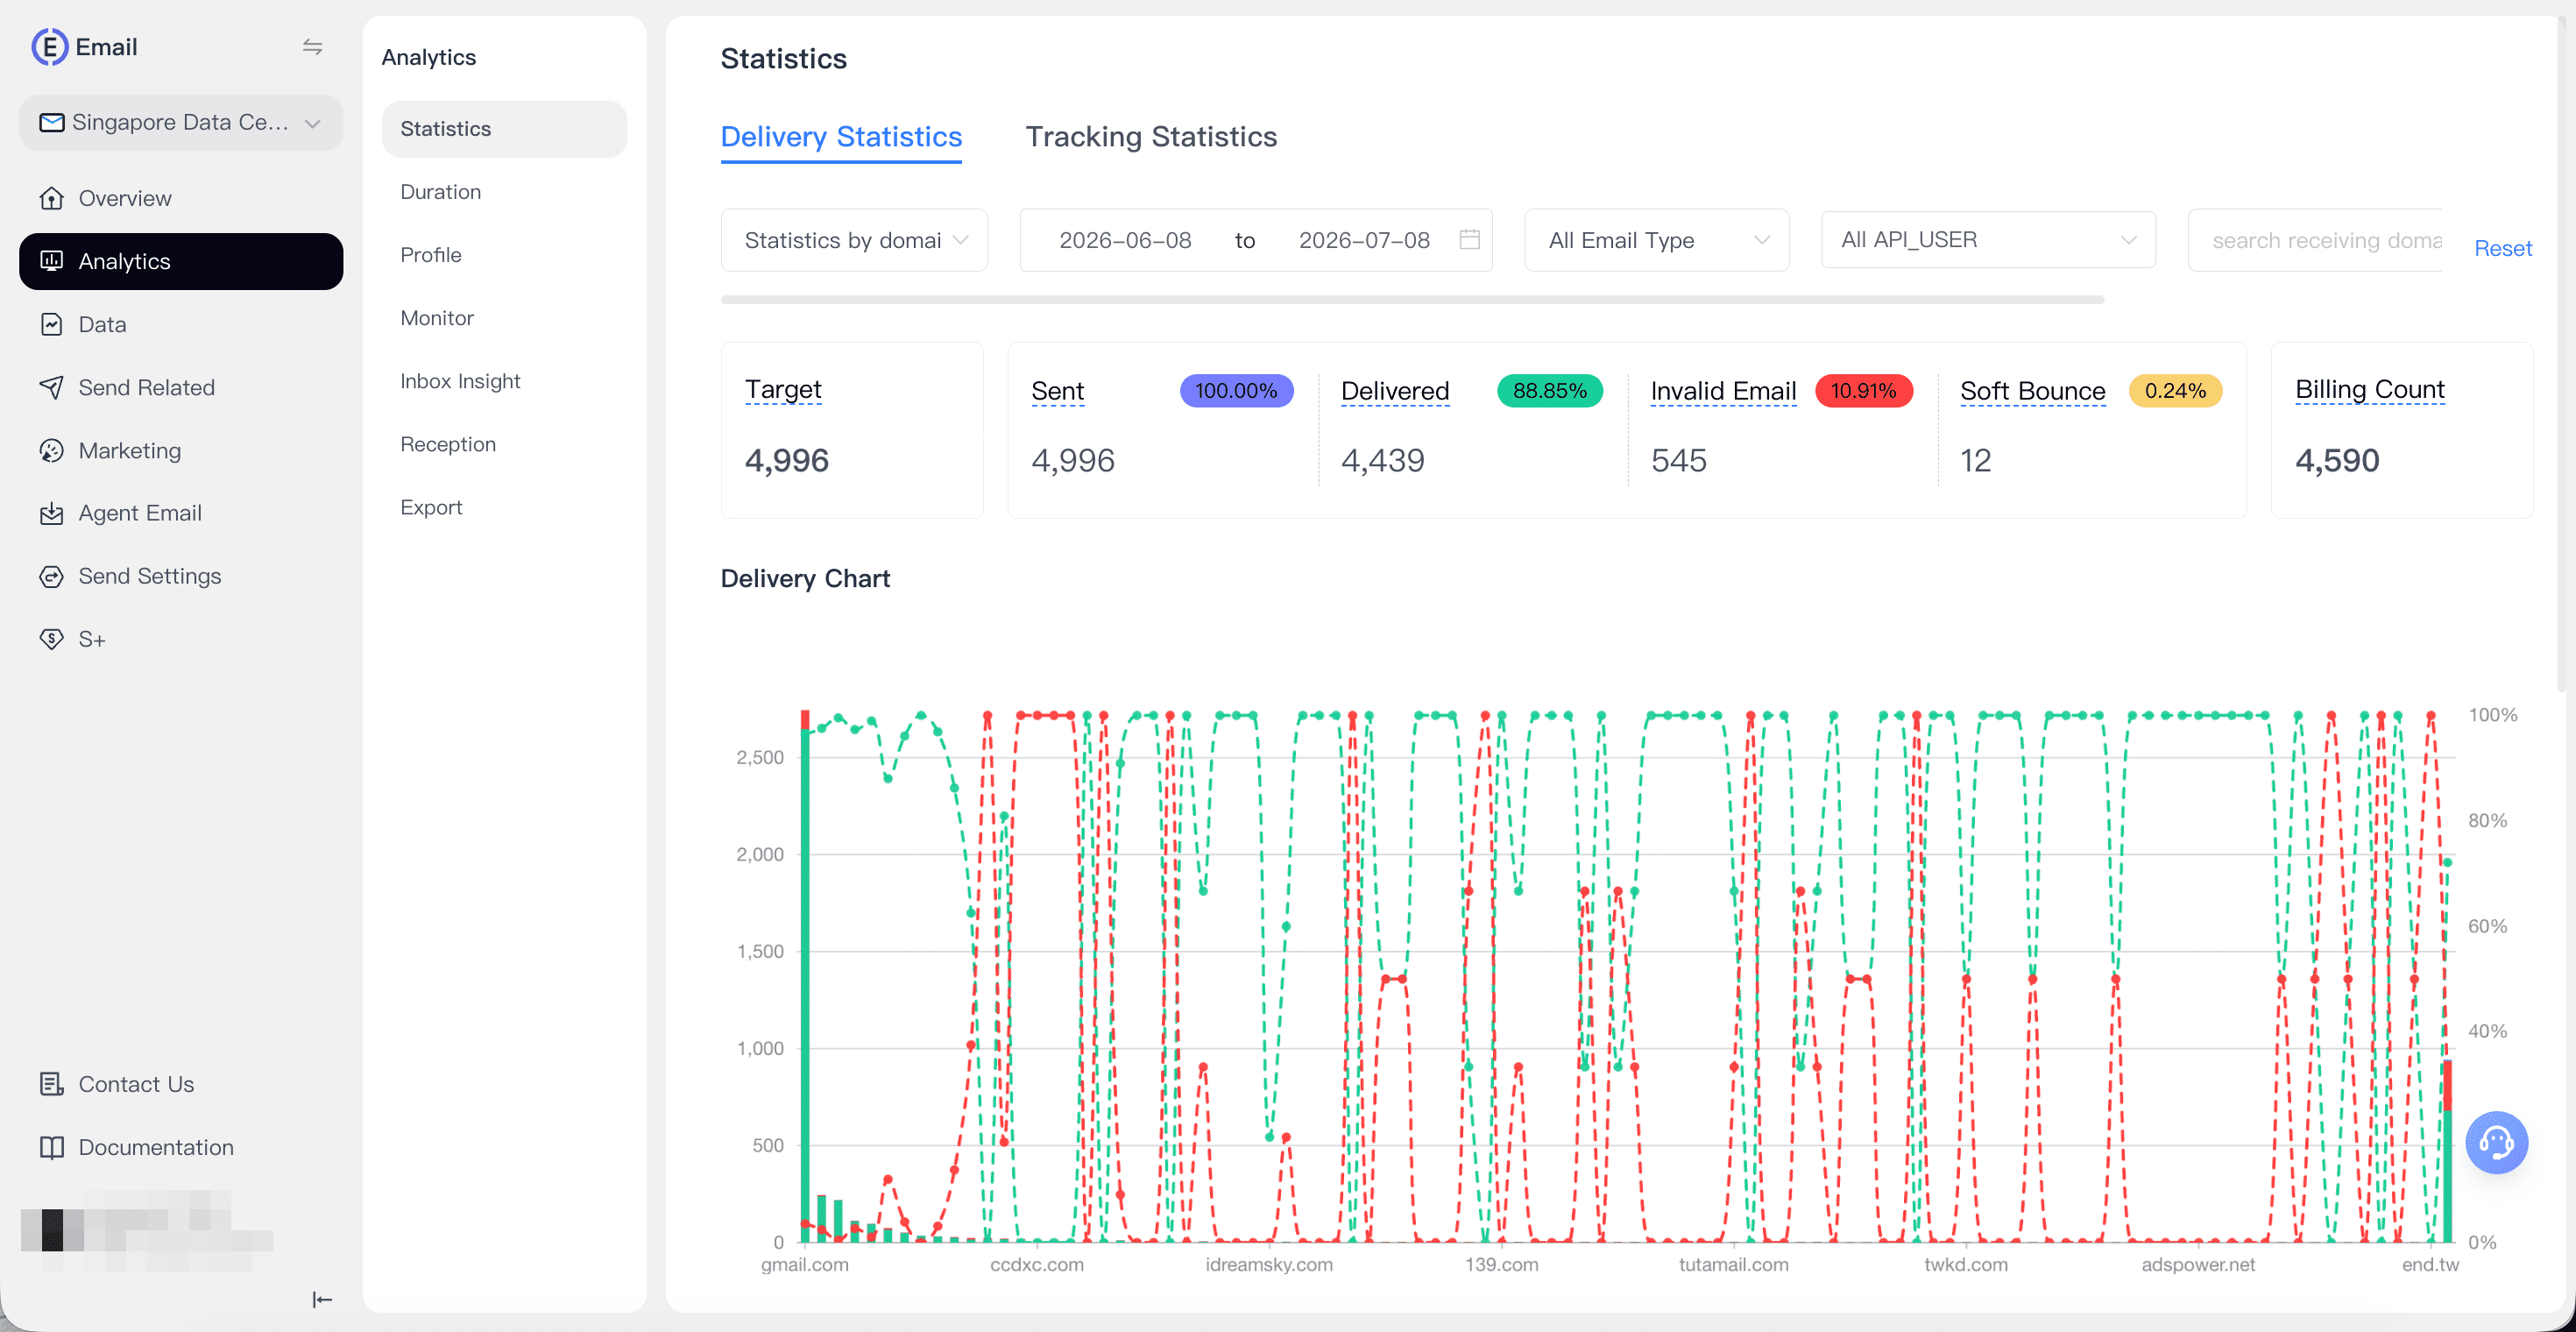
Expected result: delivery and tracking data identify what happened by campaign and receiving domain. Failure check: if delivery deteriorates, pause volume increases and use the email reputation checklist before assuming the message content is the only cause. For event-driven mail such as receipts or password resets, use the Email API or SMTP quickstart instead of a marketing campaign.
Business Email Setup Checklist
Before you announce the new address
- The domain is owned by the business and renewal access is documented.
- Every employee has an individual login; shared functions use aliases, groups, or shared mailboxes.
- MX routes inbound mail to the intended host.
- SPF, DKIM, and DMARC are published and tested for every legitimate sender.
- MFA is required, recovery options are stored safely, and former-user access can be revoked.
- External send, receive, reply, website form, and mobile tests pass.
- The old service remains accessible until migration and message history are confirmed.
- Transactional and marketing senders use a documented domain and consent strategy.
Frequently Asked Questions
Can I Create a Free Business Email Without Buying a Domain?
Short answer: not if you want an address such as name@yourcompany.com and do not already control the domain. You can open a free consumer account, or use a subdomain supplied by some services, but the provider controls that address space. A bundled domain or mailbox may feel free at signup, so check its renewal terms and ownership details before using it for business-critical mail.
Do I Need a Domain to Create a Business Email?
Short answer: you need control of a domain to create an address such as name@yourcompany.com . You do not need a website to be live first. The website and email can use the same domain while being hosted by different providers through separate DNS records.
Can I Use Gmail With My Business Domain?
Short answer: yes, through a Google Workspace plan configured for your domain. A free consumer Gmail address ending in @gmail.com is not a custom-domain business mailbox. Verify the domain and publish the Workspace records before using Gmail with your company address.
What Is the Difference Between a Business Mailbox and an Email Delivery Platform?
Short answer: a mailbox lets a person read, write, and organize everyday messages. A delivery platform sends automated or campaign email through APIs, SMTP, templates, audience tools, and reporting. Many businesses use both, but they serve different users and should have separate access, sending, and reputation controls.
How Long Does Business Email Setup Take?
Short answer: creating the domain entry and user accounts can take one working session. DNS detection may take longer because caches refresh on their own schedule. Use the provider's stated verification window, confirm records publicly, and keep the old mail service available until inbound and outbound tests pass.
Choose Your Next Step
If your goal is simply to give employees professional inboxes, choose a mailbox host and complete the six setup steps above. If your product or marketing team must send authenticated customer messages at higher volume, evaluate a separate delivery workflow after the mailboxes are stable.
Scale customer email with EngageLab
Authenticate a sending domain, deliver transactional or marketing email through API, SMTP, or campaigns, and review delivery results without turning a shared employee inbox into sending infrastructure.