ภาพรวมและคำแนะนำการใช้งาน
หลังจากเลือกบริการ WhatsApp ในศูนย์บริการ คุณจะถูกเปลี่ยนเส้นทางไปยังหน้าคู่มือ [ภาพรวม] ซึ่งคุณสามารถดูสถานะกระบวนการทั้งหมดของการใช้บริการ WhatsApp และประเด็นที่ต้องสังเกตในแต่ละกระบวนการ
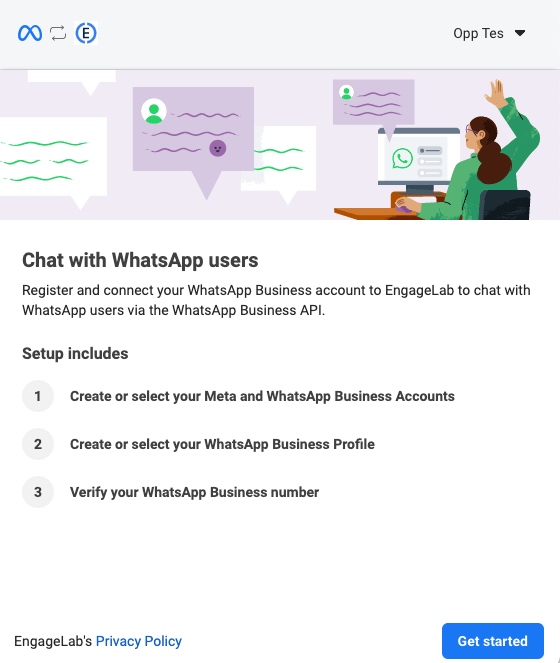
ลงทะเบียนบัญชี
หลังจากเข้าสู่แพลตฟอร์ม คุณจะเห็นหน้าจอดังต่อไปนี้ เลือกวิธีการลงทะเบียนของคุณก่อน จากนั้นคุณจะถูกเปลี่ยนเส้นทางไปยังหน้าลงทะเบียนอย่างเป็นทางการของ Meta เพื่อทำการอนุญาตให้เสร็จสมบูรณ์
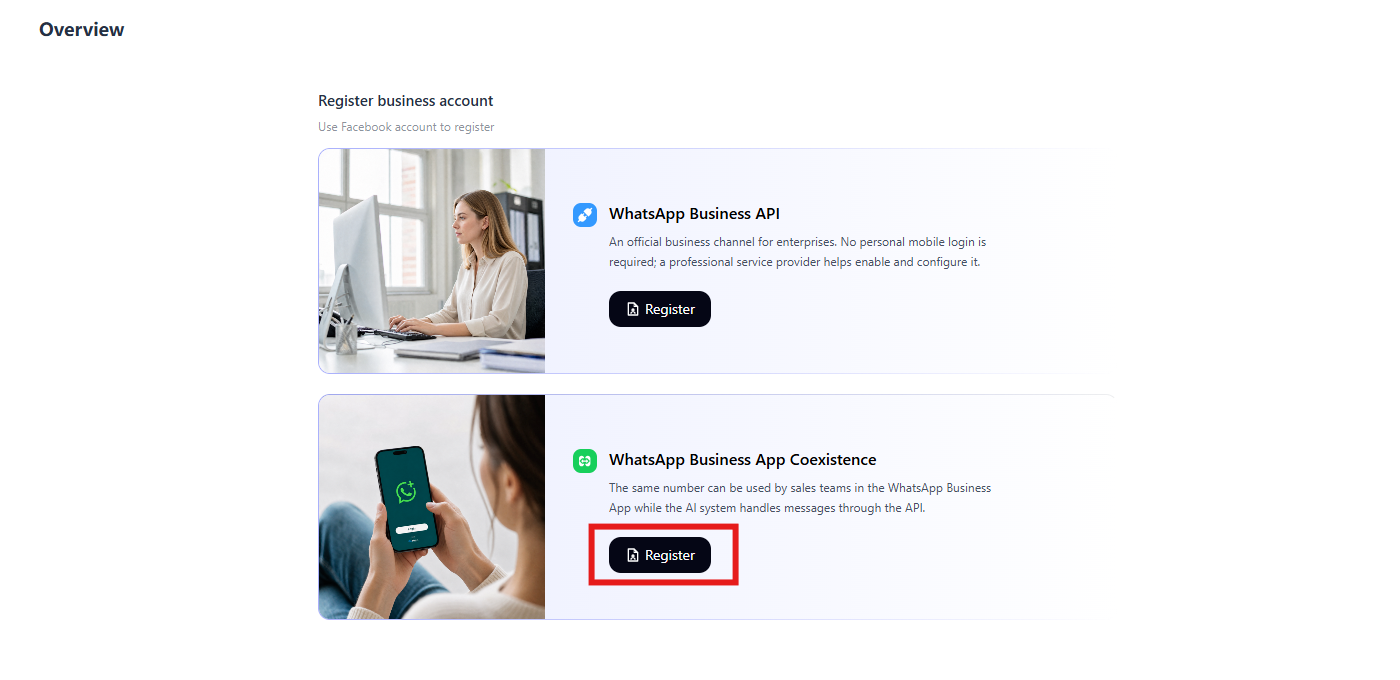
ยังไม่เคยใช้แอป WhatsApp Business และต้องการใช้แค่ API ใช่ไหม? 👉 คุณสามารถเลือกเชื่อมต่อผ่าน โหมด API โดยลงทะเบียนหมายเลขใหม่โดยตรงผ่านแพลตฟอร์ม เพื่อรับความสามารถในการส่งข้อความขนาดใหญ่และการทำงานอัตโนมัติอย่างครบถ้วน
ใช้แอป WhatsApp Business อยู่แล้วและต้องการใช้ API ด้วยใช่ไหม? 👉 คุณสามารถเลือกเชื่อมต่อผ่าน โหมด App โดยคงแอปไว้พร้อมกับได้รับความสามารถของ API ซึ่งข้อความจะซิงค์กันทั้งสองด้าน
เอกสารนี้จะอธิบายขั้นตอนการเชื่อมต่อโหมด API อย่างละเอียด รวมถึงประเด็นที่ต้องสังเกตในแต่ละขั้นตอน สำหรับขั้นตอนการเชื่อมต่อโหมด App โปรดดู คำอธิบายฟังก์ชันการอยู่ร่วมกัน
ภาพรวมกระบวนการ
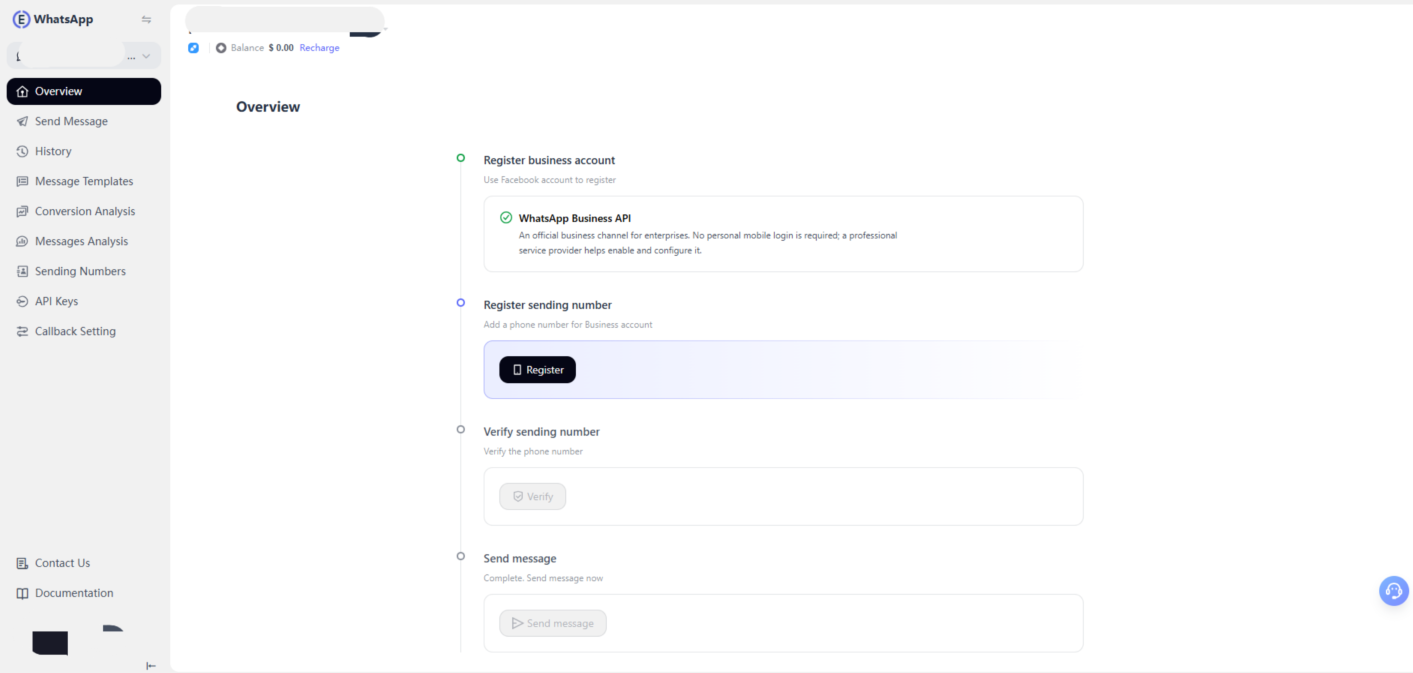
ทำตาม 4 ขั้นตอนต่อไปนี้ให้เสร็จสมบูรณ์เพื่อเริ่มส่งข้อความบน WhatsApp โดยใช้โหมด API ของ WhatsApp Business:
① ลงทะเบียนบัญชีธุรกิจ — เข้าสู่ระบบและอนุญาตด้วยบัญชี Facebook ของคุณ และเชื่อมโยงบัญชีธุรกิจ Meta ของคุณกับบัญชี WhatsApp Business ของคุณ
② ลงทะเบียนหมายเลขผู้ส่ง — เพิ่มหมายเลขโทรศัพท์ที่จะใช้เป็นหมายเลขผู้ส่งของคุณ ซึ่งลูกค้าจะมองเห็น
③ ยืนยันหมายเลขผู้ส่ง — ทำการเปิดใช้งานหมายเลขบนแพลตฟอร์มให้เสร็จสมบูรณ์ เมื่อยืนยันแล้ว สถานะจะเปลี่ยนเป็น "เชื่อมต่อแล้ว"
④ ส่งข้อความ — ส่งข้อความเทมเพลตหรือเข้าสู่แชทสนทนา หน้าภาพรวมจะเปลี่ยนจาก "คำแนะนำ" เป็น "รายงาน"
การเข้าสู่ระบบบัญชี Facebook
หากคุณได้เข้าสู่ระบบบัญชี Facebook แล้ว บัญชีที่เข้าสู่ระบบจะปรากฏโดยอัตโนมัติ คุณสามารถเลือกดำเนินการต่อหรือเปลี่ยนไปยังบัญชีอื่น
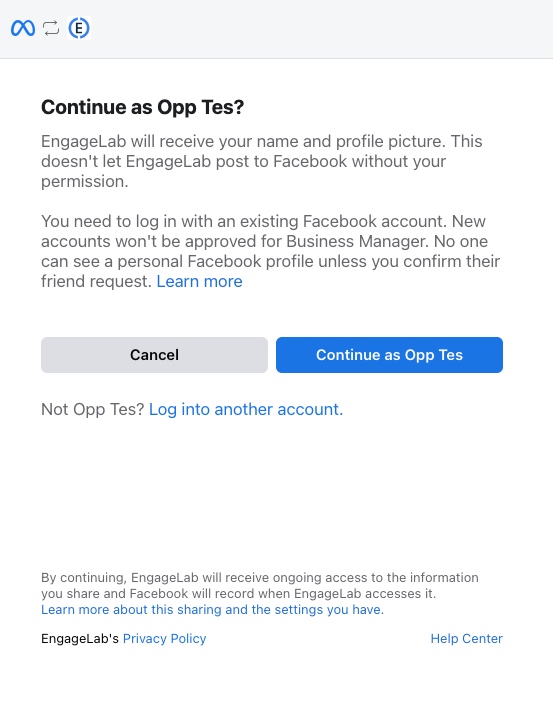
หากคุณไม่ได้เข้าสู่ระบบ คุณจะได้รับแจ้งให้เข้าสู่ระบบ
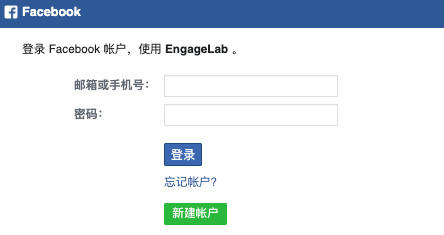
หากคุณยังไม่ได้ลงทะเบียนบัญชี Facebook โปรด สร้างบัญชี หมายเหตุ: อย่าใช้บัญชี Facebook ที่เพิ่งลงทะเบียนใหม่เพื่อสมัครบัญชี WhatsApp ทันที ให้ดำเนินกิจกรรมปกติในบัญชี Facebook เช่น การเข้าสู่ระบบ การโพสต์ และการแก้ไขข้อมูลส่วนตัว รอสองสามวันก่อนลงทะเบียนเพื่อหลีกเลี่ยงการระงับบัญชี
สำหรับข้อมูลเพิ่มเติมเกี่ยวกับการใช้บัญชี Facebook โปรดอ่าน: ข้อยกเว้นของบัญชี Facebook
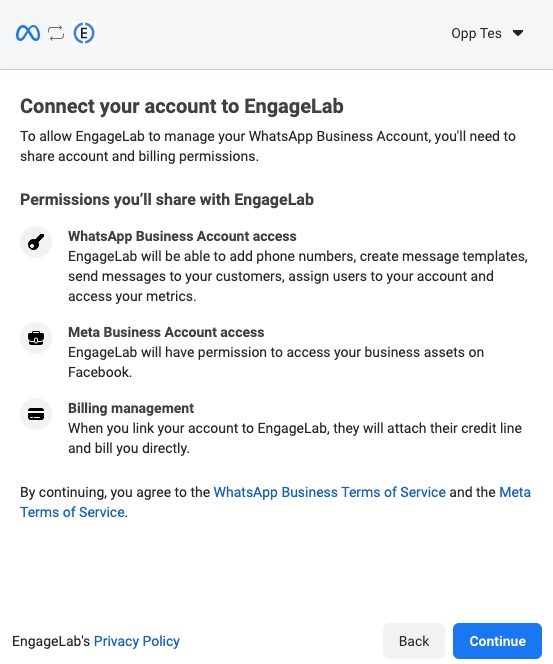
การเตือนการอนุญาต
หลังจากเลือกบัญชี Facebook เพื่อดำเนินการต่อ คุณจะเข้าสู่การเตือนการอนุญาต การอนุญาตนี้เป็นสิ่งจำเป็น
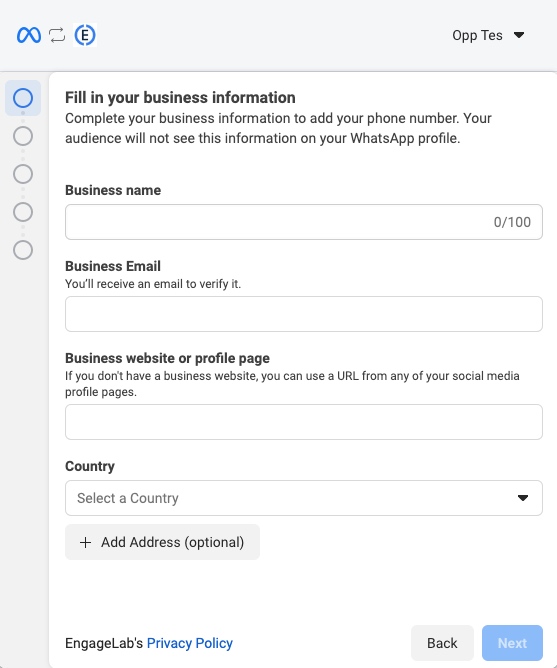
การสร้าง/เลือกบัญชีธุรกิจ Meta
หากคุณได้สร้างบัญชีธุรกิจ Meta แล้ว โดยเฉพาะบัญชีที่ผ่านการตรวจสอบธุรกิจในศูนย์ความปลอดภัยของ Meta ขอแนะนำให้เลือกบัญชีนั้นโดยตรง หากไม่ ให้กรอกข้อมูลที่จำเป็นเพื่อสร้างบัญชีใหม่ หมายเหตุ:
- ขอแนะนำให้ใช้อีเมลบริษัทแทนอีเมล QQ
- ที่อยู่เว็บไซต์ควรแสดงธุรกิจที่ถูกต้องตามกฎหมายของบริษัทของคุณ เนื่องจากจะได้รับการตรวจสอบโดย Meta
การสร้าง/เลือกบัญชีธุรกิจ WhatsApp
หากคุณได้สร้างบัญชีธุรกิจ WhatsApp ใน EngageLab แล้ว:
- หากต้องการเพิ่มหมายเลขใหม่ในบัญชี ให้เลือกบัญชีที่มีอยู่และสร้างหน้า WhatsApp Business ใหม่
- หากต้องการยืนยันหมายเลขโทรศัพท์เฉพาะในบัญชี ให้เลือกบัญชีที่มีอยู่และเลือกหน้าธุรกิจที่มีอยู่ (หมายเลขโทรศัพท์)
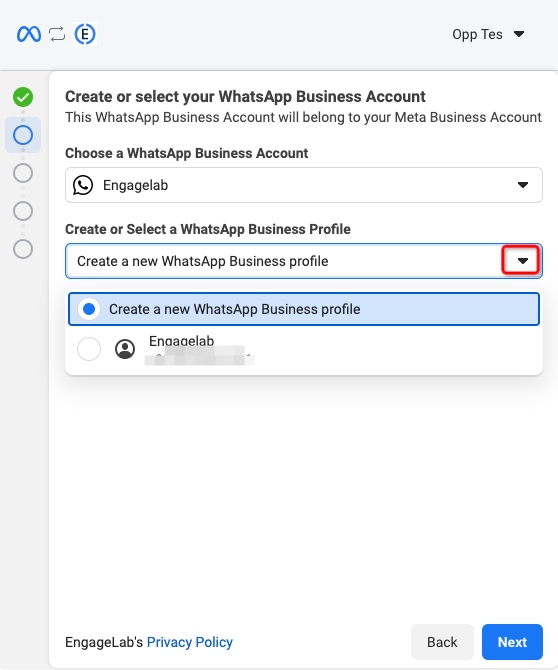
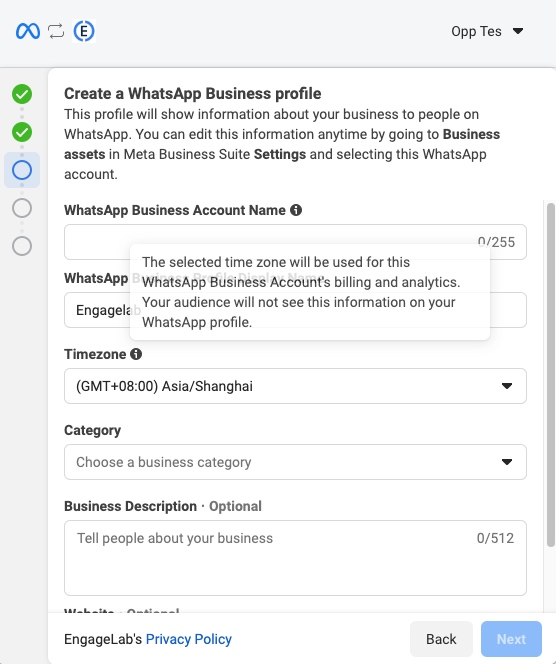
หากไม่ ให้เลือก "สร้างใหม่" สำหรับทุกตัวเลือก หมายเหตุ:
- ชื่อบัญชีจะไม่ปรากฏให้ผู้ใช้ของคุณเห็น
- ชื่อที่แสดงของหน้าธุรกิจ (ต้องปฏิบัติตาม แนวทางการตั้งชื่อ) เว็บไซต์ ฯลฯ จะปรากฏให้ผู้ใช้ของคุณเห็น
- เขตเวลาควรตรงกับเขตเวลาขององค์กร EngageLab ตำแหน่งบริษัท (ผู้ใช้ ระบบธุรกิจ) เนื่องจากข้อมูลการเรียกเก็บเงินจะขึ้นอยู่กับเขตเวลานี้ สามารถแก้ไขได้ก่อนเปิดใช้งาน
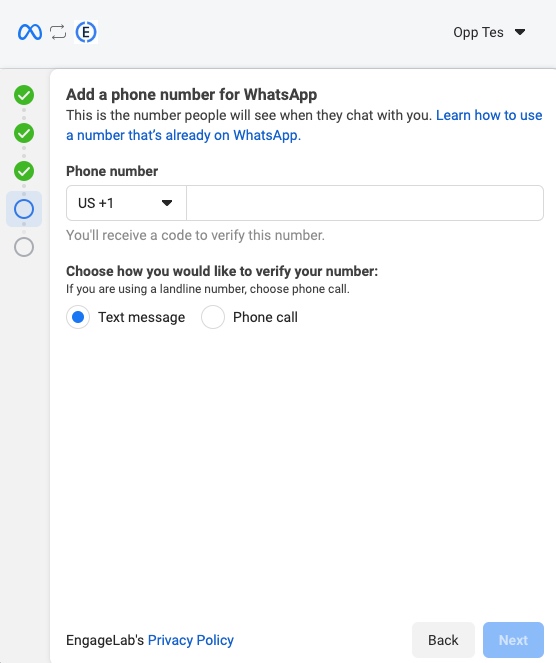
การเพิ่มและยืนยันหมายเลขโทรศัพท์
โปรดใช้หมายเลขโทรศัพท์ใหม่สำหรับการลงทะเบียน หมายเลขต้องสามารถรับรหัสยืนยันได้และต้องไม่เคยใช้ในแอป WhatsApp หรือบัญชีธุรกิจ WhatsApp ที่มีอยู่ สำหรับข้อกำหนดเพิ่มเติม โปรดดู ข้อกำหนดหมายเลขโทรศัพท์ WhatsApp รองรับทั้งวิธีการยืนยันผ่าน SMS และการโทรด้วยเสียง แต่แนะนำให้ใช้การโทรด้วยเสียง หากคุณยังไม่สามารถรับรหัสได้หลังจากลองหลายครั้ง:
- ออกจากการลงทะเบียนและลองอีกครั้งหลังจากสองสามวัน เลือกบัญชีธุรกิจ Meta ที่มีอยู่ บัญชี WhatsApp และหน้าธุรกิจ (หมายเลขโทรศัพท์) จากนั้นลองยืนยันอีกครั้ง
- ออกจากการลงทะเบียน - ในหน้า การจัดการบัญชีธุรกิจ เลือก "เพิ่มบัญชี" - ในหน้า การจัดการหมายเลขส่ง ลองยืนยันหมายเลขอีกครั้ง
หมายเหตุ:
- หมายเลขโทรศัพท์นี้จะปรากฏให้ผู้ใช้เห็น
- บัญชีธุรกิจ WhatsApp สามารถมีหมายเลขโทรศัพท์ได้สูงสุด 25 หมายเลข โดยแต่ละหมายเลขจะมีชื่อที่แสดง โปรไฟล์ และข้อมูลเว็บไซต์ของตัวเองให้ผู้ใช้ดู

หลังจากการลงทะเบียนเสร็จสมบูรณ์ คุณจะถูกเปลี่ยนเส้นทางโดยอัตโนมัติจาก [หน้าลงทะเบียน Meta] ไปยัง [หน้าภาพรวม] ณ จุดนี้ ขั้นตอนที่ 1 และ 2 จะถูกทำเครื่องหมายว่าทำเสร็จแล้ว และบัญชี WhatsApp ที่คุณเพิ่งลงทะเบียนจะถูกเลือกในมุมซ้ายบน จากนั้นดำเนินการไปยังขั้นตอนที่ 3 - การยืนยันหมายเลขส่ง
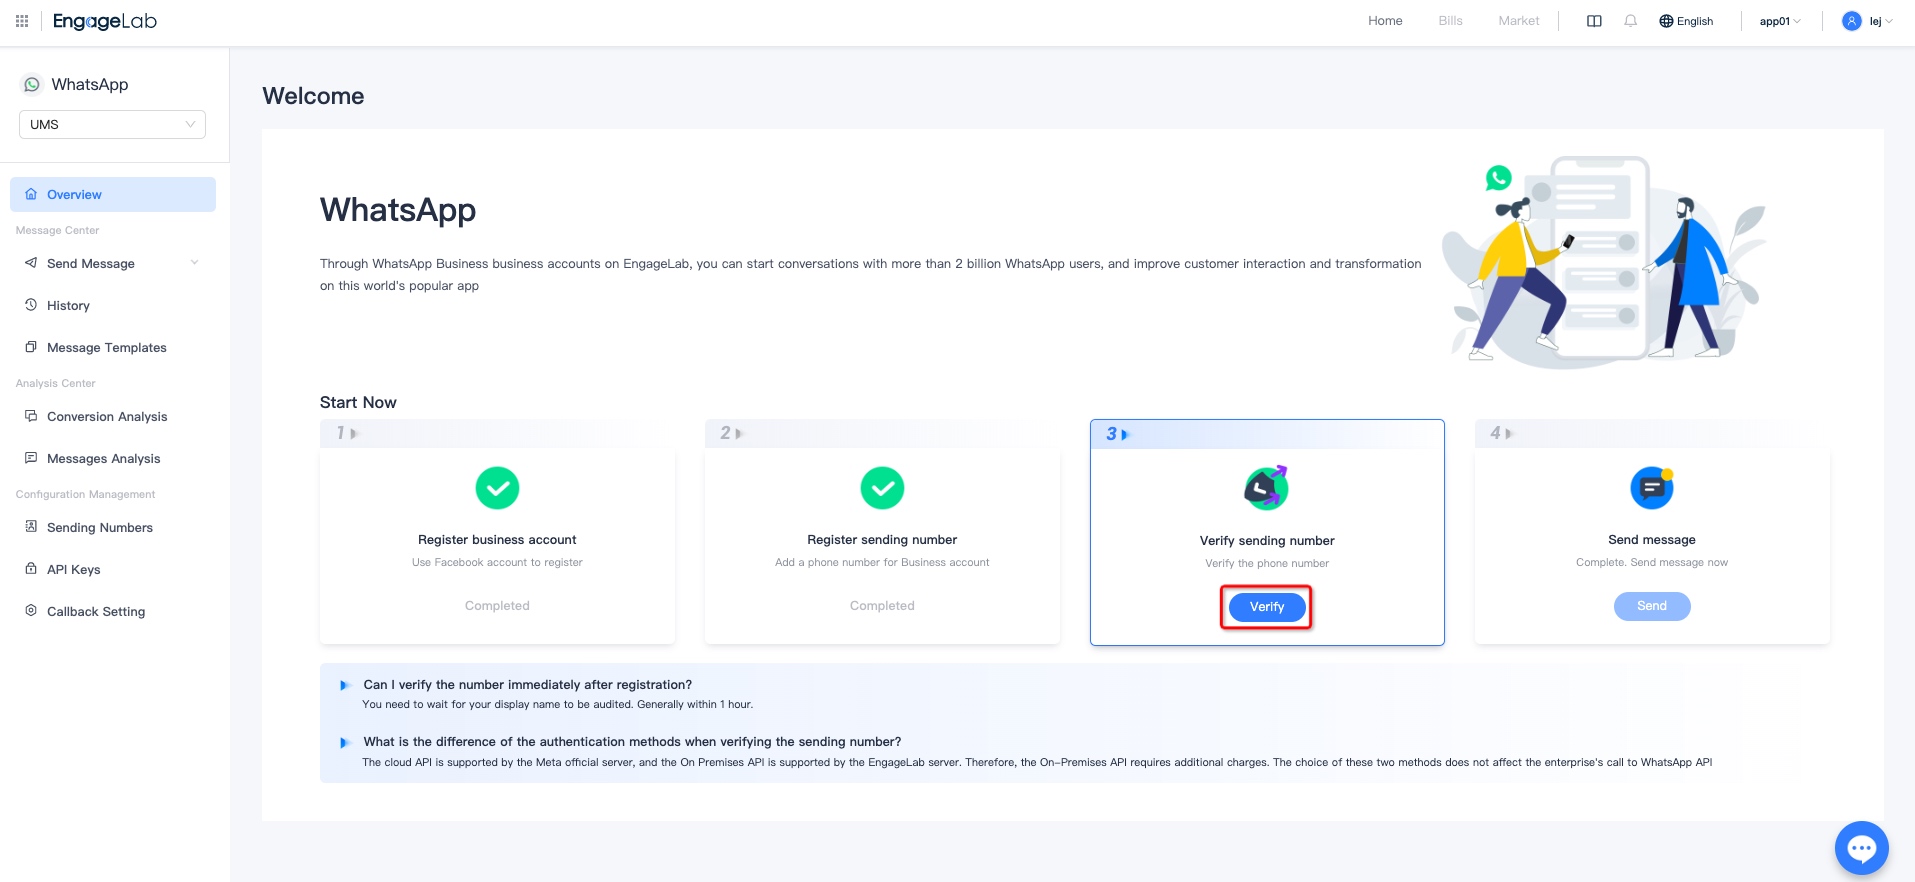
การยืนยันหมายเลขส่ง
ในขั้นตอนที่ 3 คลิก "ยืนยันหมายเลข" เพื่อเข้าสู่หน้า "การจัดการหมายเลขส่ง" ในหน้านี้ คุณต้องยืนยันหมายเลขโทรศัพท์ที่ลงทะเบียนใน EngageLab อ้างอิง การจัดการหมายเลขส่ง สำหรับรายละเอียดเกี่ยวกับวิธีการยืนยัน
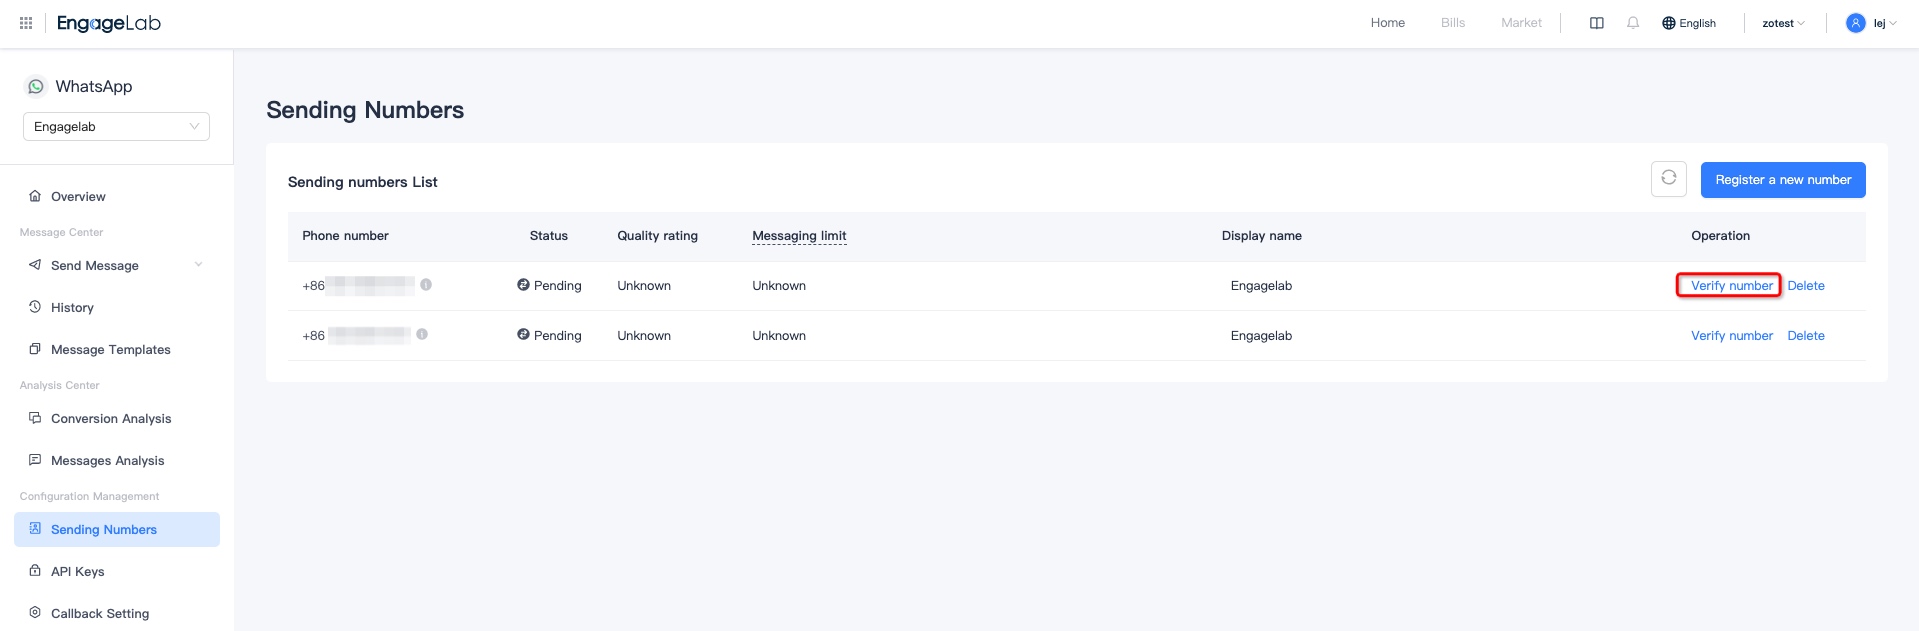 เมื่อการยืนยันสำเร็จ สถานะการดำเนินการจะเปลี่ยนเป็น "เชื่อมต่อแล้ว" และคุณสามารถเริ่มใช้หมายเลขส่งเพื่อส่งข้อความได้
การส่งข้อความ
คุณสามารถเริ่มส่งข้อความได้แล้ว หน้าภาพรวมจะอัปเดตจาก "คู่มือ" เป็น "รายงาน"
คลิก "ส่งข้อความ" เพื่อเข้าสู่หน้าส่ง "ข้อความแม่แบบ" หรือสลับไปยังหน้าสนทนา "การสนทนา" สำหรับการดำเนินการ อ้างอิง การส่งข้อความ สำหรับรายละเอียดฟีเจอร์
